
| Difficulty | Beginner to Intermediate |
| Duration | 30 to 90 seconds per side (10 slow breaths) |
| Props Needed | Yoga mat; block or folded blanket (recommended for tight hips) |
| Best Time | After a warmup or as part of a cool-down sequence |
| Avoid If | Knee pain, hip labral tears, sciatica flare-ups, recent hip or knee surgery, pregnancy (without teacher guidance) |
Are your hips constantly feeling tight, stiff, or completely locked up from hours of sitting? Pushing through a random, intense stretch usually makes things worse.
Pigeon pose yoga is one of the absolute best ways to open your outer hips, glutes, and deep rotators all at once.
I know how frustrating stubborn hip tightness can be, but you do not need perfect flexibility to find relief. This guide breaks down the exact physical mechanisms behind the stretch, provides safe step-by-step alignment cues, and offers smart modifications.
By the end of this blog, you will know exactly how to practice this shape safely to build lasting mobility without risking injury.
| Disclaimer: This article is for informational and educational purposes only. It does not constitute medical advice and should not replace consultation with a qualified healthcare provider. If you have a knee injury, hip pain, sciatica, or are pregnant, consult a doctor or qualified yoga therapist before practicing pigeon pose. |
What is Pigeon Pose Yoga (Kapotasana)?
Pigeon pose yoga targets the outer hips, glutes, piriformis, and hip flexors in a single sustained stretch, making it one of the most efficient hip openers in a yoga practice.
Known formally as Eka Pada Rajakapotasana prep, or simply half pigeon, the pose places one leg folded in front of the body while the other extends straight behind you. The result is a simultaneous stretch of the front hip’s external rotators and the back hip’s flexors.
Pigeon pose appears in vinyasa, hatha, yin, and restorative yoga practices. Depending on the style, you may hear it called half pigeon, sleeping swan, or resting pigeon. All of these refer to variations of the same fundamental shape.
The goal is never the deepest possible position. A steady, supported stretch that you can breathe through calmly is where the real benefit happens.
Why Pigeon Pose Feels So Good: The Physical Mechanism
The hips house some of the largest and most load-bearing muscles in the body: the glutes, the piriformis, the iliopsoas, and the hip adductors. When you sit for long periods, run, cycle, or lift weights repeatedly, these muscles adapt to shorter, tighter resting lengths.
Pigeon pose places the hip joint into external rotation, a position that most daily movement never reaches, and holds it there long enough for the surrounding tissue to begin releasing.
The piriformis, in particular, responds well to this pose. It sits beneath the glutes and crosses directly over the sciatic nerve path. When it becomes chronically tight, it can contribute to hip stiffness and, in some people, sciatic nerve irritation.
Pigeon pose stretches the piriformis from a floor-supported position, removing the need to stabilize the joint, which allows the muscle to relax more fully than it would in a standing stretch.
That combination of deep external rotation, passive support, and slow breathing is what makes the pose feel genuinely different from a quick standing hip stretch.
Pigeon Pose Benefits: What This Stretch Actually Does

Understanding the specific pigeon pose benefits helps you practice with more intention and less guesswork. Here is what the pose targets and what you can realistically expect from regular practice.
1. Opens Tight Hips and Improves External Rotation
This is the primary purpose of the pose. The front-leg position creates external rotation at the hip joint, stretching the outer hip capsule, the glute medius, and the piriformis simultaneously.
For people who sit at a desk for six or more hours daily, this range of motion becomes increasingly restricted over time.
A 2020 study published in the Journal of Physical Therapy Science found that prolonged sitting significantly limits hip extension and external rotation.
Pigeon pose directly addresses both. The improvement is gradual. Most people notice a meaningful change in hip openness after four to six weeks of consistent practice, three to four sessions per week.
2. Stretches the Glutes and Piriformis
The front-leg position in pigeon pose creates a deep stretch along the outer hip and buttock.
If one side feels dramatically tighter than the other, that asymmetry usually reflects a dominant movement pattern: crossing one leg more often when seated, loading one hip more heavily in sport, or sleeping consistently on one side.
Pigeon pose makes that difference immediately obvious, which is useful information rather than a problem to fix by forcing both sides into the same shape.
3. Stretches the Hip Flexors of the Back Leg
The extended back leg creates a sustained stretch through the iliopsoas and rectus femoris, the primary hip flexors. These muscles attach from the lumbar vertebrae and ilium down to the top of the femur.
When they shorten from repeated sitting or running, they can pull the pelvis into anterior tilt, which often presents as chronic lower back tightness. Lengthening them through the back-leg position of pigeon pose addresses this directly.
Keep the back leg long and active, pressing the top of the back foot into the mat. That cue keeps the stretch in the hip flexor rather than letting the knee carry tension.
4. May Ease Mild Lower Back Tension
Tight hip flexors and a shortened piriformis both affect how the pelvis sits. When the pelvis tilts or rotates, the lumbar spine compensates, and that compensation often shows up as stiffness or mild aching in the lower back.
By releasing the muscles around the hips and pelvis, pigeon pose can help the lower back feel less restricted.
This applies specifically to mild, tension-related back stiffness. People dealing with disc herniation, spinal stenosis, or persistent nerve pain should look at dedicated back pain relief exercises and get a professional assessment before using this pose.
5. Supports Hip Mobility for Athletic Movement
Hip mobility directly affects squat depth, deadlift mechanics, sprint stride length, and cycling power output. Runners and cyclists often develop tight outer hips and hip flexors from repetitive single-plane movement.
Lifters may notice restricted hip range of motion limiting their squat form before they notice any pain. Pigeon pose helps restore the range of motion these activities compress over time.
It is a passive stretch, not an active mobility exercise. For athletic performance, pair it with active hip mobility work like 90/90 transitions and hip circles, rather than relying on pigeon pose alone.
6. Builds Body Awareness of Side-to-Side Differences
Pigeon pose is one of the clearest diagnostics for hip asymmetry in a yoga practice. The side that feels more open and the side that feels stuck tell you something about your movement habits, training patterns, and daily posture.
That information, used well, helps you train more efficiently and stretch more intelligently rather than just assuming both hips need the same treatment.
7. Supports Relaxation Through Slow, Supported Stillness
Resting pigeon, where the torso folds forward over the front leg, combines a deep hip stretch with stillness and slow breathing. That combination activates the parasympathetic nervous system, shifting the body away from a stress response and toward recovery.
Some practitioners experience emotional release in hip-opening poses. That is a real physiological response: the hips are surrounded by the fascia that connects to the pelvic floor and lower abdominal region, areas where chronic tension from stress tends to accumulate.
Releasing that tension through slow stretching can produce a strong physical and emotional response.
Do not chase that feeling or force it. Let the supported position and your breath do the work.
What Muscles Does Pigeon Pose Stretch?
Knowing exactly where the stretch should land helps you distinguish between a productive sensation and a warning sign. Here is the full muscle map for pigeon pose.
| Muscle | Location | Where You Feel It |
| Piriformis | Deep beneath the glutes | Deep outer hip of the front leg |
| Glute medius and minimus | Side of the pelvis | Outer hip and upper buttock |
| Glute maximus | Posterior pelvis | Buttock of the front leg |
| Iliopsoas | Front of the hip, lumbar spine | Front of the hip of the back leg |
| Rectus femoris | Front of the thigh | Front of the thigh of the back leg |
| Hip adductors | Inner thigh | Inner thigh if the front knee is wide |
| Thoracolumbar fascia | Lower back region | Mild release in the lower back when hips are supported |
Sharp pain in the knee, a pinching sensation inside the hip joint, or numbness anywhere means the pose needs to be modified immediately. Pressure in the knee usually means the hip is not supported enough.
Pinching at the front of the hip joint usually means the front foot needs to come closer to the body, reducing the shin angle.
How to Warm Up Before Pigeon Pose
Entering pigeon pose cold, especially if your hips are tight, significantly increases the risk of knee strain and hip pinching. A short warmup of five to eight minutes creates enough circulation and mobility in the surrounding tissue to let the pose feel productive rather than forced.
Start with cat-cow for two minutes to mobilize the spine and pelvis. Follow with downward-facing dog, bending each knee alternately to warm the hamstrings and hip flexors. The low lunge stretch is a particularly effective next step, letting the hip flexor of the back leg settle into a steady opening before you take on the full floor pigeon shape.
From there, a figure-four stretch on the back with both feet on the floor opens the outer hips gently before you move into the pose.
| Note: If your hips feel very tight, spending an extra two minutes in reclined figure-four before attempting floor pigeon can make a significant difference in how the pose feels. The figure-four stretch on the back targets the same muscles with full spinal support, which helps the hip rotators release before you add body weight to the joint. |
How to Do Pigeon Pose Yoga: Step by Step
Pigeon pose is a hip opener, not a knee stretch. Every alignment cue in these steps is designed to protect the knee while letting the hip do the work.
Move slowly, support the hip with props when needed, and do not push toward a deeper shape before your body signals it is ready.
Step 1: Start in Downward-Facing Dog

Begin in downward-facing dog with your palms pressing firmly into the mat, toes tucked, and hips lifted back. Keep your spine long, soften your knees if your hamstrings feel tight, and spread your weight evenly through both hands.
Press the floor away so your shoulders stay steady. This position gives you a controlled starting point and helps you move into pigeon pose with balance instead of dropping suddenly into the stretch.
Step 2: Lift One Leg and Bring the Knee Forward

Take a slow inhale and lift one leg behind you, keeping both hands steady on the mat. The leg does not need to rise high. Focus on making enough space to guide the knee forward toward the wrist on the same side.
Move with control as you place the knee and foot down. Avoid dropping your body weight suddenly, as that shifts pressure onto the knee rather than the hip.
Step 3: Place the Front Knee Outside the Hip

Set your front knee slightly outside the line of your hip, aiming it toward the outer edge of your mat. This gives the hip more room to open and reduces strain through the knee.
Your front leg does not need to make a perfect angle or look like someone else’s pose. Steady breathing, hip support, and knee comfort matter more than the shape.
Step 4: Extend the Back Leg and Check the Front Foot

Slide your back leg straight behind you until it feels long and supported. Untuck your toes, then press the top of the back foot into the mat so the ankle does not roll to the side. Keep the back leg active without gripping.
Your front shin may move toward parallel with the mat over time, but it does not need to. If that angle feels too strong, bring the front foot closer to your body and keep it gently flexed to protect the knee.
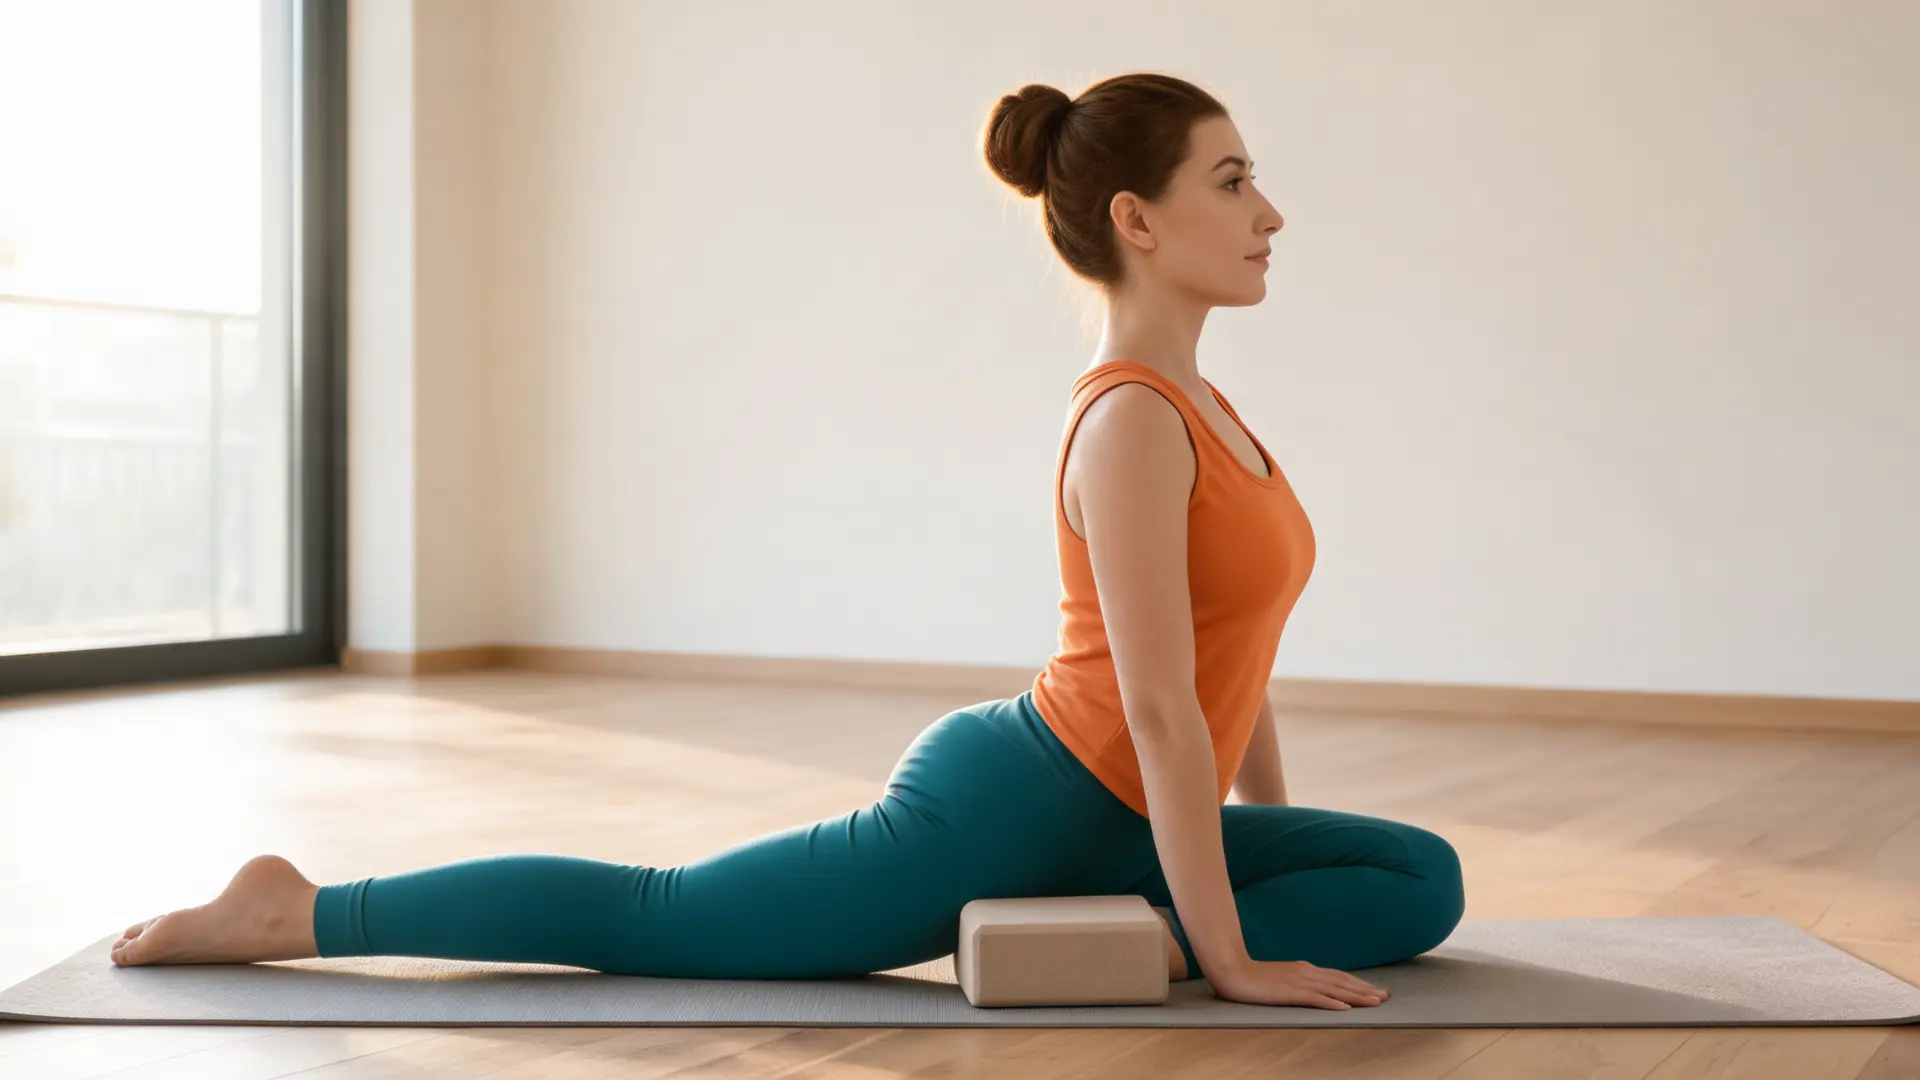
Step 5: Support the Hip if Needed

If your front hip does not reach the floor, place a folded blanket, cushion, or yoga block underneath it before going any deeper.
Your hip should feel supported, not hanging in the air or pulling your pelvis to one side. This support keeps the pelvis more level and reduces twisting through the lower back, knees, and outer hips.
Beginners with tight hips almost always benefit from this prop, and experienced practitioners use it too.
Step 6: Stay Upright Before Folding

Before folding forward, stay upright on your fingertips or place your hands on blocks for support. Lengthen your spine, lift your chest slightly, and give your hips time to settle.
Take a few slow breaths and notice where the stretch shows up. Feeling sensation around the outer hip, glute, or hip flexor is normal. Sharp knee pain, hip pinching, or lower back pressure means you need to modify before going deeper.
Step 7: Fold Forward Slowly and Relax

Once your base feels steady, begin walking your hands forward little by little. You can stay on your palms, lower to your forearms, or rest your forehead on a yoga block for support.
Let your shoulders move away from your ears, soften your jaw, and relax your neck. Keep your hips supported as you fold. The movement should feel like a slow release, not a sudden collapse into the mat.
Step 8: Hold, Breathe, and Repeat on the Other Side

Hold pigeon pose for about 10 slow breaths, keeping your body steady and supported. With each inhale, create space through your spine. With each exhale, let your hips soften without forcing them down.
If your breath tightens, your knee hurts, or your hip pinches, ease out of the pose. Then switch sides and repeat the same setup. One hip will almost always feel tighter than the other. Give both sides equal time while respecting what each side can do safely.
| Safety Note: Pigeon pose is a hip opener, not a knee stretch. If you feel any discomfort in the knee, stop and use a supported prop under the front hip, or switch to reclined pigeon instead. People with knee injuries, hip labral tears, or sciatica flare-ups should consult a healthcare provider before practicing floor pigeon. |
Here is a visual guide to help you see the full sequence before trying it on your own:
Pigeon Pose Variations: Choosing the Right Version for Your Body
Not everyone’s hips are built for a full floor pigeon. Bone structure, hip socket depth, and current mobility all influence which variation works best for your body. The table below maps common situations to the most appropriate choice.
| Situation | Best Choice | What to Do |
| Beginner or very tight hips | Reclined pigeon (figure-four) | Lie on your back with full spinal support |
| Hip does not reach the floor | Supported pigeon | Place a block or folded blanket under the front hip |
| Sharp knee pain | Reclined pigeon | Stop floor pigeon and reduce the hip angle |
| Hip pinching at the front | Smaller shin angle | Bring the front foot closer to the body and use a prop |
| Lower back compression | Upright pigeon only | Stay on blocks, do not fold forward |
| Want deeper relaxation | Resting pigeon | Fold forward with forehead or chest supported |
| Yin or restorative practice | Sleeping swan | Hold two to five minutes with full prop support |
| Advanced backbend practice | King pigeon (full Kapotasana) | Only with strong backbend and hip mobility foundation |
| Pregnancy | Modified or skipped | Consult a qualified prenatal yoga teacher or healthcare provider |
King pigeon in particular is a very different pose from the preparatory version covered here. It belongs in the category of advanced yoga poses that require an established backbend foundation, not just hip flexibility.
Choose the version where you can breathe fully, feel a steady stretch without bracing, and hold for at least 30 seconds without forcing.
Common Pigeon Pose Mistakes and How to Fix Them
Small alignment errors are what turn a beneficial stretch into knee or lower back strain. These are the mistakes that come up most often, and they are all easy to correct once you know what to look for.
| Mistake | Why It Matters | Fix |
| Forcing the front shin parallel to the mat | Loads the medial knee under compression | Let the foot come closer to the body, keep foot gently flexed |
| Letting the front hip float off the floor | Tilts the pelvis, adds torque to the lower back | Place a block or blanket under the hip immediately |
| Folding forward before the hips are settled | Compresses the lumbar spine before the hip opens | Spend at least 5 breaths upright before folding |
| Completely relaxing the front foot | Removes the protective tension at the knee joint | Keep a gentle flex through the front foot throughout |
| Holding through sharp pain | Irritation becomes injury | Come out, choose a supported variation |
| Comparing both sides and pushing the tighter one | Asymmetry is normal; forcing it creates strain | Treat each hip on its own terms, use more support on the tighter side |
| Skipping the warmup entirely | Cold hip tissue resists the stretch and braces | Five minutes of low lunge, cat-cow, and figure-four first |
A well-set-up pigeon pose should feel deep but steady, never sharp. If you are bracing your jaw, holding your breath, or gripping your hands, the pose is too intense for where your body is today.
How to Sequence Pigeon Pose Into Your Practice
Pigeon pose works best when it is not the first thing you do. It fits naturally in the second half of a yoga session, after the hips and spine are warm, or at the end of a run, cycling session, or lower-body strength workout as part of a cool-down.
As a standalone stretch, hold each side for 60 to 90 seconds (roughly 10 slow breaths) and follow it with a neutral reset pose. Child’s pose, supine twist, knees-to-chest, and downward-facing dog all work well after pigeon to rebalance the lower back and hips.
The full Surya Namaskar sequence is another structured way to warm the hips and spine before moving into deeper floor work.
For frequency, two to four sessions per week is a practical starting point for beginners. More than that is fine if the body responds well and you are using props correctly. Daily deep pigeon without adequate warmup or prop support is how people end up with irritated knees.
Frequently Asked Questions About Pigeon Pose
Can I do pigeon pose every day?
A gentle or supported version can be practiced daily if the body responds well. Full floor pigeon every day without adequate warmup or prop support may be too much for sensitive hips or knees. Alternating pigeon with lighter hip mobility work and including occasional rest days is a more sustainable approach for most people.
Why does pigeon pose hurt my knee?
Knee pain in pigeon pose almost always means the front hip is not supported enough. When the hip cannot reach the floor, the pelvis tilts and the knee takes the torsional load. The fix is to place a yoga block or folded blanket under the front hip immediately. If knee pain persists even with full hip support, switch to reclined pigeon until hip mobility improves.
Why do I shake in pigeon pose?
Shaking happens when the muscles around the hip are working hard to stabilize the joint or when the stretch sensation is intense enough to trigger a protective response. Reduce the depth, add a prop under the hip, slow the breath, and let the body settle. If shaking comes with pain, come out of the pose.
Is pigeon pose the same as figure-four stretch?
They target the same muscles, but they are different exercises. Reclined figure-four is done on the back with full spinal support, making it more accessible and less load-bearing on the knee. Floor pigeon places more body weight into the hip stretch and requires more hip mobility to set up safely. Figure-four is the better starting point for tight hips or anyone with knee sensitivity.
Is pigeon pose good for sciatica?
It depends on the cause. If sciatic symptoms come from piriformis tightness compressing the nerve, a gentle reclined pigeon may provide temporary relief. If sciatica originates from a disc herniation, spinal stenosis, or lumbar nerve impingement, floor pigeon can worsen symptoms. A dedicated approach to yoga for sciatica uses specific poses selected for nerve safety, which is a different framework than general hip stretching.
Should I feel pigeon pose in my front leg or back leg?
Both, in different places. The front leg typically produces the deeper sensation: outer hip, glute, and piriformis. The back leg creates a front-hip and quad stretch through the hip flexors. The feeling in both should be steady and breathable, not sharp or shooting.
What poses should I do after pigeon pose?
Child’s pose, knees-to-chest, supine twist, and downward-facing dog all work well as resets after pigeon pose. They help rebalance the hips and lower back after a deep one-sided stretch and bring the spine back to a neutral position before ending practice.
Can pigeon pose help with hip flexor tightness?
Yes, the extended back leg directly stretches the iliopsoas and rectus femoris. Keeping the back leg long and pressing the top of the back foot into the mat ensures the stretch stays in the hip flexor. For people whose hip flexor tightness comes from prolonged sitting, dedicated thigh and hip flexor stretches alongside pigeon pose can address the full range of tightness those muscles carry.
Final Verdict
Reclaiming your hip mobility does not require forcing your body into painful shapes.
By understanding your own side-to-side differences and prioritizing a supported foundation over depth, you can safely unlock the true physical rewards of this stretch.
Practicing pigeon pose yoga with consistency, and always warming up first, helps neutralize the constant compression of daily desk work, running, or lifting. It gives your deep outer glutes and hip flexors the exact space they need to fully release.
Now, I want to hear from you. Which variation feels best for your body today? Drop your thoughts, questions, or your favorite hip-opening tips in the comments below.