

| Difficulty | Beginner to Intermediate |
| Duration | 2 to 5 breaths per side, or 20 to 30 seconds with steady alignment |
| Props Needed | Wall, yoga blocks, or a chair for balance support |
| Best Time | After a warm-up, during standing sequences, or when practicing balance and focus |
| Style | Hatha / Vinyasa / Strength-Based Yoga |
| Avoid If | Sharp ankle, knee, hip, or lower back pain; dizziness; vertigo; or unsafe balance |
| Disclaimer: This article is for informational and educational purposes only. It does not constitute medical advice and should not replace consultation with a qualified healthcare provider. Always consult a doctor or certified yoga instructor before beginning any new movement practice, especially if you have existing injuries or medical conditions. |
Warrior 3 Pose builds balance and full-body strength by training the entire body to move as one connected unit. In my teaching experience, this is the pose that most quickly reveals where someone’s balance actually breaks down, and more importantly, where it can be rebuilt with the right cues.
The pose may look simple on paper: stand on one foot, hinge forward, lift the back leg. What actually happens when you try it is more interesting. The hips drift open. The standing knee locks. The breath shortens. Each of these is the body telling you where the real work is. This guide breaks down every step, common misalignments, and variations so Virabhadrasana III feels controlled from the first attempt.
What is the Warrior 3 Pose?
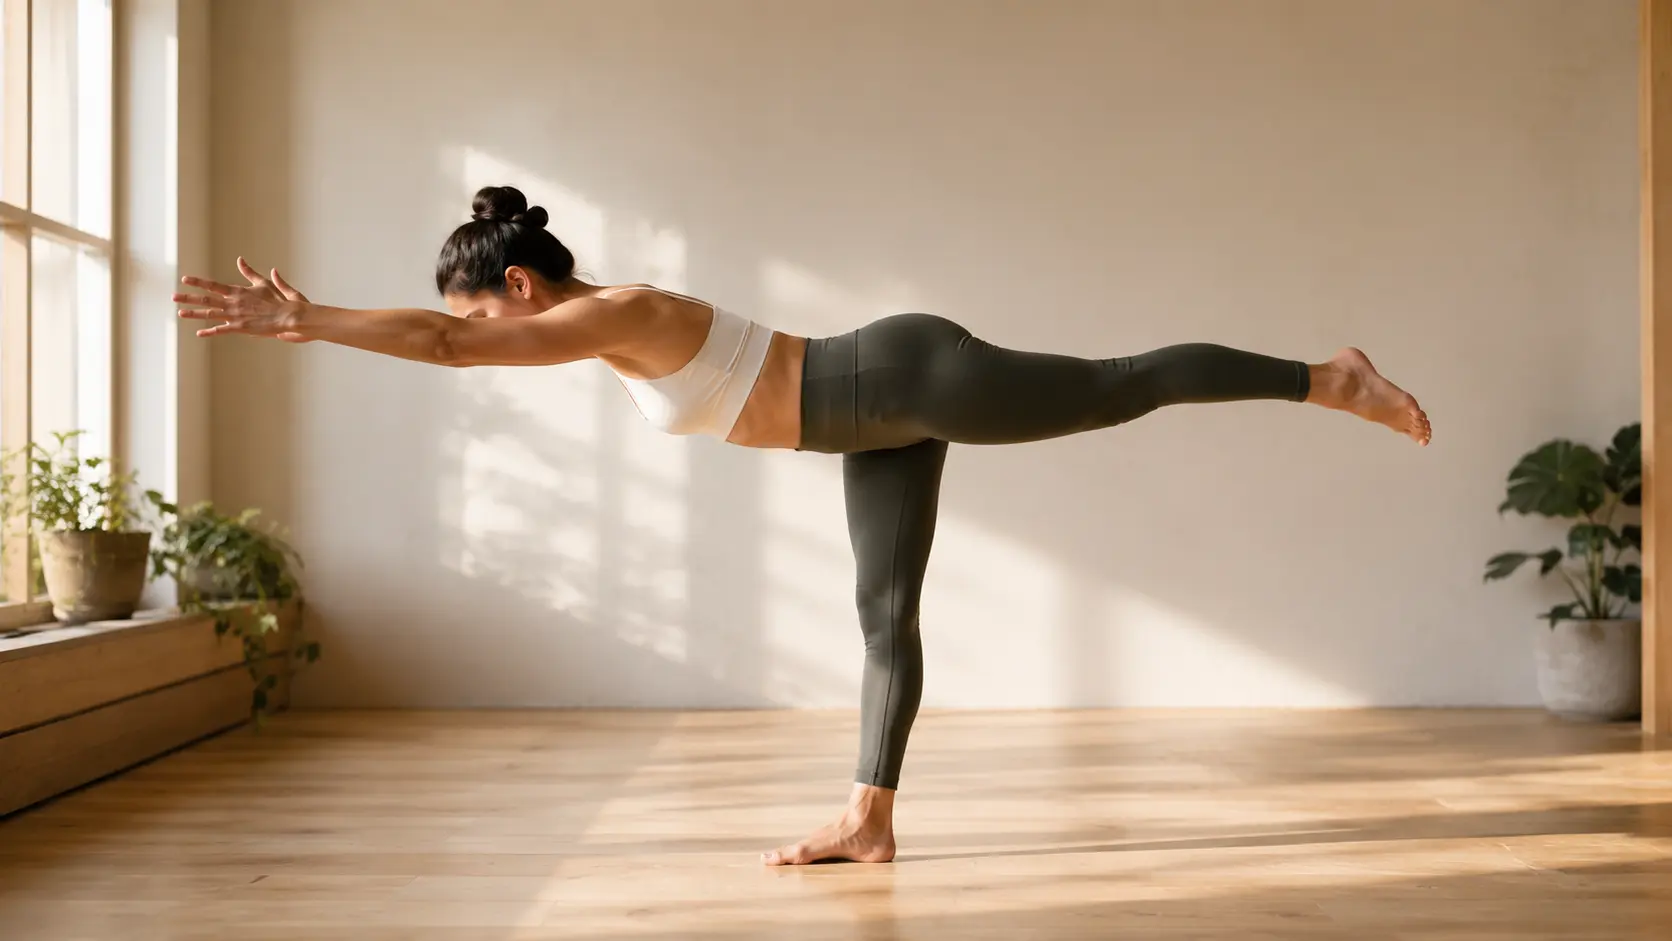
Warrior 3 Pose, known as Virabhadrasana III in Sanskrit, is a standing balance posture where the body shifts onto one leg while the torso extends forward and the opposite leg lifts behind to form a T-shape.
The name comes from Virabhadra, a fierce warrior figure in Hindu mythology, and the pose carries that quality: grounded, powerful, and precise.
What makes Warrior 3 different from other balance poses is the coordination demand. The standing foot anchors the whole structure, while the core, hips, and lifted leg have to work simultaneously to hold the line.
Even a small shift in the hips or a locked knee can pull the entire shape apart. That challenge is exactly what makes it worth practicing.
Benefits of Warrior 3 Pose
The benefits of Warrior 3 are practical, not just aesthetic. The pose works the body as an integrated system rather than targeting one isolated area, which is why it transfers directly to everyday movement.
- Balance and coordination: train the body to stay steady on one leg while improving neuromuscular control and movement awareness. Research suggests that single-leg balance training activates stabilizing muscles in the ankle and hip that standard bilateral exercises miss.
- Core and postural support: activates the transverse abdominis and spinal erectors to keep the torso stable and the spine long throughout the hold.
- Leg, glute, and ankle strength: strengthens the standing quad, calf, and ankle through sustained engagement, while the lifted leg activates the glutes and hamstrings. Studies on yoga-based hamstring activation have specifically identified Warrior 3 as one of the most effective poses for hamstring recruitment.
- Hip stability and pelvic control: works the gluteus medius and smaller hip rotators that keep the pelvis level when standing on one leg.
- Full-body integration: trains the upper body, core, hips, and legs to function as a single connected structure, which improves efficiency in walking, running, and lifting.
| Instructor Note: The value of Warrior 3 is not determined by how high the back leg lifts. A lower leg with level hips, an engaged core, and a long spine delivers more muscular benefit than a higher leg that sacrifices alignment. This is the cue I give every new student. |
How to Do the Warrior 3 Pose: Step-by-Step
Breaking the pose into smaller actions makes the balance challenge easier to understand and more stable to hold. Work through each step before moving to the next.
Step 1: Start in a Runner’s Lunge

Begin in a runner’s lunge with the right foot forward and the left leg extended back. Keep the front knee bent and aligned directly over the ankle.
Press firmly through both feet and slowly lift the torso upright. Lengthen the tailbone toward the floor and gently engage the core. This starting position establishes the foundation on which the balance phase depends.
Step 2: Ground Through the Front Foot

Shift your attention to the front foot and press evenly through all four corners: the heel, the big toe mound, and the little toe mound. Keep a soft bend in the standing knee rather than locking it straight.
At the same time, lift through the chest and the crown of the head. This combination of downward grounding and upward length creates the stability Warrior 3 requires.
Step 3: Step In and Find Your Balance Point

Lift the back heel and step the back foot halfway toward the front foot. Keep the standing knee slightly bent and let the body feel light and responsive. Draw the navel gently toward the spine and relax the shoulders away from the ears.
Before going further, fix a steady gaze on a point in front of you at eye level. A stable drishti reduces the wobble more reliably than any physical adjustment.
Step 4: Lift the Back Leg

On an exhale, begin lifting the back leg with control. Focus on activating the back thigh and glute rather than simply raising the foot. As the leg lifts, let the torso lean forward naturally in response.
Keep the hips as level as possible and resist the tendency to open the lifted hip toward the ceiling. Slow movement here preserves both balance and alignment.
Step 5: Lengthen Through the Full Body

Continue extending through the crown of the head and the lifted heel simultaneously. The goal is one long line from fingertips to heel, with the torso and back leg working together to create it.
Keep the standing leg active with a soft bend in the knee and maintain core engagement throughout. This full-body extension distributes the workload evenly and reduces unnecessary strain on the lower back.
Step 6: Position the Arms

Keep the hands on the waistline if you are still building confidence in the pose. This is the most stable arm position and the one I recommend for the first several weeks of practice.
For more challenge, extend the arms forward beside the ears (the classic variation) or sweep them back alongside the body (airplane variation). Whatever arm position you choose, keep the shoulders relaxed and away from the ears. The arms support extension, not tension.
Step 7: Hold, Breathe, and Return

Maintain a steady gaze and take slow, controlled breaths while holding the pose for 2 to 5 breath cycles. Keep length through the spine, stability in the standing leg, and active engagement in the lifted leg.
To exit, bend the standing knee slightly and lower the back foot with control. Return to Warrior I or a standing position, then repeat on the opposite side. Consistent breathing and smooth transitions build more lasting balance than holding the pose for longer with compromised alignment.
For more details refer this video:
Proper Alignment Cues for Warrior 3
These five cues address the most common places the pose breaks down. Apply them in order during the hold.
- Ground the standing foot and soften the knee: spread the toes, press evenly through the heel and both toe mounds, and keep a gentle bend in the standing knee. A locked knee makes balance harder, not easier.
- Keep the hips level and the core engaged: both hip points should face straight down. If the lifted hip rolls up, lower the leg until the pelvis is square again. A gentle belly draw-in supports the spine throughout.
- Lengthen through the spine and lifted heel: reach forward through the crown of the head and back through the heel. This creates the long horizontal line that makes the pose feel lighter.
- Relax the shoulders and fix the gaze: keep the shoulders away from the ears, the neck neutral, and the eyes locked on one point. A tense upper body makes the whole pose harder to hold.
- Move slowly into and out of the pose: the entry and exit are as important as the hold. Slow movement gives the foot, core, and hips time to coordinate before the balance challenge peaks.
Common Mistakes in Warrior 3 Pose
Most of the instability in Warrior 3 comes from a handful of predictable misalignments. Here is what to watch for and how to correct it.
| Mistake | What Happens | How to Fix It |
|---|---|---|
| Opening the hips or lifting the leg too high | The lifted hip rolls up, and the pelvis rotates, shifting the entire load unevenly. | Keep both hip points facing the floor, even if that means lowering the leg significantly. |
| Locking the standing knee | The leg becomes rigid, and the body can no longer make small balance adjustments. | Keep a deliberate micro-bend in the standing knee throughout the entire hold. |
| Letting the core and spine go passive | The chest drops, the lower back compresses, and balance becomes harder. | Draw the belly in gently and lengthen the spine actively rather than relying on the back to hold shape passively. |
| Tensing the shoulders and neck | The upper body becomes heavy, and the breath shortens. | Consciously release the shoulders away from the ears and keep the neck in line with the rest of the spine. |
| Rushing the entry | The standing foot, core, and hips do not have time to establish before the balance demand peaks. | Ground the foot and find the gaze point first, then lift slowly on an exhale. |
Correcting these habits does not require more strength. Most of the improvement comes from slowing down and applying one cue at a time rather than trying to fix everything at once.
Warrior 3 Pose Variations and Modifications
The pose is accessible at every level when the right support is in place. These four variations cover the full range from first-time practitioners to experienced students looking for a greater challenge.
1. Warrior 3 at the Wall (Beginner)

Place both hands on a wall at hip height and slowly hinge forward while lifting one leg behind you. This removes the upper-body balance demand entirely, letting you focus on keeping the hips level and the standing leg stable.
I consider this the single most effective starting point for building real confidence in the pose, and there is no reason to move past it until the hips are staying square consistently.
Goal: Build balance, hip awareness, and alignment
Sets: 3 to 5 rounds per side
Focus: Level hips, active standing leg, steady breathing
2. Warrior 3 with Blocks

Place two yoga blocks on the floor and rest your hands on them as you hinge into the pose.
The blocks lift the floor toward you, reducing the range of motion and the balance demand while maintaining the structural requirements of the pose. This is especially useful for practitioners with tight hamstrings who tend to round the spine as the torso tips forward.
Goal: Improve spinal alignment and hip positioning with support
Sets: 3 to 4 rounds per side
Focus: Long spine, square hips, grounded standing foot
3. Airplane Variation

Instead of extending the arms forward, sweep them back alongside the body with the palms facing inward. This shifts the center of gravity slightly backward, which many students find easier to manage. It also opens the chest and strengthens the upper back muscles that support posture in daily life.
The lower-body challenge remains identical to the classic variation.
Goal: Improve balance, manageability, and upper-back strength
Sets: Hold for 3 to 5 breaths, 3 rounds per side
Focus: Chest expansion and full-body coordination
4. Full Warrior 3 (Classic)

Extend both arms forward alongside the ears while reaching strongly through the lifted heel and lengthening through the crown. The whole body works as one line from fingertips to heel.
This is the version that demands the most strength, focus, and precision, and the one worth building toward rather than defaulting to before the foundation is solid.
Goal: Develop complete strength, balance, and concentrated control
Sets: Hold for 5 to 8 breaths, 2 to 3 rounds per side
Focus: Full-body integration, level hips, active lifted leg
How to Sequence Warrior 3 in Your Practice
Warrior 3 works best after the body is already warm and the hips have been opened through earlier standing poses. A typical sequence leading into it: Mountain Pose, Warrior I, then Reverse Warrior, before transitioning directly into Warrior 3 from Warrior I by hinging forward on an exhale.
As a standalone balance practice, pair it with Eagle Pose or Dancer Pose on the same side before switching, which keeps the standing-leg musculature warm between attempts. After Warrior 3, a forward fold or low lunge helps release the hamstrings and hip flexors engaged during the hold.
Three to four sessions per week are enough to see measurable improvement in balance control within four to six weeks. Short, focused holds with clean alignment build more transferable strength than longer holds with compromised form.
If you are also working on overall joint mobility, Warrior 3 pairs well with hip and ankle mobility work done earlier in the same session.
Who Should Avoid or Modify Warrior 3?
Warrior 3 should feel like a controlled challenge, not pain. Use support or avoid the pose when any of the following apply.
- Ankle pain or weakness: use a wall or chair if standing on one foot feels unstable or uncomfortable.
- Knee discomfort: keep the standing knee in a deliberate soft bend; avoid the pose entirely if the knee feels strained during the hold.
- Hip pain or tightness: lower the lifted leg until the hips can stay level without forcing. The height of the lift is never worth compromising joint comfort.
- Lower back pain: keep core engagement active throughout and avoid lifting the back leg higher than the spine can support comfortably.
- Dizziness or vertigo: practice near a wall or skip the pose when balance feels unsafe, particularly at the entry and exit.
- Pregnancy: balance shifts as the body changes; use a wall or chair throughout the entire hold.
- Sharp pain during practice: come out of the pose immediately and choose a supported version for the remainder of the session.
| Safety Note: A supported Warrior 3 with clean alignment is always a better choice than pushing into the full shape when comfort or joint safety feels limited. People with existing lower extremity injuries should consult a healthcare provider or certified yoga teacher before practicing single-leg balance poses. |
Frequently Asked Questions About Warrior 3 Pose
How long should you hold the Warrior 3 Pose?
Beginners can work with 2 to 3 breaths per side. As balance improves, build gradually to 5 breaths, then 20 to 30 seconds. The hold length matters less than whether the breath stays steady and the hips stay level throughout. If either breaks down, shorten the hold rather than forcing duration.
What muscles does Warrior 3 work?
Warrior 3 works the standing quad, calf, and ankle for stability, plus the gluteus medius to keep the pelvis level. In the lifted leg, the primary activation is in the glutes and hamstrings. The core, particularly the transverse abdominis and spinal erectors, works continuously throughout the hold. Research has specifically identified Warrior 3 as an effective hamstring recruitment exercise, with activation levels high enough to include in rehabilitation protocols.
What is the difference between Warrior 1, 2, and 3?
Warrior I is a two-footed lunge with the torso upright and arms raised. Warrior II opens the hips to the side with arms extended horizontally. Warrior 3 shifts all the weight onto one foot, tips the torso forward, and lifts the back leg, creating a horizontal T-shape. In terms of difficulty, Warrior 3 is generally the most demanding of the three because of the single-leg balance component.
Why is one side harder than the other in Warrior 3?
One side almost always feels harder in balance poses. Daily movement patterns, dominant leg use, past injuries, and postural habits create real differences in hip stability and ankle proprioception between sides. Practice both sides patiently rather than forcing the weaker side to match. The asymmetry typically reduces with consistent practice over several weeks.
Can beginners do the Warrior 3 Pose?
Yes, with the right support. The wall variation and block variation make the pose accessible from the first session. The key is to start with the hands supported and build familiarity with the hip and core engagement before attempting the unsupported version. Most beginners are ready to attempt the unsupported pose after two to four weeks of practicing the wall version consistently.
What time of day is best for Warrior 3?
Warrior 3 can be practiced at any time, but it typically feels better when the body is warm and alert. Morning practice tends to build focus and set a steady tone for the day. Evening practice can help decompress stiffness from prolonged sitting or standing. Avoid attempting it cold, particularly if balance is already a challenge.
How often should you practice Warrior 3?
Three to four times per week allows enough recovery between sessions for the stabilizing muscles to adapt. Short focused holds with clean alignment are more effective for building balance than occasional long attempts. Increase hold duration only when both the alignment and the breath remain steady throughout the current duration.
Final Verdict
This balance shape becomes steadier when you stop chasing the final look and start trusting small, clear actions. I like how it teaches control through the standing foot, a soft knee, level hips, an active core, and calm breathing.
You have also seen how wall support, blocks, arm choices, and slower movement can make practice safer. These details matter because they help you build strength without forcing the body. The warrior 3 pose is not about height or speed.
It is about focus, stability, and steady progress. Try these cues in your next practice, then share what helped you most in the comments or read a related yoga blog next.