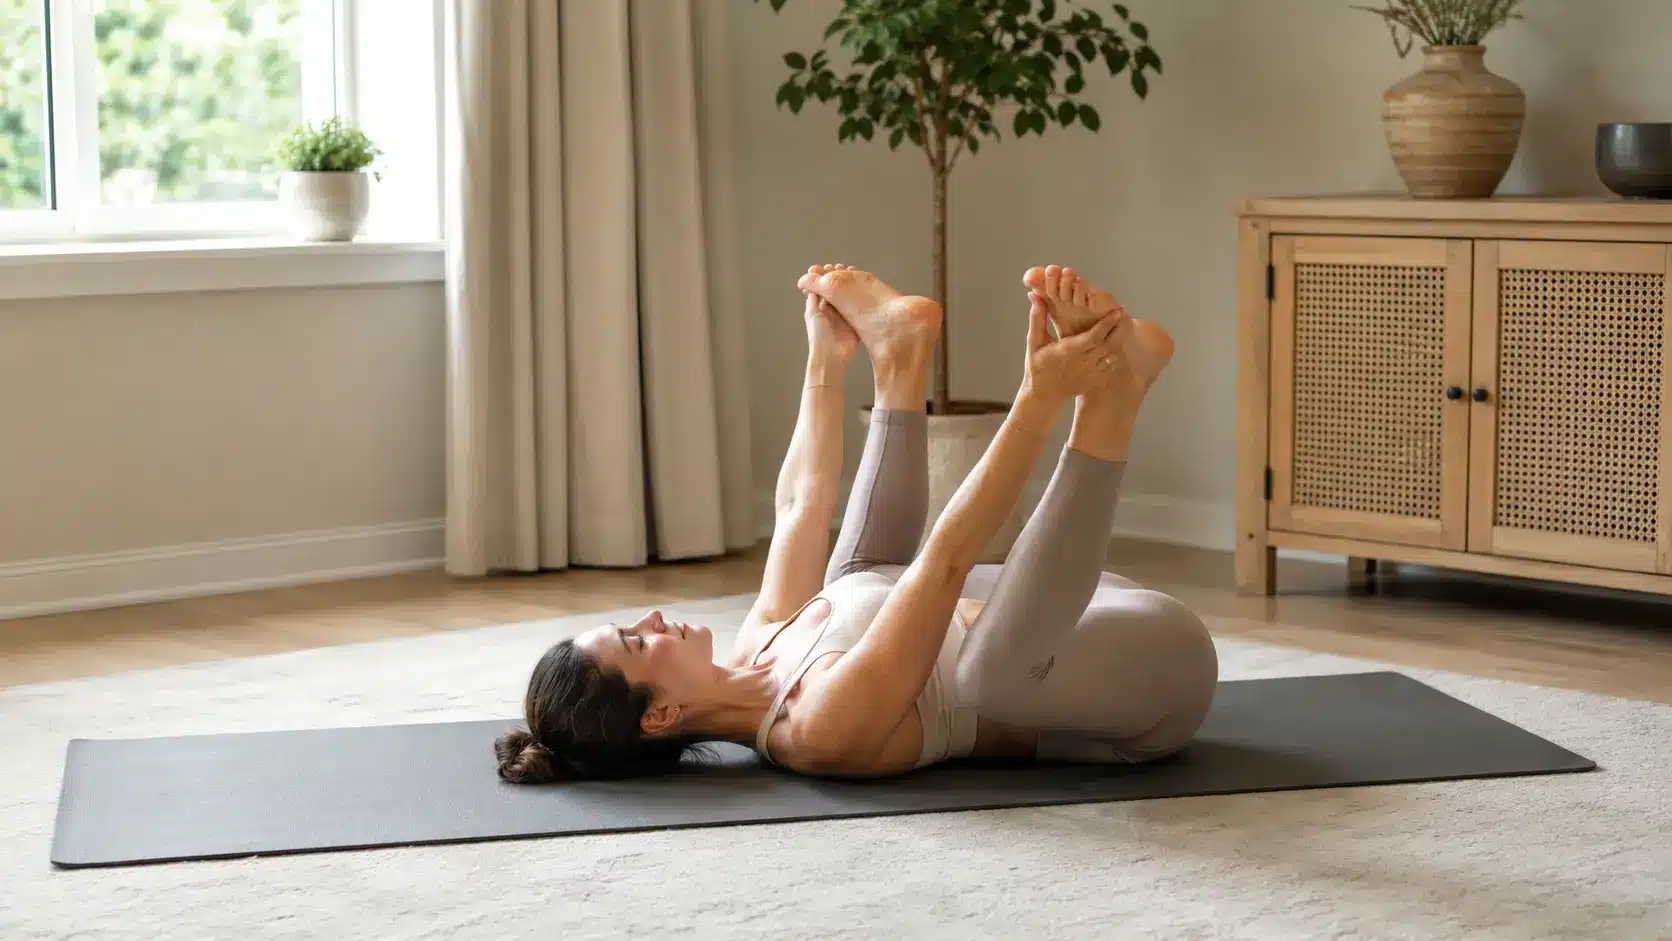

Happy Baby Pose may look simple at first: lying on the back, knees wide, and feet lifted. But in practice, I’ve seen how a few slow breaths in this shape can create a noticeable release through the inner thighs, hips, and lower back.
Because the spine stays supported on the mat, the body can relax into the stretch without needing to balance or hold itself upright. I like using this pose near the end of practice, especially when the hips feel tight after sitting, standing, or moving through more active poses.
Happy Baby Pose, known in Sanskrit as Ananda Balasana, is a reclined hip-opening posture that stretches the inner thighs, groin, hamstrings, and lower back while your spine stays fully supported on the mat.
Because you are lying down, your body does not have to work to stay balanced, which makes the stretch easier to control and gentler on the joints than most standing or seated hip openers.
What Does Ananda Balasana Mean?
The Sanskrit name breaks down simply: Ananda means bliss or happiness, Bala means baby or child, and asana means posture.
Together it translates as the Pose of the Blissful Baby, named for the shape a contented infant makes when lying on its back and reaching for its feet. The pose is also sometimes called Dead Bug Pose in modern fitness contexts, which describes the same shape without the Sanskrit framing.
In classical Hatha yoga philosophy, the pose carries a deeper invitation: to approach your practice with the softness and openness of a child rather than the effort of an adult. That quality, ease without collapse, is what makes it so effective as a closing posture. Your body is supported, your breath can slow, and the stretch deepens without you having to force anything.
What Does Happy Baby Pose Stretch?
Understanding the muscles involved helps you get more out of every hold. Happy Baby Pose primarily targets the adductors (inner thigh muscles), the hip flexors including the iliopsoas complex, the hamstrings, the groin, and the lower lumbar spine. The wide-knee position pulls the adductors toward their outer range, which is a direction most people rarely access during walking, sitting, or standing exercise.
The gentle traction created when you pull your feet toward the floor also creates mild decompression at the sacroiliac joints and the lumbar vertebrae. This is why many people feel immediate relief in the lower back even on their first attempt.
The pose also engages the parasympathetic nervous system, your body’s rest-and-digest response, through the combination of supine position and slow diaphragmatic breathing. In my classes, I have seen students visibly shift from a tense, guarded state to a noticeably calmer one within a single minute of the hold.
How to Do Happy Baby Pose Step by Step
Move slowly as you set up. The goal is not to pull your legs as far as possible. Keep your spine supported while your hips open at a comfortable level.
Step 1: Set Up on Your Back

Lie on your back on a yoga mat or firm floor. Bend both knees and bring them toward your chest.
Let your head rest down, soften your shoulders, and take one or two slow breaths. I find this pause useful because it helps you feel how your lower back meets the floor before you move deeper.
Step 2: Lift Your Feet and Choose Your Grip

Keep your knees bent and lift your feet so the soles face upward. Your shins may come close to vertical, but they do not have to look perfect.
Reach toward your legs and hold the outer edges of your feet if that feels comfortable. If your shoulders tense or your head lifts, hold your ankles, calves, or the backs of your thighs instead.
Instructor Tip: The most common form error I see in class is people holding their feet but with white-knuckled shoulders. If your trapezius is working hard, your grip is too ambitious. Move your hands lower on your legs and let your neck fully relax before going deeper
Step 3: Open Your Knees, Flex Your Feet, and Breathe

Open your knees wider than your ribs. Think of your knees moving toward the outside of your body, not straight down.
Flex your feet as if you are placing them flat on the ceiling. Hold for 5 to 10 slow breaths, keeping your jaw loose and your belly moving with each breath.
Alignment Check: Keep your knees wide without forcing them down. Keep your feet flexed to support your knees. If your breath feels short or tight, ease back.
To come out, release your grip and bring your knees back toward your chest. Pause for a breath before rolling to one side or placing your feet down.
Good alignment should make the pose feel calmer, not harder. If your body feels tense, reduce the pull or hold lower on your legs.
Watch this short Happy Baby Pose video to see the setup, grip, knee position, and breathing pace before you try it on your mat.
Half Happy Baby Pose: The Single-Leg Variation
If one hip feels significantly tighter than the other, or if the full bilateral version pulls your lower back off the mat, start with Half Happy Baby Pose, also called Ardha Ananda Balasana.
To practice it: lie on your back, keep one foot flat on the floor with the knee bent, and bring only the opposite knee toward your chest. Reach for the outer edge of that single foot, or hold your ankle or calf if reaching the foot causes strain. Open that one knee wide while keeping the grounded foot stable. Hold for 5 to 8 breaths, then switch sides.
This variation is particularly useful for people who have significantly different hip flexibility side to side, which is more common than most people realize.
Working one side at a time lets you give the tighter hip more attention without forcing the looser side into a range it does not need. It is also the correct starting point for anyone using a yoga strap for stretching, since the single-leg setup makes the strap easier to loop and hold.
Beginner-Friendly Changes
If the full version feels too strong, use these changes to make the pose easier and safer.
- Hold behind your thighs: Use this if your feet feel too far away or your lower back lifts. This keeps the stretch gentle while still opening the hips.
- Hold your calves or ankles: This gives you more reach without pulling your shoulders off the mat. Keep your grip light and your neck relaxed.
- Use a yoga strap: Loop it around the arches of your feet and hold the ends softly. A strap helps you reach without forcing your arms or back.
- Try one leg at a time: Keep one foot on the floor and work with one side first. This helps if one hip feels tighter than the other.
- Support your head: Place a folded towel under your head if your neck feels tight. Keep your chin relaxed and avoid pushing it toward your chest.
- Keep the stretch mild: Your hips should feel gently open, not strained. If your breath feels tight, make the pose smaller.
A beginner version should still feel useful, not weak. When your body feels steady, and your breath stays smooth, you are using the right version for that day.
Benefits of Happy Baby Pose

Happy Baby Pose can support tight hips, inner thighs, and lower back comfort. Treat it as a gentle stretch, not a cure for pain or a replacement for proper care.
1. Stretches the Hips and Groin
The wide-knee position helps stretch the inner thighs, groin, and deep hip area. This can feel useful if your hips feel stiff after sitting for long hours, walking, or light exercise.
Since you are lying on your back, your body does not have to work hard to stay balanced. That makes the stretch feel easier to control. Keep the pull light so your hips can open without strain.
2. Helps the Lower Back Feel Less Tense
Bringing your knees toward your body may help reduce mild tightness in the lower back. The floor supports your spine, so your back can settle while your hips and legs move into the stretch.
Some people also like a small side-to-side rock because it can feel soothing on the lower back. Keep the movement slow and gentle.
If your pain is sharp, ongoing, or travels down your leg, ask a qualified professional for help.
3. Supports Gentle Hip Mobility
Happy Baby Pose lets your hips move through a wide, supported position. This can help you notice stiffness without putting pressure on your joints from standing or deep-seated stretches.
You do not need to force your knees wide to get value from it. A smaller range can still help your hips feel more mobile over time, especially when you practice with steady breathing and good control.
4. Helps the Body Slow Down
Because this pose is done lying down, it can help your body shift into a calmer state. Your head, shoulders, and back stay supported, which makes it easier to breathe slowly and release extra tension.
I like using this pose near the end of practice because it gives you a quiet moment to check in with your body. When your breath slows, the stretch often feels softer and easier to hold.
5. May Ease Some Pelvic Tension
The wide-kneed shape may help some people feel less gripping around the hips and pelvis. This can be helpful if tension builds after sitting, stress, or a long day of movement.
Keep this benefit gentle and realistic. Happy Baby Pose may help with mild pelvic tightness, but it should not be used on its own to treat pelvic pain.
If you have pelvic pain, pressure, bladder symptoms, or bowel symptoms, ask a clinician before using this pose often.
Common Mistakes to Avoid
Small form errors can make the Happy Baby Pose feel harder than it should. Use this table to keep the stretch safe, steady, and comfortable.
| Mistake | Why It Matters | What to Do Instead |
|---|---|---|
| Pulling too hard | This can strain the hips or knees. | Use light pressure and stay within a mild stretch. |
| Forcing the knees down | This can make the hips feel pinched. | Let your knees open only as far as they can. |
| Lifting the tailbone too high | This can make the lower back feel pulled. | Use a smaller range and keep the spine supported. |
| Gripping too high, too soon | This can tense the neck and shoulders. | Hold your calves, ankles, or thighs instead. |
| Ignoring sharp pain | Pain, numbness, or tingling is not a normal stretch. | Stop and use a gentler version. |
A good stretch should feel clear and controlled. If your body starts to guard, tighten, or ache, ease back before holding the pose longer.
Contraindications and Safety Tips
Understanding safety before practicing the Happy Baby Pose can help you avoid strain and stay in control.
- Lower Back Sensitivity: Use a smaller range if your back feels pulled or tense.
- Knee Pain: Avoid pulling hard on your feet. Hold lower on the legs if your knees feel strained.
- Hip Pinching: Stop or reduce the stretch if you feel deep pinching in the hip.
- Neck Strain: Support your head with a folded towel if your neck feels tight.
- Pregnancy or Recent Birth: Ask a qualified yoga teacher, physical therapist, or clinician before doing deep hip-opening positions.
- Recent Hip, Knee, Ankle, or Back Injury: Skip the pose until a healthcare provider clears you.
A safe stretch should feel steady and mild. If it feels sharp, numb, or hard to leave, choose a gentler version.
How to Add Happy Baby Pose to Your Practice
Happy Baby Pose works best near the end of a session, after your body is warm and your nervous system has had time to settle. It pairs naturally with other restorative floor postures and is an excellent bridge between active asana practice and Savasana.
Many of the students I work with also use it as a standalone evening stretch, holding for 8 to 10 breaths per side after a day of prolonged sitting.
If you are building a consistent yoga habit, this pose belongs in your regular rotation alongside other hip-opening practices. For anyone exploring a broader movement routine, the principle of supported hip mobility that Happy Baby Pose teaches carries into standing postures across many of the foundational hot yoga poses that require open hips and a stable pelvis.
Daily practice is appropriate for most people, provided the pose feels comfortable and produces no soreness or strain afterward. Start with one hold of 5 breaths per session and build from there. Consistency over weeks matters far more than depth on any single day.
Frequently Asked Questions
Should your tailbone stay on the floor?
Your tailbone does not need to press flat, but your lower back should feel supported. If your hips lift too much, reduce the pull, hold lower on your legs, or try one leg at a time.
Can beginners do Happy Baby Pose?
Yes, beginners can do Happy Baby Pose with simple changes. Hold behind your thighs, use a strap, or practice one leg at a time. The goal is comfort and control, not reaching your feet perfectly.
What muscles does Happy Baby Pose stretch?
Happy Baby Pose mainly stretches the inner thighs, groin, hips, hamstrings, and lower back. Because you lie on your back, the stretch is supported and easier to control than many standing hip openers.
Is Happy Baby Pose good before bed?
Yes, Happy Baby Pose can work well before bed if it feels relaxing. The supported position and slow breathing may help your body settle. Keep the stretch gentle so it calms you instead of creating tension.
Why can’t I reach my feet?
You may have tight hips, hamstrings, or shoulders, and that is normal. Hold your ankles, calves, or thighs instead. You can also use a yoga strap to reach comfortably without lifting your head or shoulders.
Conclusion
Happy Baby Pose may look simple, but the small details make it more useful and comfortable. I’d focus on keeping your spine supported, choosing an easy grip, and letting your knees open without force.
You learned what the pose stretches, how to do it step by step, which beginner changes can help, and what mistakes to avoid. This matters because a gentle hip opener should make your body feel calmer, not strained.
Use Happy Baby Pose when your hips, groin, or lower back feel tight. Try it for a few slow breaths today, and check out related yoga guides for more beginner-friendly poses.