| Exercise Type | Bodyweight glute isolation/hip extension |
| Muscles Targeted | Gluteus maximus (primary), gluteus medius, gluteus minimus, hamstrings, core |
| Difficulty | Beginner to Intermediate |
| Equipment | None required (bands, ankle weights, cable machine for progressions) |
| Best For | Glute activation, mind-muscle connection, home training, warm-up before squats or deadlifts |
| Avoid If | Active knee injury, wrist pain (use standing variation), unmanaged lower back pain |
What Donkey Kicks Actually Train
Donkey kicks may look like a basic floor movement, but they reveal how well the hips actually function under control. The key value comes from isolating hip extension without letting the spine take over the effort.
When the gluteus maximus is not firing correctly, the lower back tends to compensate, especially during fatigue or poor positioning.
That compensation often carries into compound lifts where load increases and form becomes harder to correct. I use this movement to check whether the glutes respond in a clean, controlled way before progressing to heavier patterns.
It also helps highlight side-to-side stability issues through the gluteus medius, which keeps the pelvis steady during single-leg lift phases.
Because the setup removes balance demands and external load, attention stays fully on muscle control. This makes donkey kicks a simple but effective way to build stronger activation patterns that carry into squats, deadlifts, and lunges
| Trainer Tip: If you feel this exercise more in your lower back than your glutes, reduce the range of motion immediately. A smaller lift with a genuine glute squeeze beats a high kick with zero muscular connection. In my experience, most people need to start with a 45-degree range and work up from there. |
Muscles Worked During Donkey Kicks
Donkey kicks rely on a mix of primary and stabilizing muscles that work together to control hip movement, maintain balance, and protect the lower back during each controlled lift.
- Gluteus Maximus: Primary hip extender and main driver of the movement. It contracts strongly at the top of each rep, creating the visible “glute squeeze” that signals correct activation and full hip extension.
- Gluteus Medius & Minimus: These side-hip muscles stabilize the pelvis and prevent rotation or tilting. They keep both hip points facing the mat and support clean alignment throughout the lifting leg.
- Hamstrings: Secondary movers that assist hip extension, especially during slower reps. Overactivation often signals the knee angle is too open, shifting work away from the glutes.
- Core Stabilizers: Deep abdominal muscles, especially the transverse abdominis, maintain a neutral spine. They prevent lower back arching and ensure the lift originates from the hip, not the lumbar region.
- Shoulders, Arms & Upper Back: These muscles provide a stable base. They stabilize the upper body, allowing the lower body to move without shifting the frame or losing balance during the exercise.
Proper engagement across all these muscle groups ensures smoother reps, better glute activation, and reduced strain on the lower back or supporting joints.
How to Do Donkey Kicks With Proper Form
Good donkey kicks are built from the ground up. Every element of your starting position, the pace of the lift, and your control on the way down contributes to whether your glutes actually do the work. Here is the full step-by-step breakdown.
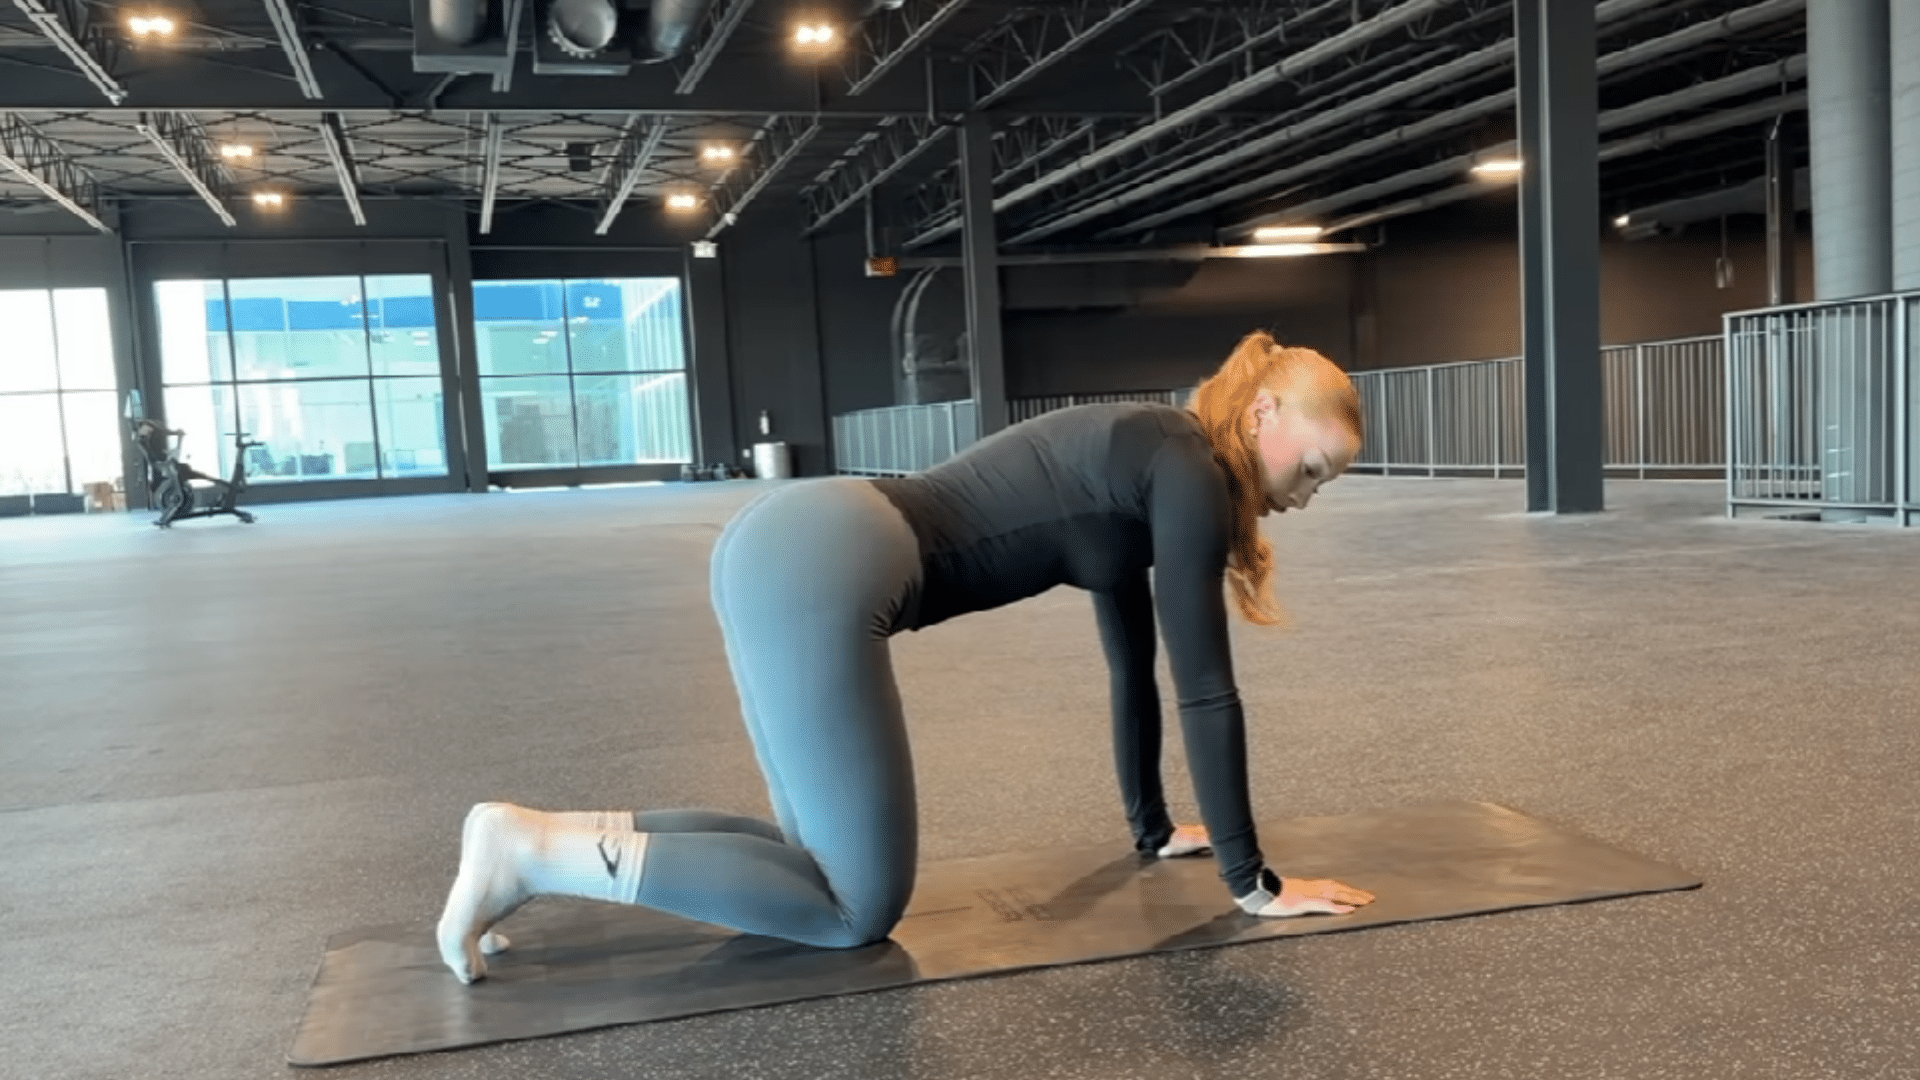
Step 1: Set Up Your Base Position
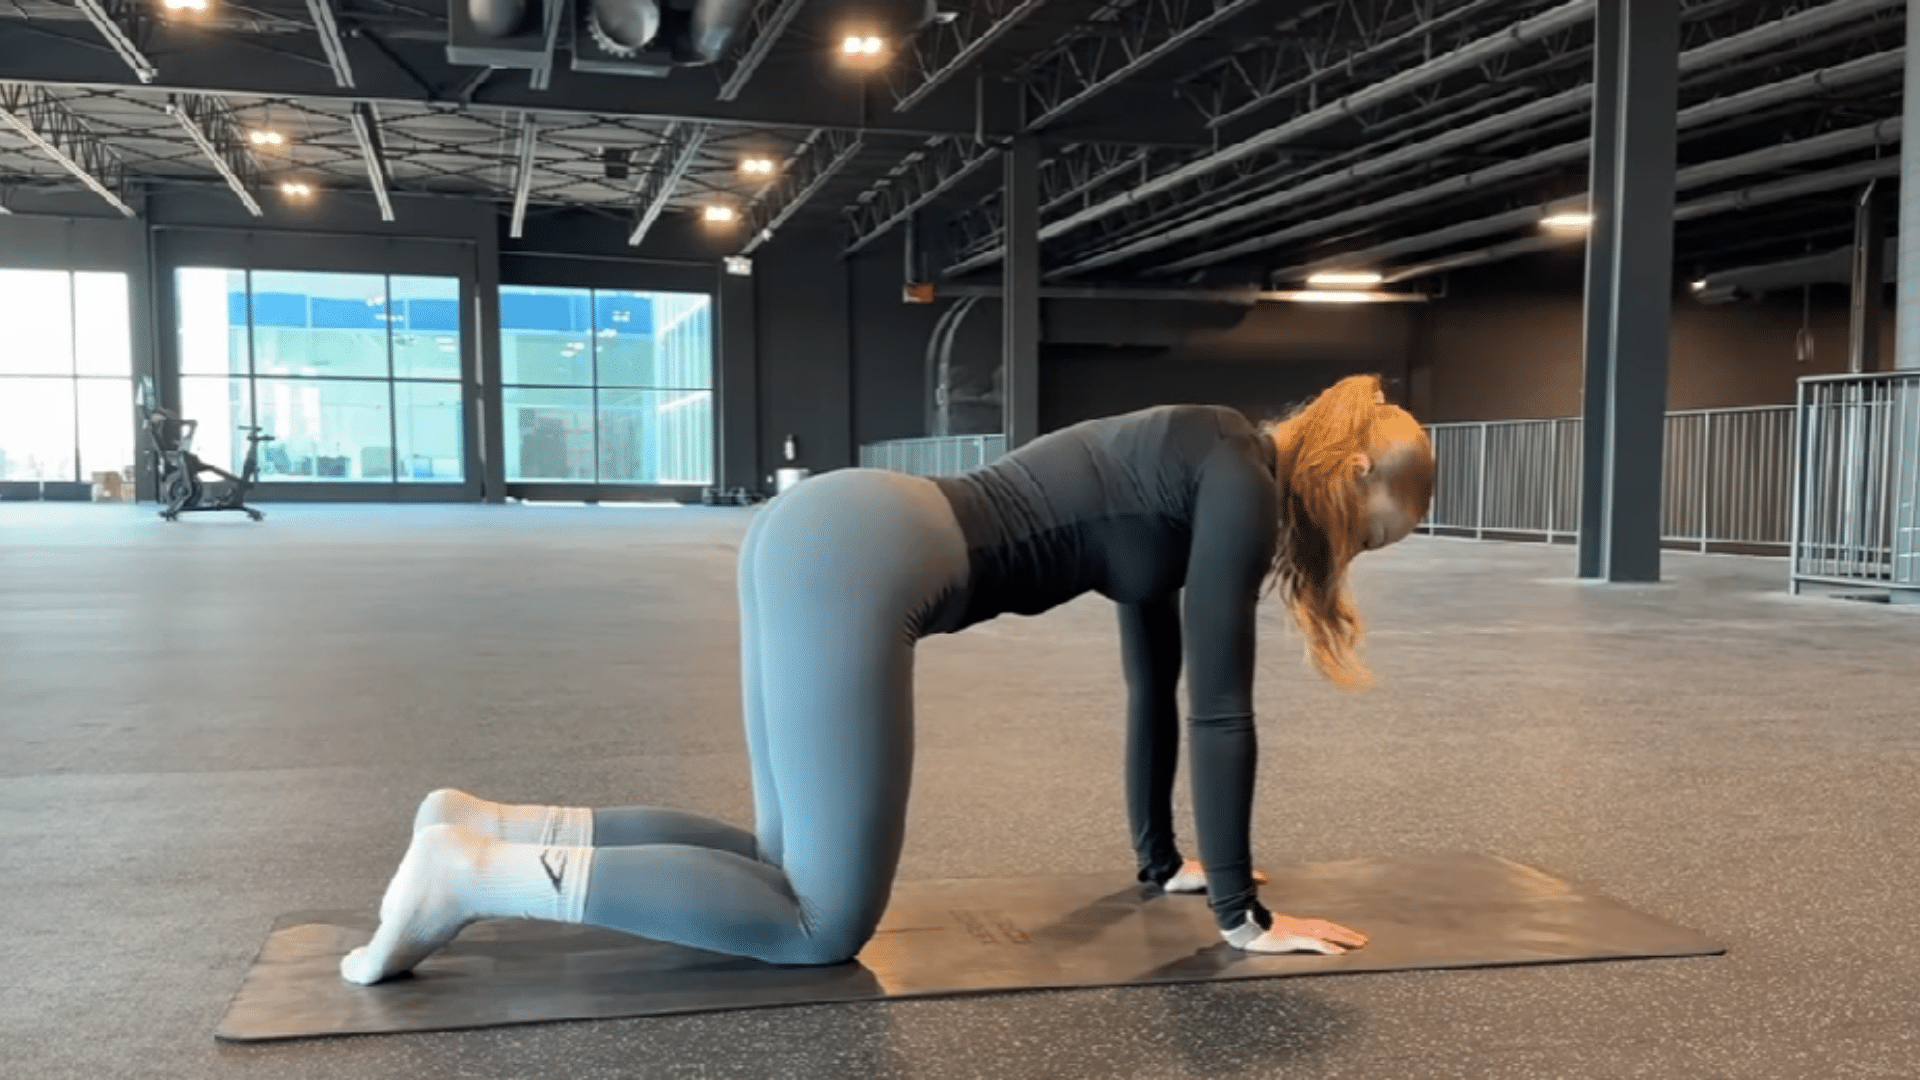
Start on a yoga mat with your hands placed directly under your shoulders and your knees directly under your hips. This is the tabletop position. Your spine should be neutral, your neck relaxed, and your gaze directed toward the floor rather than forward.
Spread your weight evenly across both hands and both knees before you lift anything. A shaky or uneven base will pull your torso out of alignment the moment one leg goes up.
Before the first rep, take a breath and lightly brace your core. Think of pulling your belly button gently away from the mat. That tension is what protects your lower back throughout the set.
Step 2: Lift the Leg With Intention

Keeping your knee bent at approximately 90 degrees, raise one leg behind you until your thigh is roughly parallel to the floor. Aim the sole of your foot toward the ceiling. Do not chase height.
A lift where your thigh reaches parallel with full glute engagement is far more effective than a high kick that causes your lower back to arch or your hip to rotate open.
At the top of the movement, pause for one to two seconds and consciously squeeze the glute of the working leg. That intentional pause is where most of the muscle-building stimulus occurs. Without it, you are just swinging your leg and calling it an exercise.
Step 3: Lower With Control
Lower your knee back toward the mat slowly and with full control. The eccentric phase, which is the lowering portion of any lift, creates significant muscle adaptation.
The same principle that makes eccentric quad exercises effective for tendon health applies here: the controlled lowering portion does as much training work as the lift itself.
Dropping the knee quickly removes this benefit entirely. Aim to take two to three seconds on the way down. Stop just before your knee touches the mat, then begin the next rep from that position to keep constant tension in the glute.
Step 4: Complete the Set, Then Switch Sides
Finish all reps on one side before switching to the other. Alternating sides every rep reduces the time under tension on each glute and makes it harder to maintain quality form.
When you notice the weaker side, start your sets on that side every session. I always program the weaker glute first when training clients with side-to-side imbalances, and I would apply the same rule here.
| Programming Note: Start with 2 to 3 sets of 8 to 12 reps per side. Keep every rep slow enough that you can feel the glute contracting throughout. If your lower back tightens or your hips begin to twist, stop and reset. Add resistance bands, ankle weights, or cable attachments only once bodyweight reps feel fully controlled. |
Watch the step-by-step tutorial:
Straight-Leg Donkey Kicks (Advanced Bodyweight Variation)
Straight-leg donkey kicks extend the working leg fully behind you instead of keeping the knee bent. The longer lever arm increases demand on your glutes, hamstrings, and core stabilizers significantly.
I recommend this variation only after you can complete 3 sets of 15 clean bent-knee reps without any arching, twisting, or swinging. The extended position makes compensations much harder to hide.
To perform: from the tabletop position, extend one leg straight back until it forms a line from your hip to your heel. Brace your core, then raise the leg using only your glute. Keep the lift small and controlled. Lower the same way. This is a strong bodyweight step before adding external resistance.
Donkey Kick Variations for Every Fitness Level
Once the basic movement is clean, variations give you a clear progression path. I would not make this exercise harder purely for the sake of it. Each variation below serves a specific purpose, and knowing which one fits your current level is more important than chasing the most advanced option.
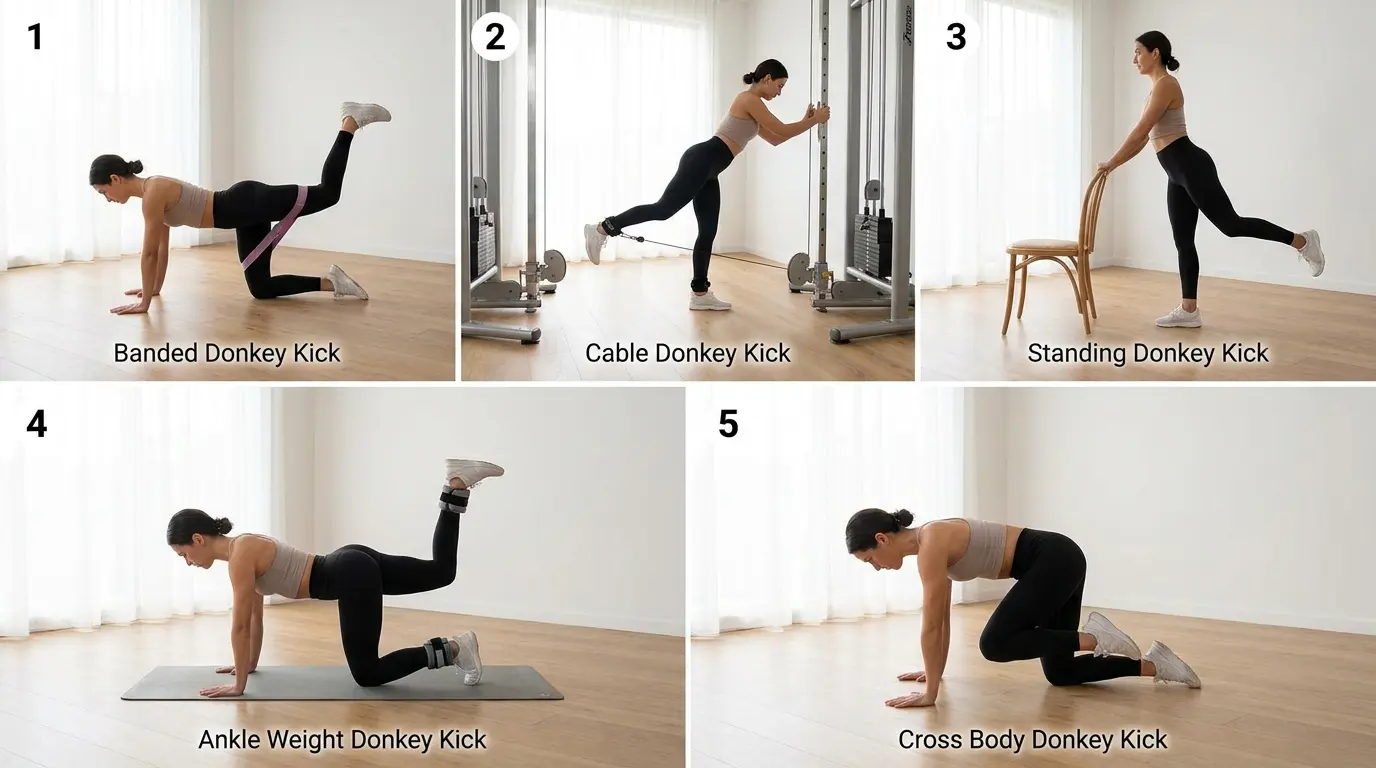
1. Banded Donkey Kicks
A mini resistance band looped just above the knees adds tension throughout the full range of motion. Bodyweight donkey kicks lose glute tension at the bottom of the rep.
The band maintains it. This variation is the natural next step once bodyweight reps no longer produce noticeable glute fatigue by the end of a set. Start with a light band and verify that your hip position stays stable before increasing resistance.
2. Donkey Kicks with Ankle Weights
Ankle weights are the most accessible form of resistance for home training. They increase the load on the gluteus maximus without requiring any equipment setup beyond strapping them on.
Keep the weight light enough that your reps remain smooth. When I program ankle weight variations for clients, I typically start at 2 to 3 pounds and only increase once form is consistent across all 12 to 15 reps.
3. Cable Donkey Kicks
A cable machine provides constant resistance throughout the movement, making every portion of the rep challenging, not just the top. This is the gym version to move to when ankle weights feel manageable but you want a clear way to track and increase load over time.
Attach the cable ankle cuff to your working leg, set the weight at a level that challenges you without breaking form, and execute the same controlled movement as the floor version.
4. Standing Donkey Kicks
Standing donkey kicks, also called standing glute kickbacks, are performed while holding a wall, chair, or sturdy bench for balance.
This variation eliminates all wrist and knee pressure, making it the best option for beginners, older adults, or anyone dealing with joint discomfort on the floor. The hip extension mechanics are identical. The only difference is the base.
5. Cross-Body Donkey Kicks
This variation begins with the working knee moving slightly toward the midline of the body before extending upward.
The altered starting angle places more demand on the gluteus medius and can help you feel portions of the glute that the standard version does not fully reach. Use it as an accessory after the basic version, not as a replacement.
Donkey Kicks Workout Plan: Sets, Reps, and Programming by Goal
Donkey kicks should fit the goal you are training toward, not just be tacked onto the end of a session as an afterthought. Here is how I program them depending on what the training objective is.
| Goal | Sets | Reps Per Side | Rest | Best Placement |
|---|---|---|---|---|
| Beginner form practice | 2 | 8 to 10 | 45 sec | Start of lower body session |
| Glute activation before lifting | 2 to 3 | 10 to 12 | 30 sec | Warm-up before squats, lunges, or deadlifts |
| Glute strength building | 3 to 4 | 12 to 15 | 45 to 60 sec | Main glute session or after compound lifts |
| Workout finisher | 2 to 3 | 15 to 20 | 20 to 30 sec | End of lower body session |
| Banded or weighted variation | 3 | 10 to 15 | 45 sec | Main session once bodyweight is mastered |
These are not maximum-effort protocols. Every set should feel challenging enough that you notice genuine glute fatigue by the final few reps, but controlled enough that your form does not deteriorate. For weekly frequency, beginners should train donkey kicks 2 to 3 times per week with at least one rest day between lower-body sessions. When you add bands or ankle weights, treat those sessions the same as any resistance workout and allow adequate recovery before repeating.
Common Donkey Kick Mistakes and How to Fix Them
Most form errors with donkey kicks come from the same root cause: trying to lift higher than your glute strength currently allows. The body compensates by recruiting whatever else is available, usually the lower back. Here are the specific mistakes I see most often and the exact correction for each.
| Mistake | What You Feel or See | The Fix |
|---|---|---|
| Arching the lower back | Tightness or pinching at the base of the spine | Lower the lift height and brace your core before each rep |
| Hip rotation | One hip point faces upward instead of the floor | Keep both hip points facing straight down throughout the lift |
| Swinging through reps | Leg moves fast with momentum carrying it up and down | Pause for two seconds at the top and take three seconds on the way down |
| Knee pressure on the mat | Sharp or aching pain in the support knee | Fold a towel under the knee or switch to a thicker mat |
| Chest dropping | Upper body sinks toward the mat, arms shaking | Press actively through your palms and engage your shoulder stabilizers |
| Feeling it in the back, not the glute | Tension in the hamstring or lower back instead of the butt | Flex your foot, drive through your heel, and focus the squeeze in the glute at the top |
| Knee drifting outward | Working knee tracks sideways instead of straight back | Think “straight back and up,” not to the side |
| Adding resistance too early | Reps become jerky and choppy with the band or weight on | Return to bodyweight until you can do 3 sets of 12 without any compensations |
Small corrections in this exercise produce outsized results. If fixing one cue, say driving through your heel instead of your knee, makes you suddenly feel the glute clearly for the first time, that cue is the one to lock in before moving to any variation.
How to Progress Donkey Kicks Over Time
Progression in donkey kicks should follow a clear sequence based on what your current reps actually look like, not on how long you have been doing them. Here is the progression path I use when programming this exercise for clients at different training stages.
The first stage is mastering the bodyweight bent-knee version at a slow tempo. When you can complete 3 sets of 12 to 15 reps on each side with zero arching, zero hip rotation, and a clear glute squeeze at the top, you are ready to move forward.
The second stage is the straight-leg variation described above. This builds additional demand from the extended lever before any load is added. Most people need two to four weeks at this stage before moving on.
The third stage is adding light resistance, either a mini band, ankle weights of 2 to 3 pounds, or a cable attachment at a very light setting. The test for staying at this stage: can you maintain perfect form for all reps on both sides? If yes, increase weight or band resistance. If not, stay where you are and focus on consistency. Understanding the right rep ranges for strength helps you decide when bodyweight volume is no longer enough to drive further adaptation.
The fourth stage is progressive overload through resistance increases. At this point, donkey kicks function like any other loaded exercise: add load gradually over weeks, not sessions, and track which variation you are using and at what weight to ensure you are actually progressing.
| Trainer Tip: When I program donkey kicks for clients, I track whether they feel it in the glute by the end of the first set. If they do not, I adjust the tempo before I adjust the load. Slowing the eccentric phase to 3 seconds resolves most “I cannot feel my glutes” complaints without adding a single pound of resistance. |
Donkey Kicks vs. Glute Bridges: Which One Should You Do?
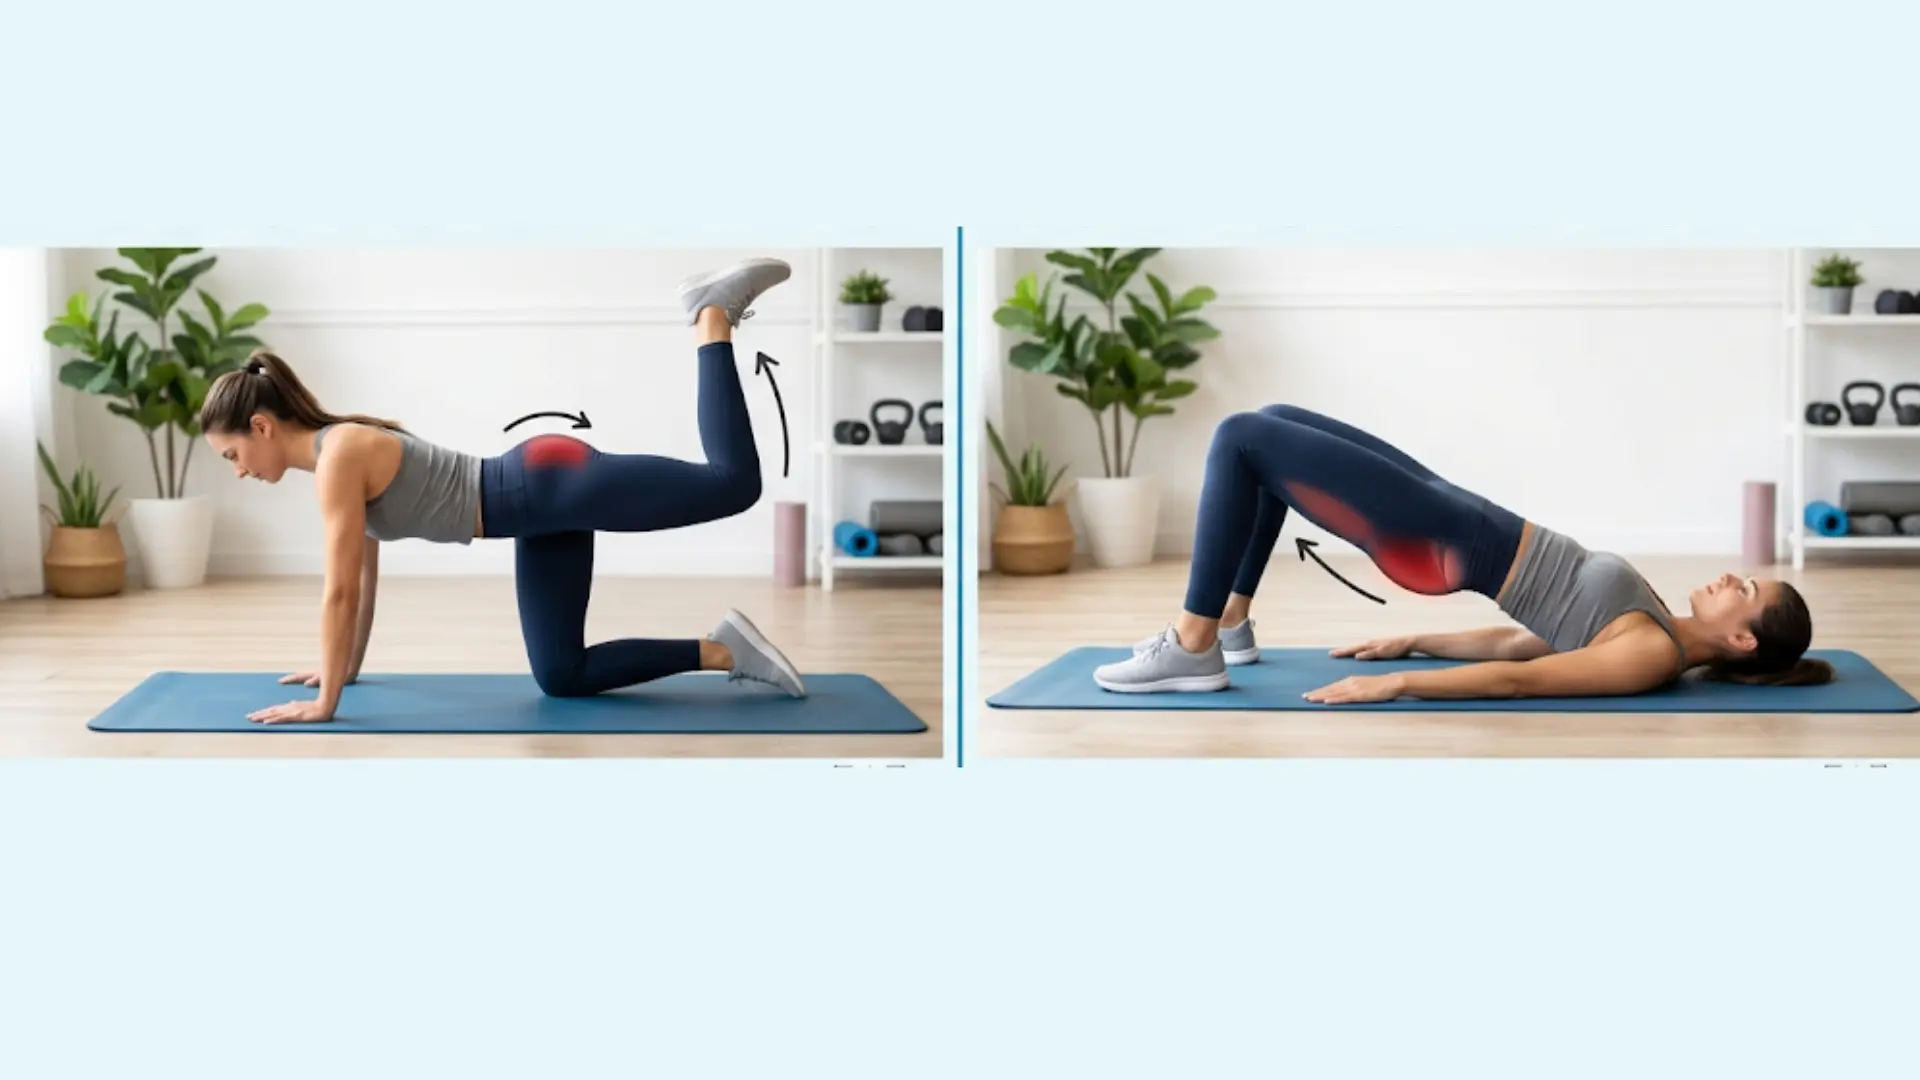
This is one of the questions I get most often from people building a home glute routine. Both exercises are done without equipment, both target the gluteus maximus, and both appear in the same beginner programs. The difference is in the angle of movement and the type of demand placed on the glute.
Donkey kicks train the glute in a prone position through hip extension with a fixed knee angle. The movement is small and controlled, which makes it excellent for isolation and mind-to-muscle connection.
Glute med exercises like the single-leg glute bridge also train hip extension but from a supine position, with the full weight of the body loading the glute differently. Glute bridges allow heavier loading potential over time and work more of the posterior chain in a single movement.
My recommendation: use both. Donkey kicks at the start of a session to establish glute activation and build the mind-to-muscle connection. Glute bridges or hip thrusts are a primary movement to load the glute more heavily. They complement each other rather than replace one another.
Safety Tips and Modifications
Donkey kicks should produce muscle fatigue, not joint pain. Sharp discomfort in the knee, lower back, hip, or wrist during this exercise is a signal to change something, not push through. These modifications address the most common physical barriers.
- Knee discomfort on the mat: Fold a yoga blanket or thick towel under the support knee. A thicker mat layer alone often resolves this completely.
- Wrist pain or weakness: Move to the standing donkey kick variation using a chair or wall for balance. The hip extension mechanics are identical. You lose nothing except floor pressure.
- Lower back taking over: Reduce the lift height until the lower back stays completely still. A lift where your thigh barely passes the height of your pelvis but your glute contracts clearly is doing more work than a high kick your lower back is driving.
- Hip impingement or clicking: Check that your working leg is moving straight back, not diagonally outward. A lateral drift increases impingement risk at the hip joint. If the clicking is painful, stop and consult a qualified clinician before continuing.
- Persistent pain after multiple sessions: Stop the exercise and seek guidance from a physical therapist or sports medicine provider. This movement is low-risk when done correctly, but pain that returns session after session points to something that needs professional evaluation.
Frequently Asked Questions About Donkey Kicks
What muscles do donkey kicks work?
Donkey kicks primarily work the gluteus maximus, the largest muscle in the body and the primary driver of hip extension. The gluteus medius and gluteus minimus assist with pelvic stability during the lift. The hamstrings contribute as secondary movers, particularly during slow, controlled reps. Your core, specifically the transverse abdominis and obliques, works continuously to prevent your lower back from arching. Your shoulder stabilizers and forearm muscles hold your base position throughout the set.
Are donkey kicks effective for building glutes?
Donkey kicks are effective for glute development when programmed correctly alongside heavier compound movements. A 2020 study in the International Journal of Medicine and Health Development found that six weeks of resistance training combining squats and donkey kicks produced measurable improvements in gluteal muscle characteristics in young adults. By themselves, donkey kicks are better classified as an activation and isolation tool rather than a primary mass-builder. They work best in combination with hip thrusts, deadlifts, or Bulgarian split squats where heavier progressive overload is possible.
How many donkey kicks should I do per day?
The number of donkey kicks that produces a training effect depends on your current fitness level and the resistance being used. For beginners, 2 to 3 sets of 10 to 12 reps per side with no added load is a productive starting point. For more trained individuals using ankle weights or a band, 3 to 4 sets of 12 to 15 reps per side with proper rest between sides generates enough stimulus for adaptation. Daily donkey kicks are unnecessary and can limit recovery, particularly when resistance is added. Two to three sessions per week with at least one rest day between is a more effective approach than daily training.
Can donkey kicks help reduce lower back pain?
Donkey kicks can support lower back health by strengthening the glutes and hip stabilizers, which reduces the demand placed on lumbar muscles during everyday movement. Weak glutes are one of the more common contributing factors to lower back overload, because when the glute cannot do its job during hip extension, the erector spinae and quadratus lumborum compensate. That said, donkey kicks should not be treated as a treatment for existing lower back pain. Anyone with active pain should get a clinical assessment before beginning any exercise program targeting that area.
Do donkey kicks burn fat or tone the glutes?
Donkey kicks do not burn significant calories in isolation, and no single exercise selectively reduces fat in a specific area. What they do is strengthen and develop the gluteus maximus, which contributes to the appearance of a more defined posterior when combined with appropriate overall training volume and nutrition. If toning the lower body is your main goal, pairing donkey kicks with a broader set of effective toning exercises produces far better results than relying on this movement alone. The “toning” effect most people associate with exercises like donkey kicks comes from both increased muscle development in the glutes and reduced overall body fat through a complete training program, not from the exercise alone.
Why can I only feel donkey kicks on one side?
Asymmetry in how donkey kicks feel is extremely common and usually reflects a genuine difference in glute activation, strength, or hip mobility between sides. In my experience, the side that feels less is almost always the weaker or less mobile one, and it typically corresponds to a dominant side compensation pattern during squats or lunges. Start every set on the weaker side, use a slightly slower tempo on that side, and focus on the quality of the glute squeeze rather than matching reps exactly. The gap closes with consistent practice over several weeks.
Should I do donkey kicks before or after squats?
As a general rule, donkey kicks work best before squats, deadlifts, or lunges as part of a glute activation warm-up. Performing 2 sets of 12 controlled reps per side before your main compound movements improves glute recruitment during those lifts, which both enhances performance and reduces the tendency to compensate with the lower back. When used as a workout finisher after compound lifts, they work well at higher rep ranges with shorter rest periods, capitalizing on already-fatigued glutes to increase training volume without heavy loading.
What is the difference between donkey kicks and fire hydrants?
Both exercises start in the tabletop position and target the glutes, but they train different movement patterns. Donkey kicks involve hip extension, moving the leg straight back. Fire hydrants involve hip abduction, moving the leg out to the side. Donkey kicks primarily target the gluteus maximus. Fire hydrants place more demand on the gluteus medius and minimus. Including both in a glute program ensures you are developing the hip extensors and hip abductors together, which is the combination most relevant to functional lower-body stability.
Final Thoughts
Hummus can fit into a low-carb routine when you treat it as a measured addition rather than a free-flowing dip. You’ve seen how its carbs add up quickly, why portion size matters, and how low-carb swaps can make things easier.
Understanding is hummus keto-friendly helps you decide when it belongs on your plate and when to skip it. That awareness keeps your daily carb budget steady without feeling overly restricted.
You can try smaller portions, test different dips, and see how your body responds across a normal day of eating. Share your experience or compare it with other keto-friendly dips to refine what works best for you in your routine today.
Sources
Orji, E.O., et al., “Effect of Resistance Training (Squats and Donkey Kick) on Gluteal Muscle Characteristics.” International Journal of Medicine and Health Development. 2020. https://doaj.org/article/75ef626ea8824f6e814e1eee7243a09e
National Strength and Conditioning Association (NSCA), “Resistance Training for the Gluteal Muscles.” https://www.nsca.com
Hinge Health, “How to Do Donkey Kicks.” 2025. https://www.hingehealth.com/resources/articles/donkey-kicks/