| Style | Hatha, Vinyasa, Restorative |
| Level | Beginner to All Levels |
| Duration | 30 seconds to 2 minutes per hold |
| Props Needed | Yoga mat, optional: yoga block, folded blanket |
| Best Time | Morning, after a desk session, or as a cool-down |
| Avoid If | Acute shoulder injury, wrist pain (use wall variation), late pregnancy (use wide-knee or wall version) |
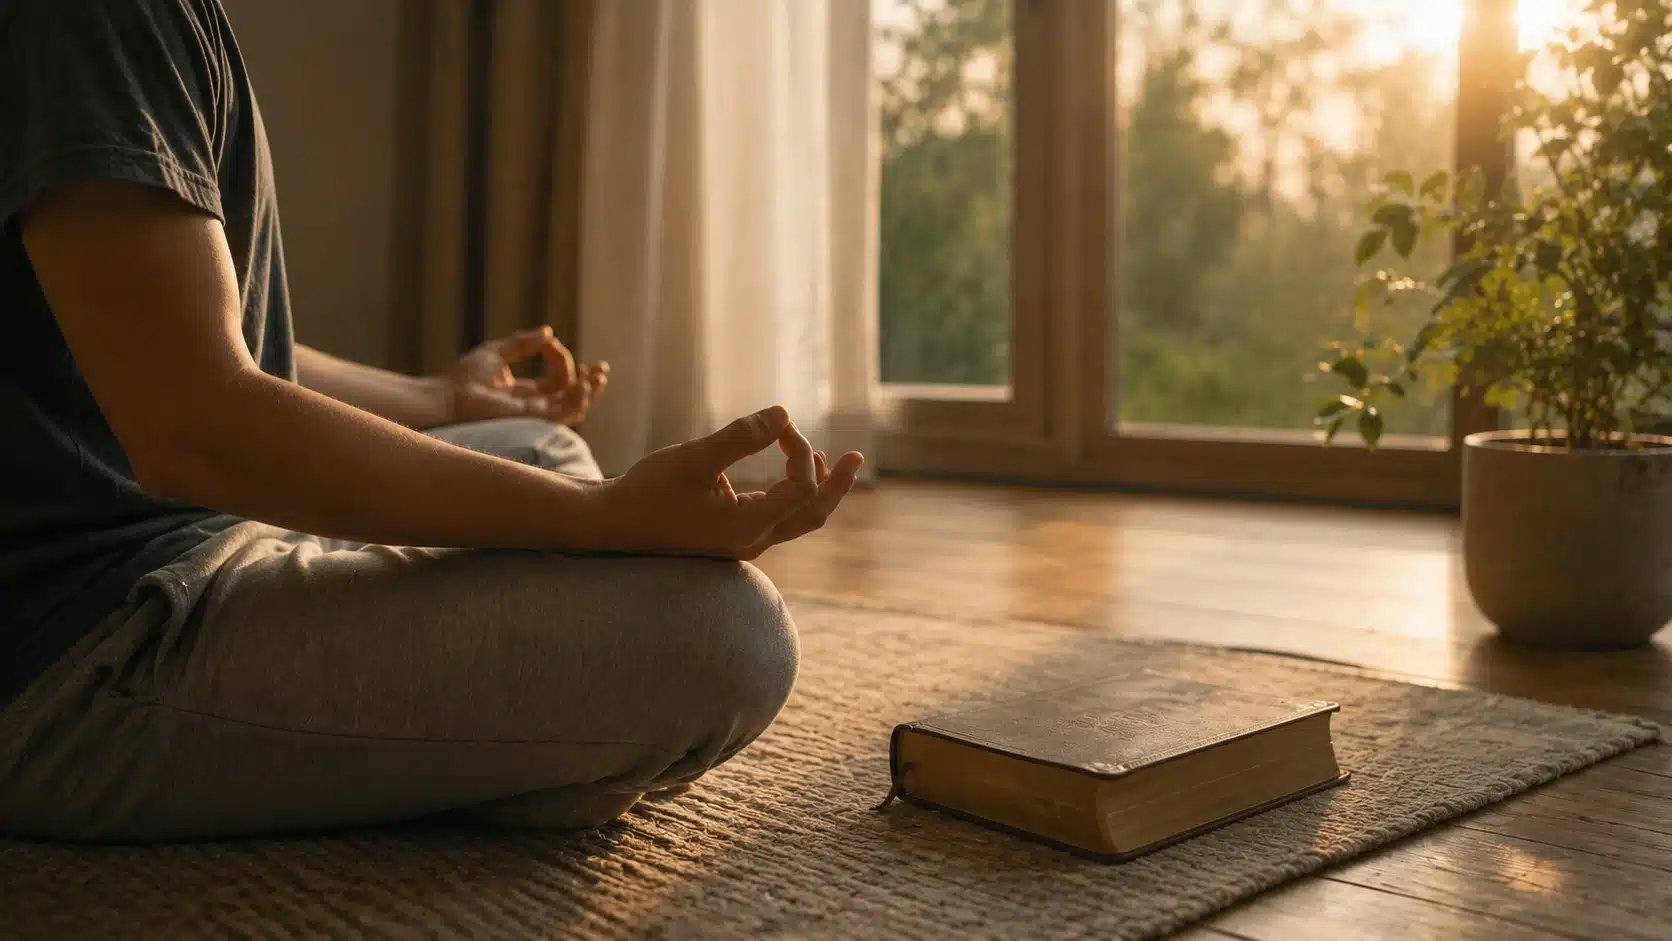
| Disclaimer: This article is for informational and educational purposes only. It does not constitute medical advice. Always consult a qualified healthcare provider before starting a new exercise, nutrition, or wellness program. |
I first taught puppy pose yoga to a student who had spent years hunching over a laptop and thought chest-opening poses were simply not for her body. Ten minutes after her first session with Uttana Shishosana, she looked up and said her shoulders felt wider.
That moment is why I keep coming back to this pose in my classes. Puppy pose yoga sits in a genuinely useful middle ground: it gives you the deep shoulder and chest opening of Downward Dog, with the steady, grounded feeling of Child’s Pose, all from your knees on the mat.
In this guide, you will learn how to do puppy pose correctly, the specific benefits it creates in the thoracic spine and shoulders, how to adjust it with props, and how to build it into your regular practice.
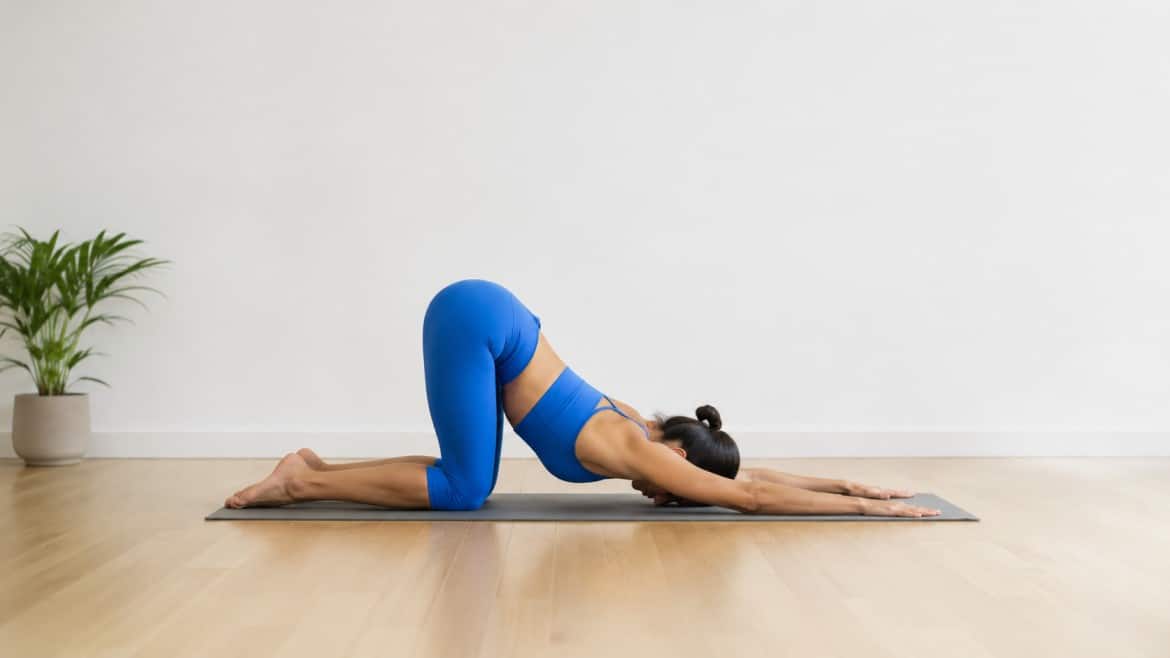
What is Puppy Pose Yoga (Uttana Shishosana)?
Puppy pose yoga, known in Sanskrit as Uttana Shishosana, is a kneeling pose that gently opens the chest, shoulders, upper back, and spine. The name combines three words: Uttana (intense stretch), Shisho (puppy), and Asana (pose). Together they describe the shape of a puppy stretching forward with its chest toward the floor, tail lifted, and arms extended, which is almost exactly what your body does in the pose.
It is also widely called Melting Heart Pose, or Anahatasana in some traditions, because the chest softens toward the mat in a way that mirrors the heart opening. The thoracic spine, the section of your back that runs between the shoulder blades, is the primary area of movement. Most spinal stiffness from sitting accumulates here, which is why so many students feel an immediate sense of relief when they settle into this pose correctly.
Puppy pose is commonly practiced in Hatha, Vinyasa, and Restorative yoga as a shoulder-opening transition, a warm-up before deeper backbends, or a cooling pose at the end of class.
Because the knees stay on the mat throughout, it is accessible to a wide range of bodies, including beginners, those recovering from mild shoulder tightness, and students who find full Downward Dog uncomfortable. If you are already working on heart opening yoga poses, Uttana Shishosana is one of the best places to start before progressing to deeper chest openers.
Benefits of Puppy Pose Yoga
The benefits of puppy pose come from its combination of active arm reach and passive chest release. Because the hips stay stacked above the knees while the chest and arms drop toward the floor, the thoracic spine is placed into a gentle extension that most seated positions never allow. Held for even five to ten slow breaths, this position begins to reverse the forward rounding that builds up over hours of desk work or screen time.
These are the specific benefits I have seen consistently across different students and body types:
- Opens the thoracic spine: The thoracic region, which spans roughly from mid-back to just below the neck, is the area most restricted by prolonged sitting. Puppy pose places this section into gentle extension without compressing the lumbar spine, which makes it one of the more targeted mid-back stretches available at the beginner level.
- Stretches the shoulders and chest: The combination of arms reaching forward and chest dropping toward the mat creates a long, diagonal stretch through the anterior deltoids, pectorals, and the muscles between the shoulder blades. Students who carry chronic tightness in these areas from typing or driving often feel this stretch most strongly on their first hold.
- Lengthens the latissimus dorsi and triceps: The lats run from the mid-back down to the hip and are typically shortened by poor posture. With the arms extended overhead in puppy pose, these muscles receive a passive stretch that is difficult to achieve in most standing or seated exercises.
- Supports deeper breathing: As the chest opens, the intercostal muscles around the ribs gain more room to expand. Students often notice they can take a fuller inhale in puppy pose than in standing positions because the anterior chest is no longer compressed.
- Calms the nervous system: The grounded position, with knees, hands, and forehead all connected to the mat, activates a sense of physical stability that helps settle the nervous system. In my classes, I use puppy pose during transitions between more demanding sequences for exactly this effect.
- Prepares the body for deeper backbends: Baby Cobra, Camel, Wheel, and Bridge all require the chest and shoulders to be open and the thoracic spine to move freely. Puppy pose is the warm-up I consistently choose before any of these. If you are working toward camel pose, starting with a few rounds of puppy pose will make the deeper bend feel significantly more accessible.
| Instructor Tip: In my experience, the students who get the most from puppy pose are those who stop trying to press their chest all the way to the floor. The stretch happens in the mid-range, not at the end of the range. Settle about halfway down, breathe into your upper back, and let your shoulders release gradually over several breaths. |
Puppy Pose Yoga: Step-by-Step Guide for Beginners
When I introduce puppy pose to new students, I always say the same thing: go slower than you think you need to. The shape looks simple, but the shoulder and chest stretch can feel strong within the first two breaths, especially for anyone who carries tension from a desk job or phone use. Have a block, blanket, or pillow nearby before you begin so you can adjust without stopping mid-hold.
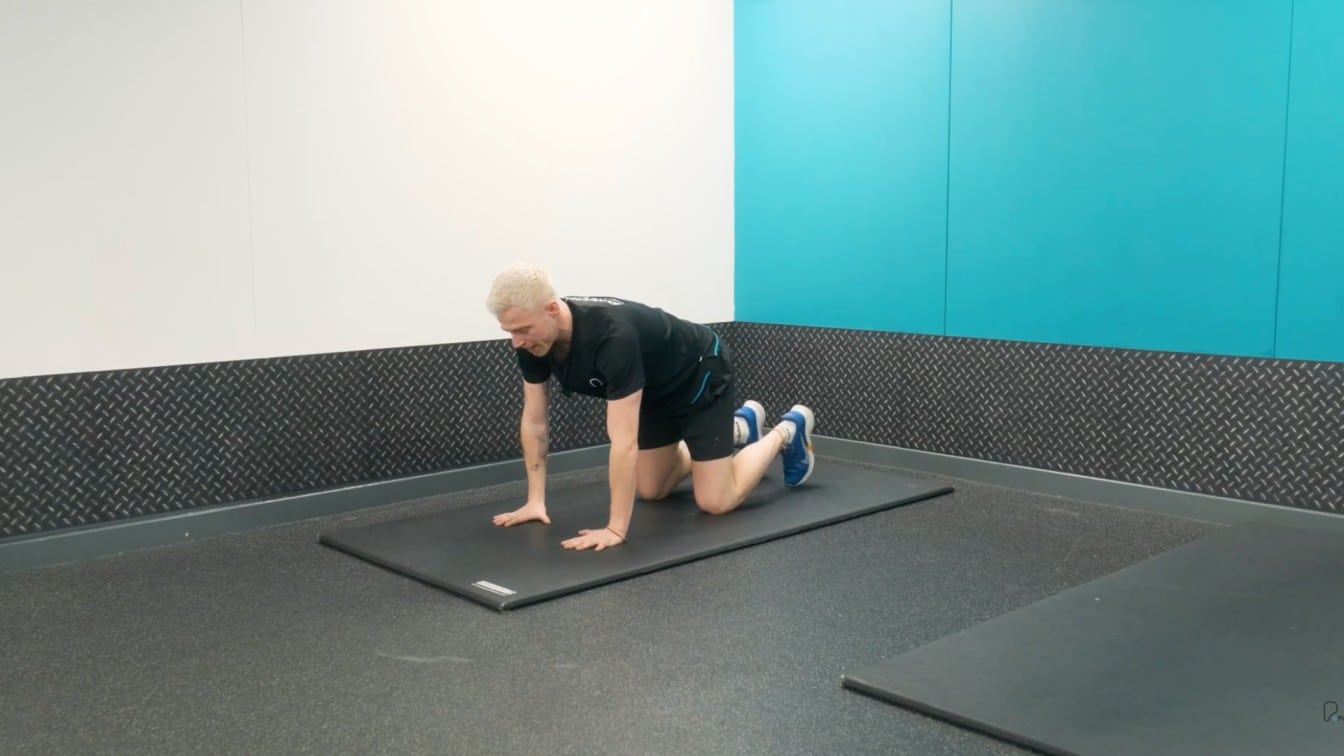
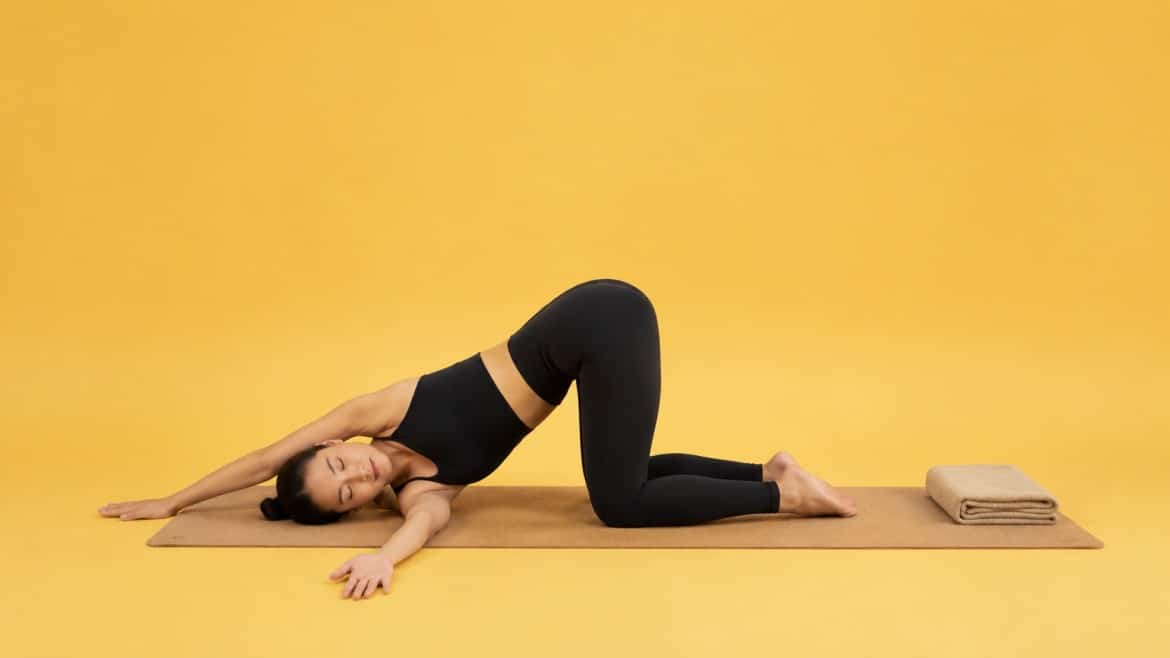
Step 1: Start on Hands and Knees
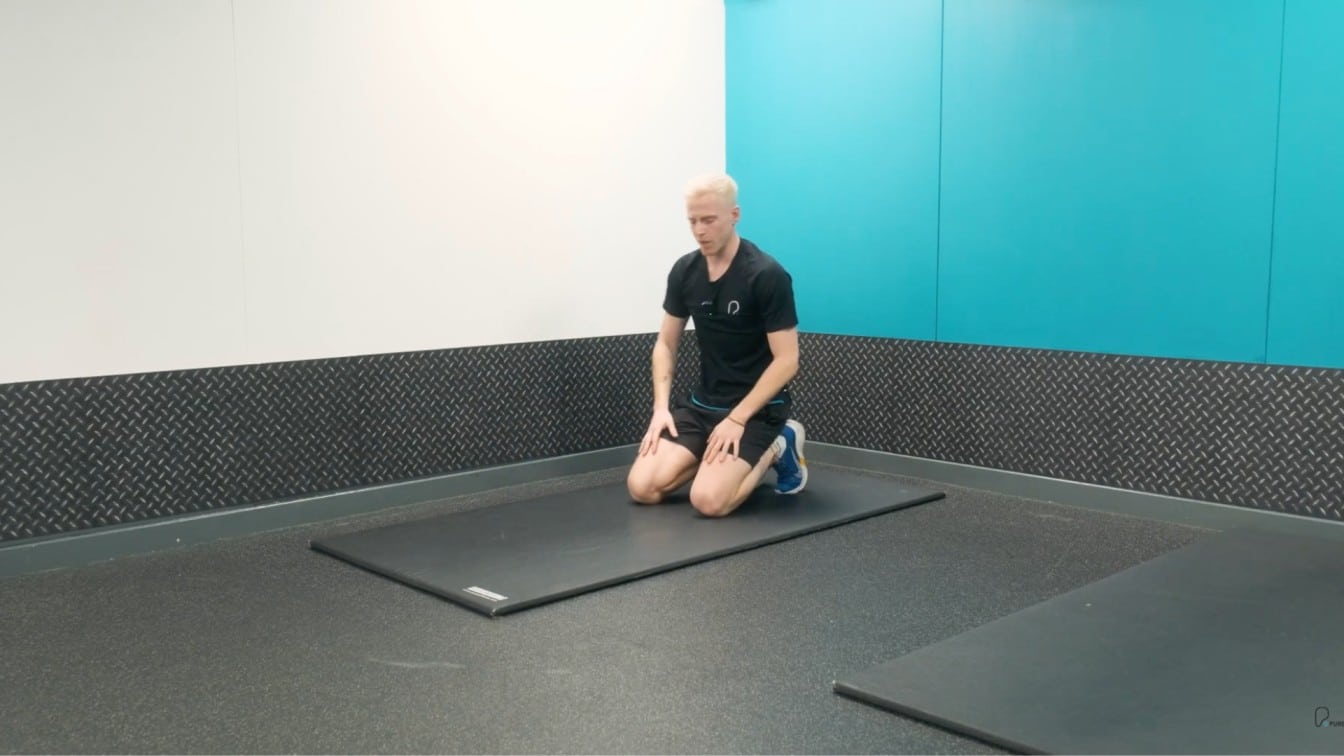
Come to a tabletop position on your mat with your hands under your shoulders and your knees under your hips. Spread your fingers wide so your hands feel steady, with your middle fingers pointing forward.
Keep your back flat and your neck in a neutral position. Take one slow breath here. If the floor feels hard beneath your knees, fold a blanket underneath them before moving forward.
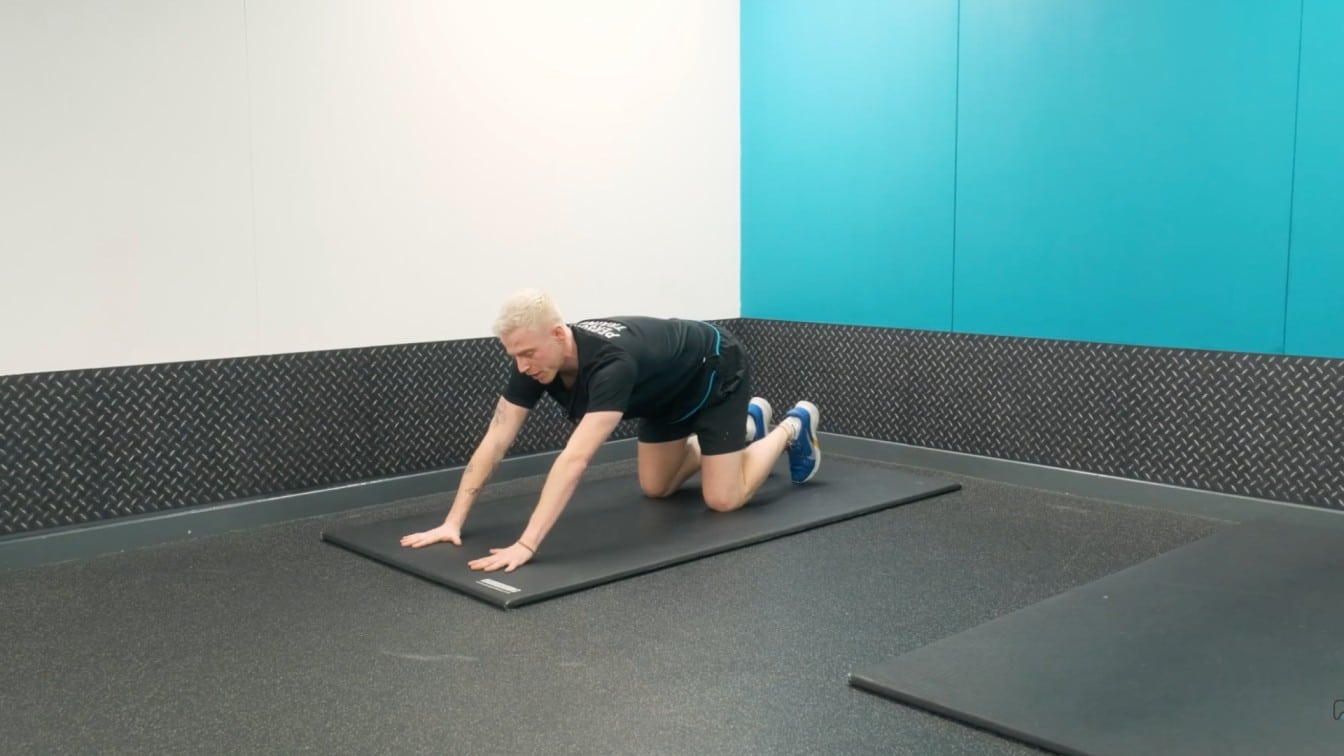
Step 2: Walk Your Hands Forward
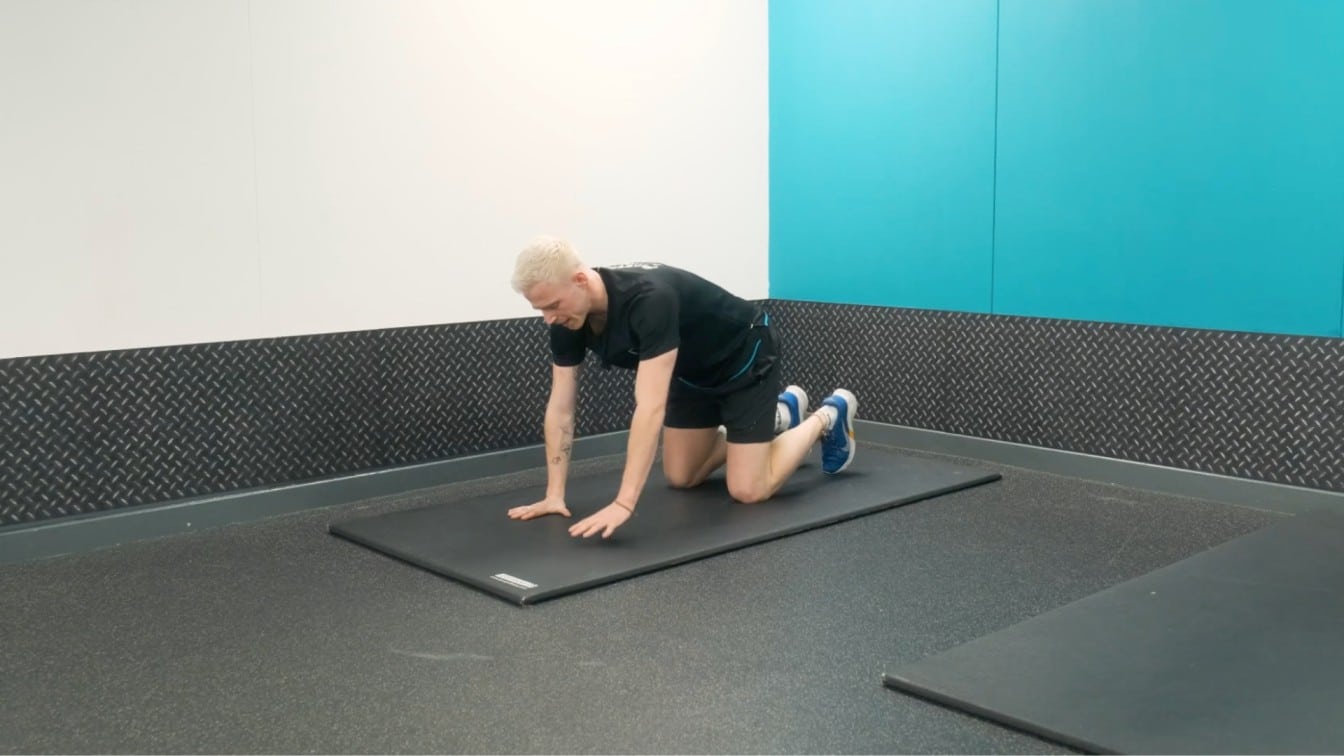
Begin to move both hands forward toward the top of the mat. Keep your palms flat and your fingers spread. Move a little at a time. As your hands travel forward, check that your elbows are soft rather than locked. Your arms should feel active but not effortful at this stage.
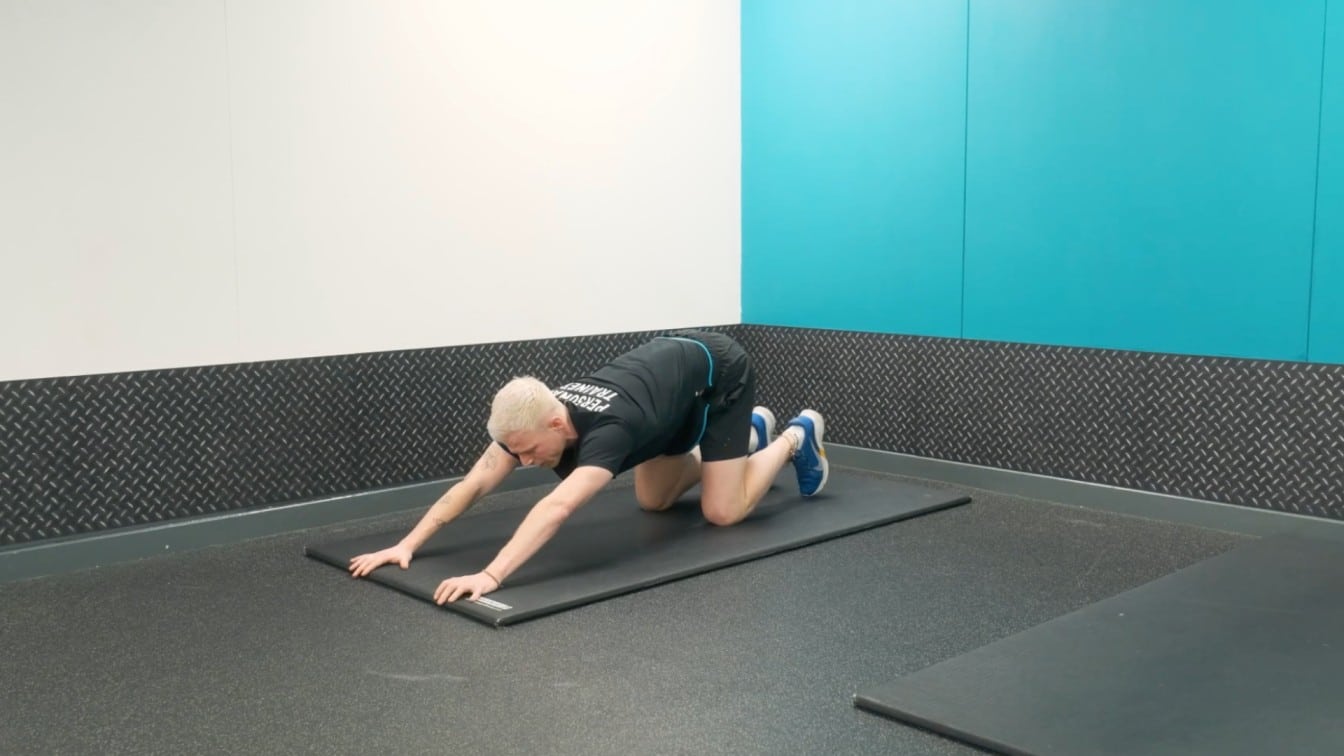
Step 3: Keep Your Hips Above Your Knees
This is the single most important alignment cue in the entire pose. As your arms extend forward, your hips must stay stacked above your knees. The moment your hips shift back toward your heels, you have moved into Child’s Pose.
Keeping the hips lifted is what creates the specific stretch through the chest, shoulders, and thoracic spine that makes puppy pose distinct. Glance down at your knees if needed to confirm they are still directly beneath your hip points.
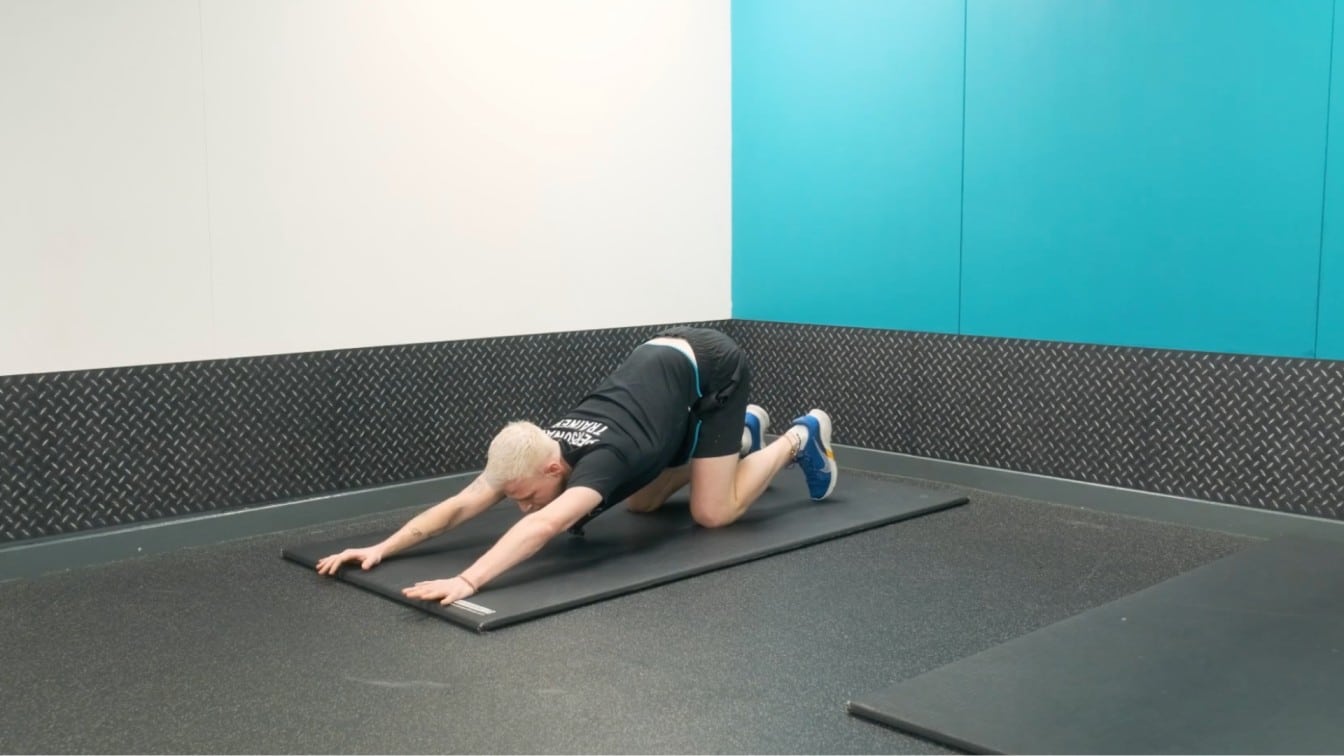
Step 4: Lower Your Chest Gently
With your hips held above your knees and your arms extended, let your chest begin to drop toward the mat. Do not push or force this movement. Simply allow the weight of your upper body to descend as you exhale.
You will feel the stretch across your chest, shoulders, and upper back, and possibly along the sides of your ribs. If the stretch feels sharp at any point, ease back a few centimeters. Keep your belly soft and avoid collapsing into your lower back.
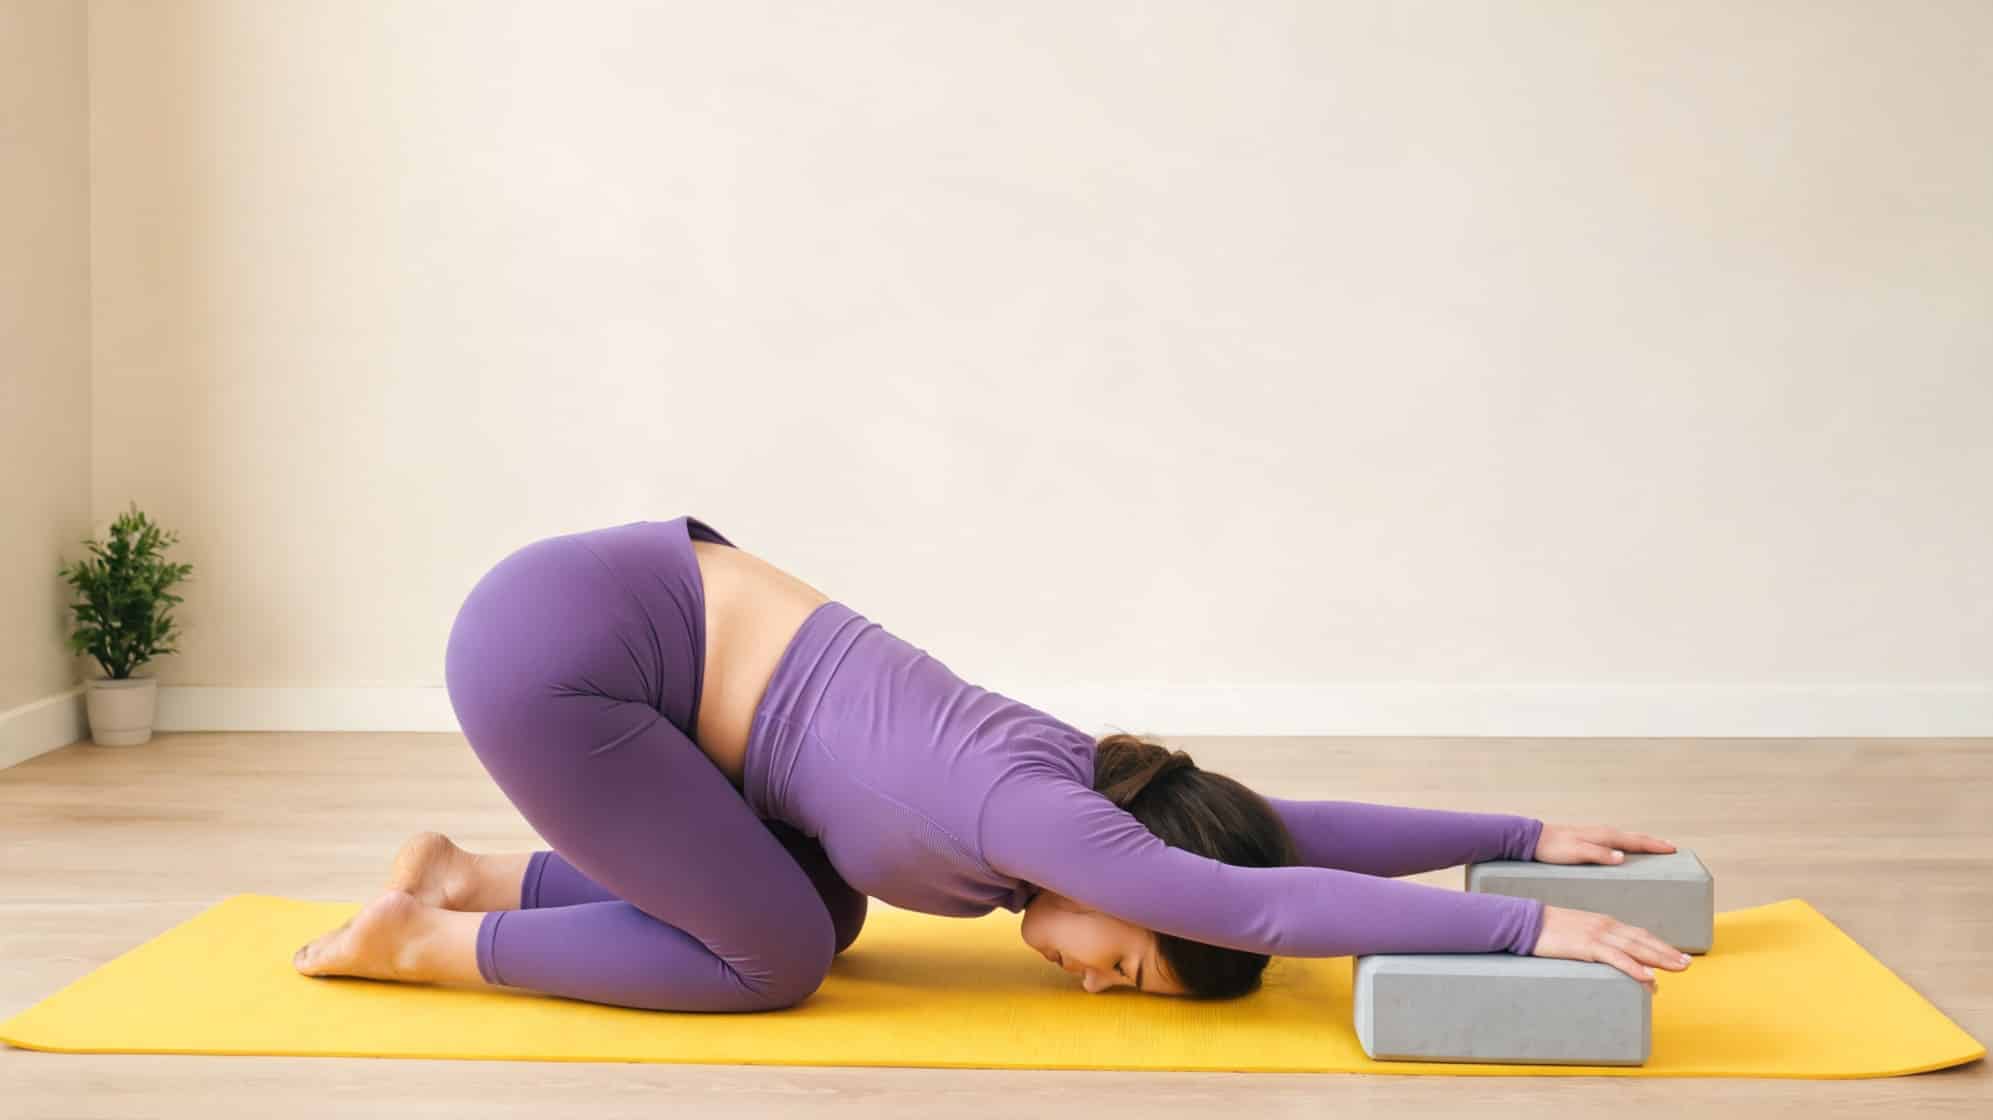
Step 5: Rest Your Head
Let your forehead come to the mat if it reaches comfortably. This is the preferred position for beginners because it allows the neck to relax fully. If your forehead does not reach, place a yoga block, folded blanket, or pillow beneath your head.
Avoid letting your head hang unsupported in the air, which creates strain in the neck. Some experienced students choose to lower the chin instead, which increases the chest stretch slightly, but forehead-down is the right starting point for most people.
Step 6: Breathe and Hold
Stay in the pose for three to ten slow breaths. Inhale through your nose and feel your upper back and ribs expand. As you exhale, let your chest soften a little more. Do not force your body lower with each breath; let the release happen naturally.
Keep your hands pressing gently into the mat, your arms active, and your hips lifted. Relax your face, jaw, and the muscles around your eyes.
Lift your chest gently. Return to your tabletop position and take one slow breath before moving on. Your shoulders and upper back may feel stretched, which is normal.
For more details, refer to the video below.
How to Warm Up for Puppy Pose
Puppy pose feels significantly more comfortable when the shoulders, thoracic spine, and upper back are already mobile. Entering the stretch cold often means the chest stops short, the shoulders tighten defensively, or the lower back absorbs pressure it should not. A five-to-ten-minute warm-up changes this.
After teaching this sequence to beginner classes for several years, I find that students who do it consistently need far fewer modifications in the main pose.
- Cat-Cow Pose (5 to 8 rounds): Start on hands and knees. Round your back on the exhale and lift your chest gently on the inhale. This warms the entire spine and helps the thoracic region begin to move freely before the longer hold in puppy pose.
- Child’s Pose (5 breaths): Sit your hips back toward your heels and stretch your arms forward. This opens the back, hips, and shoulders while helping your body settle and your breath slow down.
- Thread the Needle (5 breaths each side): From hands and knees, slide one arm under the other and let your shoulder move toward the mat. This rotation opens the upper back and rotator cuff area, both heavily engaged in puppy pose.
- Downward Facing Dog (5 breaths): Press your palms into the mat and lift your hips. This activates the shoulders, arms, and back before you move into the deeper chest stretch.
- Sphinx Pose (5 breaths): Lie on your belly and place your forearms on the mat. Gently lift your chest. Sphinx is a mild thoracic extension and signals to the spine that deeper chest opening is coming.
- Tabletop Shoulder Circles (5 rounds each direction): Return to hands and knees and slowly circle your shoulders over your wrists in both directions. This warms the shoulder joints and wrists so they are ready to bear weight in the pose.
After this sequence, most students enter puppy pose with noticeably more ease. The shoulders are warm, the thoracic spine has been asked to move in multiple directions, and the breath is already slower and more intentional.
How Long Should You Hold Puppy Pose?
One of the most common questions in my classes is about hold time, and the answer depends on your goal. For general shoulder and chest release, holding for five to ten slow breaths is usually enough to feel the stretch without straining. That typically works out to about 30 seconds to a minute.
In Yin or Restorative practice, you can extend the hold to two to three minutes, using a block under the forehead and a blanket under the knees to fully support the body. In these longer holds, the goal shifts from active stretching to passive tissue release, which requires more support rather than more effort.
For beginners, start at three to five breaths and build gradually over several sessions. The key signal is the breath: if you cannot breathe slowly and evenly, the hold is either too deep or too long. Ease out slightly and use props before increasing duration.
Puppy Pose Alignment Cues
Small alignment changes make a significant difference in both the safety and effectiveness of puppy pose. The cues below are the ones I return to most often in class, because they are the ones students most frequently lose when they are focused on the sensation rather than the structure.
- Hips stay above knees throughout. This is not just a starting cue; check every few breaths that your hips have not crept back.
- Spread your fingers wide and press both palms evenly into the mat. Uneven hand pressure tends to create uneven shoulder loading.
- Keep a micro-bend in your elbows. Locked elbows transfer force directly into the joint rather than distributing it through the arm muscles.
- Think of lengthening forward through your arms rather than collapsing downward through your chest. The stretch should feel long, not compressed.
- Rest your forehead, not your chin, on the mat or a support. Chin-down position increases the chest stretch but creates more pressure in the cervical spine.
- Keep your arms active, meaning engaged, not rigid. Your hands should be pressing gently into the mat throughout the hold to keep the shoulders stable.
- Draw your lower ribs softly inward. This gentle engagement prevents the lumbar spine from excessively arching, which is the most common reason students feel lower back discomfort in this pose.
Puppy Pose Variations and Modifications
Variations are not shortcuts. They are the way the pose actually works for more people in more situations. In my classes, I teach modifications as the default starting point, not as an afterthought. The five versions below each serve a specific purpose, and choosing the right one for your body on a given day is good practice, not compromise.
1. Puppy Pose with Bent Elbows (Supported on Blocks)
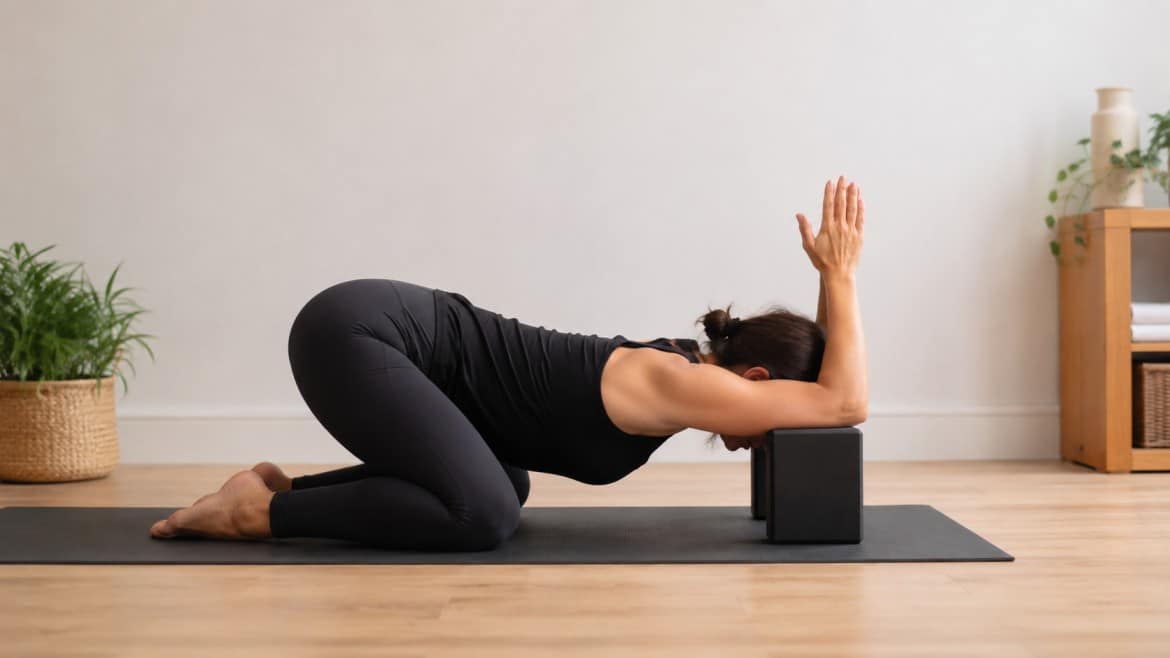
This version reduces the demand on the shoulder joint by shortening the lever arm of the arm. From the standard puppy pose position, bend your elbows and place them on the mat or on yoga blocks. Keep your hips above your knees and let your chest soften gently. The stretch still reaches the thoracic spine and chest but with significantly less intensity at the shoulder.
Goal: Gentler shoulder stretch with reduced shoulder load.
Best for: Mild shoulder discomfort, very tight shoulders, first attempts at the pose.
2. Puppy Pose with a Blanket Under the Knees
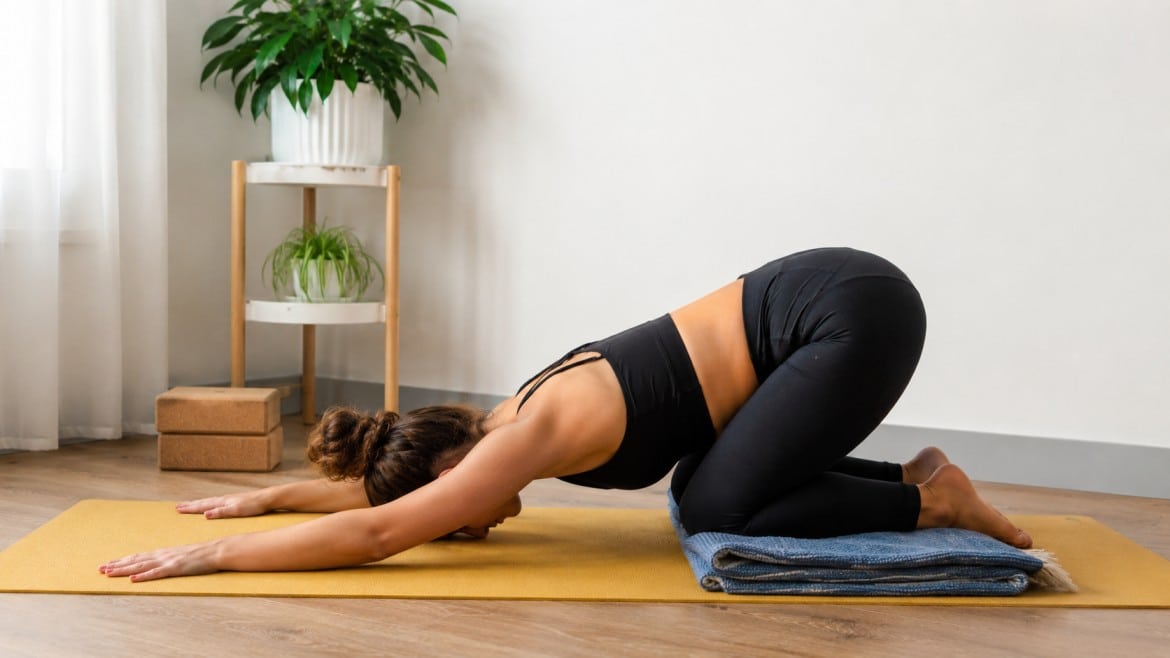
This is a straightforward comfort modification that lets you focus on the upper body work rather than knee sensation. Fold a blanket and place it beneath both knees before entering the pose. Keep your knees hip-width apart and your hips stacked above them. The rest of the alignment remains the same.
Goal: Increased lower-body comfort without changing the upper-body stretch.
Best for: Sensitive knees, hard floors, beginners, and longer holds.
3. Puppy Pose at the Wall
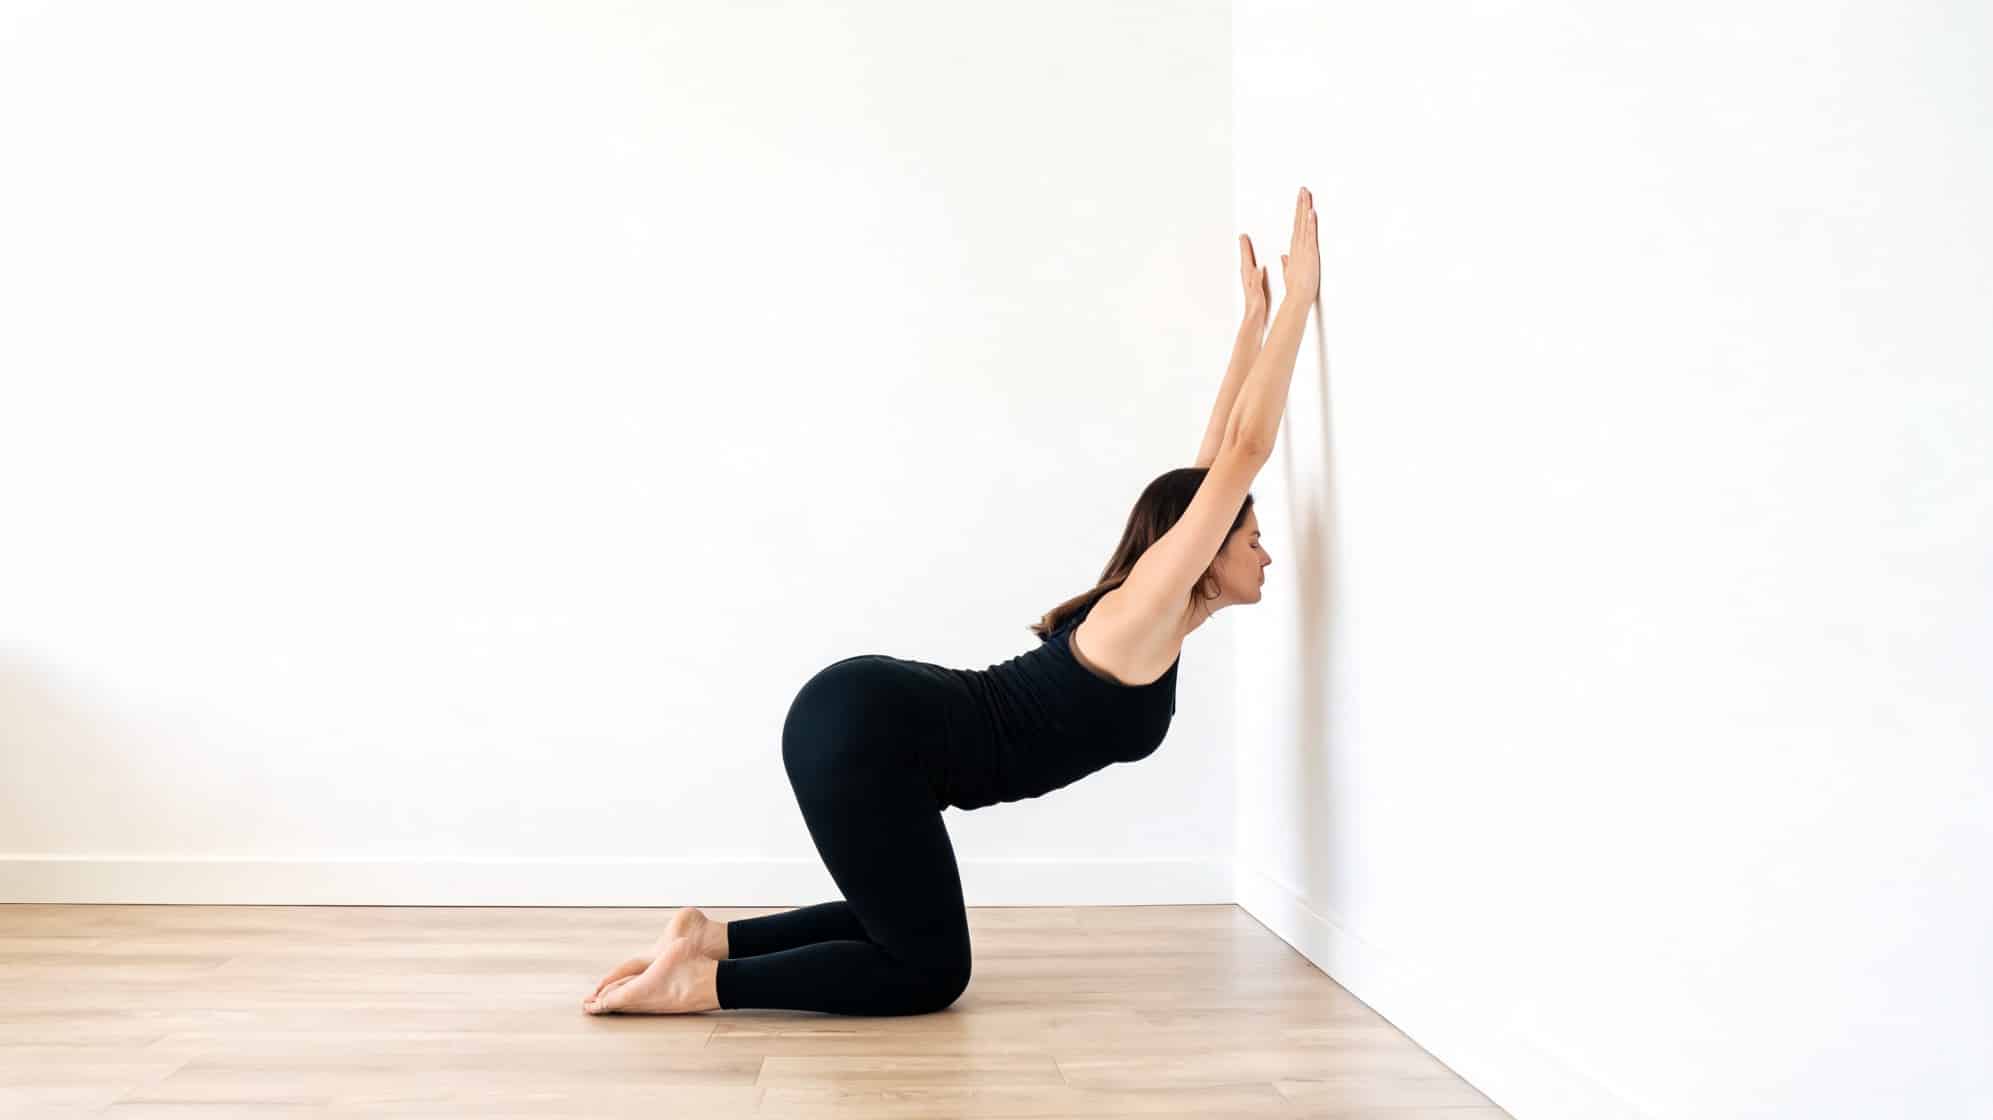
The wall version keeps you upright and removes all pressure from the wrists, knees, and floor-level shoulders. Stand facing a wall and place your palms on it at about chest height. Step your feet back and hinge forward from the hips until your arms are extended and your chest begins to move toward the wall. Keep your spine long and a soft bend in your knees. I use this variation regularly with students managing shoulder pain, returning to practice after injury, or navigating later stages of pregnancy.
Goal: Upright shoulder and chest opening with full body support.
Best for: Wrist pain, pregnancy, balance limitations, or returning from shoulder injury.
4. Puppy Pose with Hands on Blocks
Placing blocks under the hands elevates the arms and intensifies the stretch through the shoulders and chest. This is appropriate for students comfortable in the standard pose who want to explore more depth. Place one block under each hand before walking them forward. Move into the shape slowly and be ready to lower the block height if the shoulders feel pinched.
Goal: Deeper shoulder and chest opening with greater range of motion.
Best for: Intermediate students with good shoulder mobility and comfort in the standard version.
5. Twisted Puppy Pose (Thread the Needle Variation)
This variation is often overlooked in beginner guides, but it is one of the most useful additions once the standard shape feels familiar. From your puppy pose position, thread your right arm under your left and allow your right shoulder to descend toward the mat. Your left arm can remain extended or bend at the elbow as needed. This adds a gentle spinal rotation on top of the chest and shoulder opening, directly targeting the area between the shoulder blades that holds a lot of accumulated tension. Hold for five breaths on each side, then return to centre before releasing.
Goal: Shoulder and upper-back rotation combined with the standard chest stretch.
Best for: Students comfortable in the base pose who want to address the inter-scapular area specifically.
How to Incorporate Puppy Pose Into Your Practice
Knowing how to do a pose is only part of the work. Knowing when and how often to include it is what turns a single stretch into a practice that actually changes how your body feels over time.
For most people, two to three sessions per week is a reasonable starting frequency for puppy pose. At this rate, the thoracic extension and shoulder stretch have time to accumulate benefit without overloading tissue that is still adapting to the range. Students who are working specifically on shoulder mobility can practice daily, using the gentler bent-elbow or wall variation on recovery days.
Within a yoga session, puppy pose works well in three different positions. As a warm-up, place it after Cat-Cow and before deeper backbends like Baby Cobra. As a transition, use it between demanding standing sequences as a grounding reset. As a cool-down, hold it for two to three minutes with full prop support to let the thoracic spine passively release after an active session.
Knowing which role it plays helps you decide how long to hold and whether props are needed. If you are unsure where yoga fits in your broader training schedule
Is Puppy Pose Yoga Beginner-Friendly?
Yes, puppy pose yoga can be beginner-friendly, but it will often feel stronger than it looks. The stretch through the thoracic spine, anterior deltoids, and chest can be quite direct for anyone whose shoulders are tight from desk work, driving, or phone use. Beginning students sometimes expect the pose to feel easy and are surprised by how much is happening in the upper back within the first few breaths.
The good news is that beginners do not need to reach the floor for the pose to work. A forehead resting on a block, a blanket under the knees, and arms that stop halfway down are all legitimate positions that deliver real stretch. Trying to force the pose deeper before the shoulders are ready is the most common beginner error, and it typically leads to neck strain or lower back discomfort.
If your shoulders feel locked, start with the bent-elbow variation or the wall version for two to three weeks before attempting hands-on-mat.
Most students find that after a few consistent sessions, the mid-range stretch that once felt intense begins to feel comfortable and even welcome. Improving overall flexibility through yoga strap stretches for beginners, alongside puppy pose, can help speed up that shoulder adaptation.
Puppy Pose vs. Child’s Pose and Downward Dog
Puppy pose sits between these two familiar shapes in terms of both effort and target area. Understanding the differences helps you choose the right pose for what your body actually needs on a given day rather than defaulting to the same option every time.
| Category | Puppy Pose | Child’s Pose | Downward Dog |
|---|---|---|---|
| Body position | Kneeling with hips lifted | Kneeling with hips back | Inverted V, toes and palms |
| Primary target | Thoracic spine, chest, shoulders | Lower back, hips, thighs | Hamstrings, calves, shoulders |
| Effort level | Gentle to moderate | Gentle | Moderate |
| Best for | Chest opening, desk tension | Rest and lower-back release | Full-body activation |
| Key cue | Hips over knees | Hips toward heels | Lengthen spine, press heels |
The clearest way I explain this in class: if your lower back needs rest, use Child’s Pose. If your whole body needs activation, use Downward Dog. If your chest and thoracic spine need opening and you want your knees on the mat, use puppy pose. All three are useful, and none replaces the others.
Who Should Avoid or Modify the Puppy Pose
I always prefer to catch discomfort early rather than wait for a student to push through something that should have been modified. If you feel a sharp sensation anywhere in the shoulders or neck, or if your lower back feels compressed rather than neutral, that is the moment to adjust rather than continue. Most people who report discomfort in puppy pose have either let their hips drift back, forced their chest too far down, or skipped the warm-up.
- Shoulder injury: Widen the arms, bend the elbows, or use the wall variation. Avoid reaching the arms fully overhead if you have an active rotator cuff issue.
- Neck pain: Rest your forehead on a block or folded blanket. Never force the chin down, and avoid any position that creates compression or tingling in the neck.
- Wrist pain: Use the forearm or wall version. Pressing palms flat into the mat loads the wrist into extension, which can aggravate existing wrist conditions.
- Knee pain: Place a folded blanket under both knees before entering the pose. This simple fix removes most knee discomfort without changing the stretch at all.
- Recent surgery: Obtain clearance from your surgeon or physiotherapist before attempting any pose that involves weight-bearing through the upper limbs or deep spinal movement.
- Late pregnancy: Use the wide-knee variation or the wall version. Lying prone or loading the wrists on the floor may be uncomfortable as the abdomen grows.
- Severe lower back pain: Avoid letting the chest drop too far. Use a block under the forehead and draw the lower ribs gently inward to keep the lumbar spine from overextending.
| Safety Note: Anyone with a diagnosed spinal condition, shoulder injury, or joint hypermobility should consult a healthcare provider or certified yoga teacher before practicing puppy pose yoga. If you experience sharp pain, numbness, or tingling at any point, come out of the pose immediately and seek guidance before trying again. |
Common Puppy Pose Mistakes and How to Fix Them
The mistakes below are not signs that someone is doing yoga badly. They are the natural defaults that happen when attention drifts or when someone is trying to go deeper than their current range allows. I see most of them in every beginner class, and a single alignment cue usually resolves them immediately.
| Mistake | Why It Happens | How to Fix It |
|---|---|---|
| Hips drift back toward heels | Gravity and habit pull the hips into Child’s Pose. | Check every few breaths. Hips directly above knees. |
| Shoulders feel pinched | Hands are too close together. | Move hands slightly wider than shoulder-width. |
| Lower back collapses | The chest drops too far, or the core is disengaged. | Draw lower ribs gently inward. Use a block under the forehead. |
| Neck feels strained | The head is unsupported, or the chin is forced down. | Rest your forehead on a block. Never force the chin to the mat. |
| Elbows lock out fully | Arms overextending, tensing the whole shoulder chain. | Keep a micro-bend in the elbow throughout the hold. |
| Breathing becomes shallow | The pose is too deep for the current shoulder mobility. | Back out slightly. The stretch should never interfere with the breath. |
If you recognize yourself in more than two of these patterns, the most effective fix is usually to use more support and go less deep rather than trying to correct everything at once. A block under the forehead and a blanket under the knees while you work on keeping the hips above the knees will resolve the majority of alignment issues within a few sessions.
Frequently Asked Questions
What muscles does the puppy pose stretch?
Puppy pose primarily stretches the anterior deltoids (front of the shoulder), the pectorals (chest), the triceps, the latissimus dorsi (the wide muscles of the mid-to-lower back), and the muscles of the thoracic spine and upper back. Secondary engagement includes the intercostal muscles around the ribs as the chest opens and the breath deepens. Students with tight lats from pulling or rowing movements often feel the pose most strongly along the sides of the back rather than in the chest.
How long should I hold puppy pose?
In an active yoga class, three to ten breaths, roughly 30 seconds to a minute, is the standard hold. In Yin or Restorative practice, the pose is often held for two to three minutes with full prop support under the forehead, knees, and sometimes the chest. For beginners, start at three to five breaths and build from there. The key indicator is the breath: if you cannot breathe slowly and steadily, the hold is either too deep or too long. Shorten it and use props before increasing duration.
Is puppy pose good for posture?
Yes. Puppy pose directly addresses the thoracic rounding that develops from prolonged sitting, screen use, and forward-facing activities. By placing the thoracic spine into gentle extension and stretching the anterior chest and shoulders, the pose counteracts the muscular shortening that contributes to a hunched upper back. Regular practice, two to three times per week over several weeks, tends to produce noticeable changes in how the upper back feels during daily activities. It works best as part of a broader posture-focused approach that includes strengthening the upper back muscles alongside the stretching work.
Is puppy pose the same as melting heart pose?
Yes, puppy pose and melting heart pose refer to the same shape. The Sanskrit name Uttana Shishosana is the most widely used term in Hatha and Vinyasa traditions. Melting Heart Pose, and sometimes Anahatasana, are names used more commonly in Yin yoga and some Restorative lineages. All three refer to the kneeling position with hips above knees, arms extended forward, and chest releasing toward the mat. The different names reflect different teaching traditions rather than different poses.
Can I do puppy pose every day?
Yes, for most people, puppy pose is safe to practice daily. Because it is a passive stretch rather than a loaded exercise, the recovery demand is low. On days when the shoulders feel fatigued or tender, use the bent-elbow or wall variation and reduce the hold time. Students who are working specifically on shoulder mobility and chest flexibility often benefit from daily practice over a six-to-eight-week period, after which they typically maintain with two to three sessions per week.
Can Marjaryasana help with scoliosis?
Marjaryasana, or Cat Pose, may help some people with scoliosis move the spine gently and reduce stiffness. Practice it slowly with Cow Pose and avoid forcing the back. Work with a trained yoga teacher or healthcare provider if you have pain or a diagnosed spinal condition.
Final Verdict
Reversing hours of desk slouching does not require a complicated fitness routine.
Consistently spending just a few minutes in puppy pose yoga will structuralize a beautiful release in your tight thoracic spine and open up your restricted chest muscles.
This gentle kneeling position acts as the ultimate antidote to modern daily habits, creating space in your upper body while calming your nervous system.
Remember to prioritize proper form by keeping your hips stacked high and utilizing props whenever your shoulders need extra breathing room.
Have you tried this pose yet, or do you prefer other variations for shoulder tension? Share your experiences or leave your questions in the comments below