
| Medical Clearance Required: Always consult your doctor or physical therapist before beginning any exercise program during injury recovery. Follow your weight-bearing restrictions exactly and stop immediately if any movement causes sharp pain, increased swelling, or sudden weakness in the injured area. |
| Exercise Type | Injury Recovery / Seated Strength |
| Muscles Targeted | Shoulders, chest, upper back, triceps, core (rectus abdominis, obliques), glutes |
| Difficulty | Beginner |
| Equipment | Sturdy chair, light dumbbells or water bottles, resistance band (optional) |
| Best For | Anyone on crutches with a lower leg or foot injury needing to stay active during recovery |
| Avoid If | The doctor has advised complete rest; any exercise causes sharp joint pain or increased swelling |
Can You Exercise While Using Crutches?
When I first had to think about staying active while using crutches, I honestly thought exercise was not possible. Walking alone feels exhausting, so working out sounds borderline reckless.
But after working through recovery with clients in similar situations, I learned that the right crutches workout can actually help keep your muscles strong, improve blood circulation, and support a smoother return to full activity. The key is choosing safe movements that keep all pressure off the injured leg.
Yes, you can exercise on crutches. Safe workouts during this period focus on three areas: upper body strength, core stability, and gentle circulation work for the legs. These keep your muscles active and your blood moving while the injury heals. I always tell people to start with seated or floor-based exercises where the injured leg can rest completely.
Avoid jumping, running, or any standing movement unless your doctor has explicitly cleared it. If any movement produces sharp pain, stop immediately. Move gently, stay safe, and keep your doctor’s weight-bearing instructions as the non-negotiable boundary.
Safety Rules Before Starting Any Crutches Workout
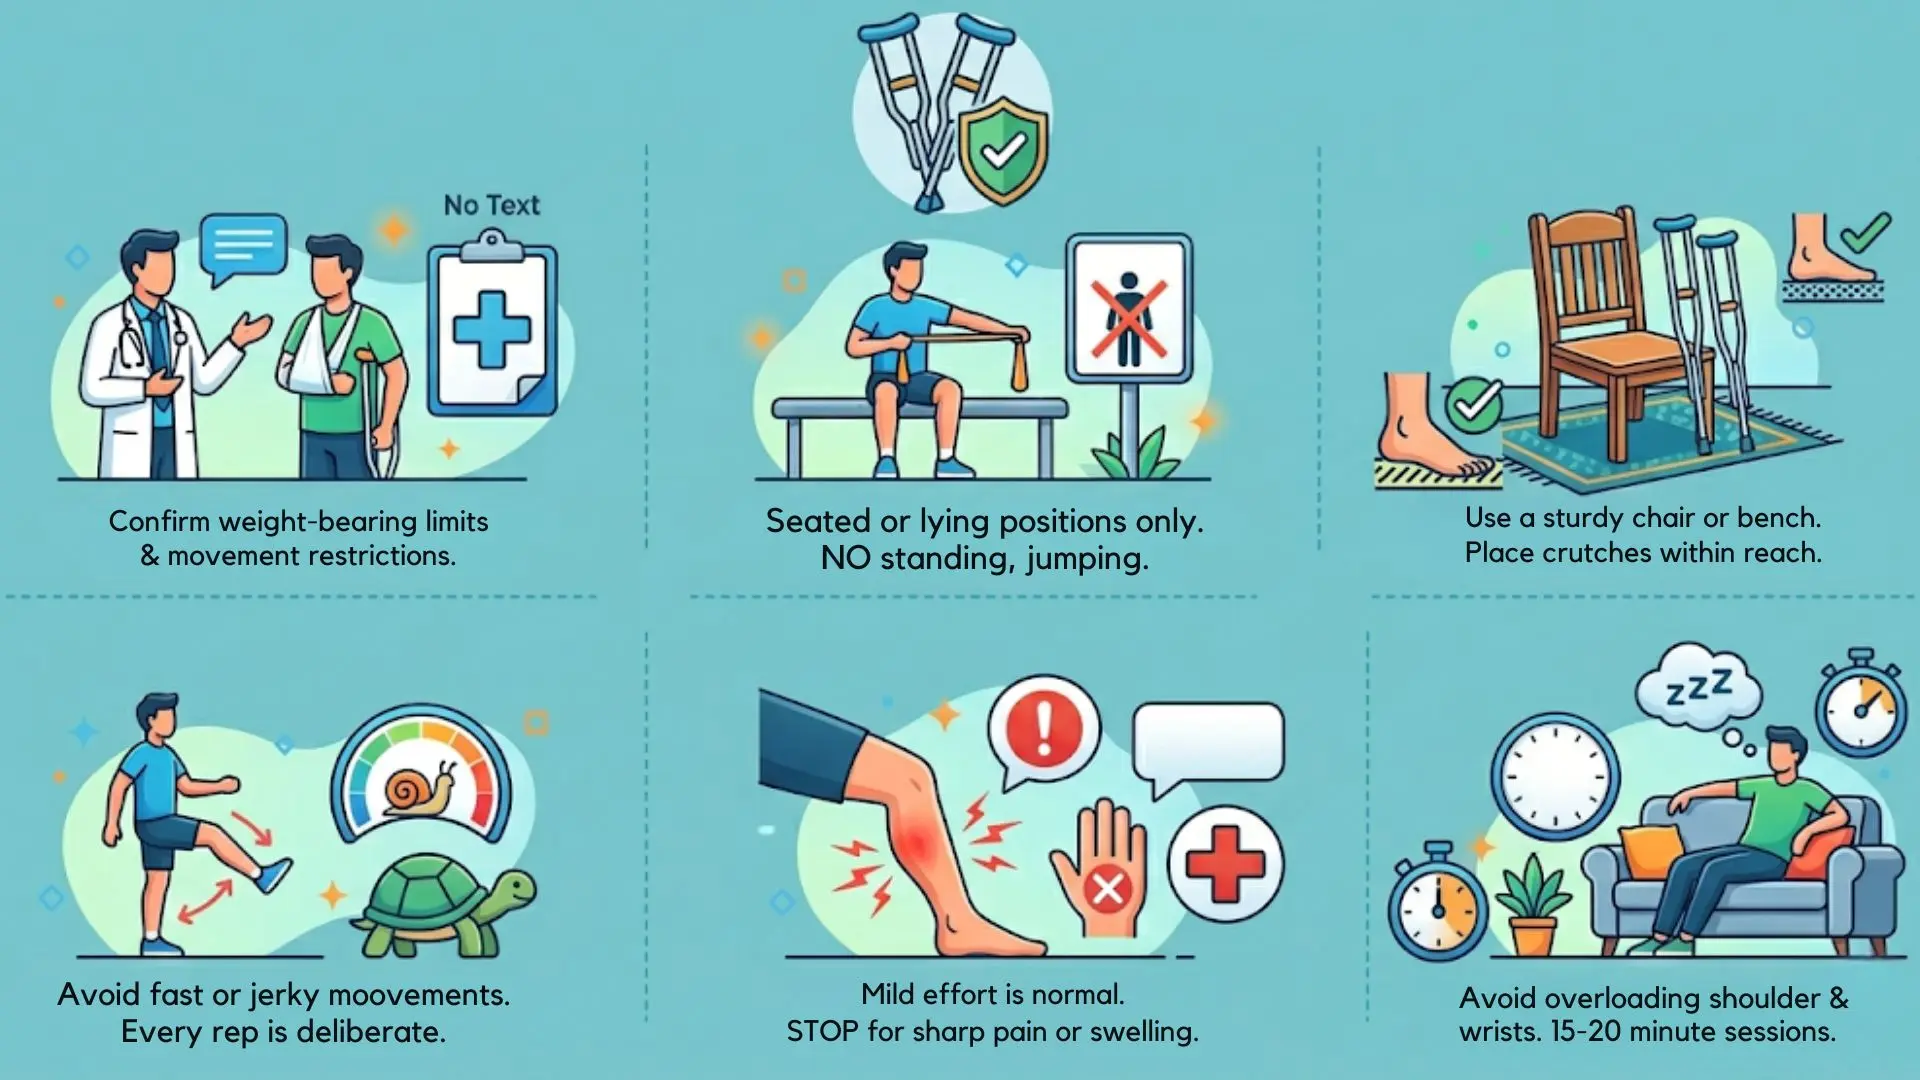
Before choosing a single exercise, these six rules need to be in place. Every rule here exists because I have seen what happens when it is skipped.
- Medical approval first: Confirm weight-bearing limits and movement restrictions with your doctor or physical therapist before starting any workout. What is safe varies significantly depending on whether you have a fracture, a soft tissue injury, or a post-surgical repair.
- Zero pressure on the injured leg: Every exercise in this guide is designed for seated or lying positions. Do not attempt standing movements, jumping, or directional changes unless your medical team has given explicit clearance for weight-bearing activity.
- Stable, non-slip surface: Use a sturdy chair or bench that will not slide. Place crutches within reach before you begin so you are never caught off-balance between positions.
- Slow and controlled only: Fast or jerky movement increases fall risk and can strain the injured area. Every rep should be deliberate. If you cannot control the movement, reduce the range or stop.
- Read your pain signals: Mild muscular effort is normal. Sharp pain, sudden joint weakness, or increased swelling after exercise are warning signs. Rest immediately and report to your provider before continuing.
- Short sessions, adequate rest: Crutch use already places daily strain on the shoulders, wrists, and hands. Overloading these same structures in a workout is a fast route to secondary injury. Keep sessions to 15 to 20 minutes and build gradually.
With those rules in place, here are the specific exercises that are safe to start with during crutch-assisted recovery.
Safe Crutches Workout Ideas to Stay Active During Recovery
These eleven exercises cover upper body strength, core activation, and gentle circulation. Each one is safe for most lower-leg injuries when weight-bearing restrictions are respected. Always confirm with your provider before adding any new movement.
1. Wall Push-Ups
Wall push-ups are one of the safest upper-body moves to start with during crutch recovery because they train the chest, shoulders, and triceps without adding pressure to the injured leg. They also help maintain pushing strength for daily tasks like getting up from a chair or moving around safely.
What makes this exercise useful is how easy it is to adjust. Standing closer to the wall makes it easier, while stepping farther back increases the challenge.
Step-by-step:
- Stand an arm’s length away from a wall.
- Keep your uninjured leg stable and use crutch support if needed.
- Place both palms flat on the wall at chest height.
- Brace your core and keep your body tall.
- Slowly bend your elbows and lower your chest toward the wall.
- Keep your shoulders relaxed and avoid arching your lower back.
- Push through your palms to return to the starting position.
- Perform 2 sets of 10 to 12 reps.
This is a good first-week exercise because it builds confidence without feeling risky. Stop if your balance feels unstable or your shoulders start to strain.
| Trainer Tip: Keep your core braced throughout each rep. Letting the lower back arch defeats the stabilization benefit and puts extra strain on the lumbar spine, which is already compensating for altered gait patterns during crutch use. |
2. Seated Shoulder Press
The seated shoulder press is especially helpful when you are using crutches because your shoulders and triceps are working harder than usual every day. Strengthening these muscles can make crutch walking feel less tiring over time.
This move also keeps your upper body active without needing to stand, making it a practical option when balance or weight-bearing is limited.
Step-by-step:
- Sit tall on a sturdy chair with your back straight.
- Keep your feet flat on the floor if medically allowed.
- Hold light dumbbells or water bottles at shoulder height.
- Keep your elbows slightly in front of your shoulders.
- Brace your core and avoid leaning backward.
- Press the weights overhead until your elbows are nearly straight.
- Lower the weights slowly back to shoulder height.
- Perform 3 sets of 10 reps with light resistance.
Start lighter than you think you need. The goal is steady shoulder strength, not fatigue that makes crutch use harder later in the day.
3. Resistance Band Rows
Resistance band rows are excellent for posture during crutch recovery. Crutches often pull the shoulders forward, and this exercise helps strengthen the upper back muscles that pull the shoulder blades back into a better position.
Rows also balance out pressing movements like wall push-ups and seated chest presses, which keep your upper body training more even. People who struggle with this forward-shoulder pattern between sessions often find that wall angels for posture work well alongside rows to reinforce the same upper back correction.
Step-by-step:
- Sit upright on a sturdy chair.
- Anchor a resistance band at chest height around a secure object.
- Hold one end of the band in each hand.
- Start with your arms extended in front of you.
- Keep your chest lifted and shoulders down.
- Pull both hands toward your lower ribs.
- Squeeze your shoulder blades together for 2 seconds.
- Slowly return your arms to the starting position.
- Perform 3 sets of 12 to 15 reps.
This is one of the best exercises to reduce rounded shoulders from crutch use. Keep the movement slow so your back works more than your arms.
4. Seated Chest Press
The seated chest press helps maintain pushing strength while your lower body is recovering. This matters because pushing movements are used often during recovery, especially when rising from a chair, shifting in bed, or moving on and off a couch.
Using a resistance band makes this exercise easier to control, while light dumbbells can work well if you have good seated balance.
Step-by-step:
- Sit tall on a sturdy chair.
- Hold light dumbbells or a resistance band at chest level.
- Keep your elbows bent and close to shoulder height.
- Brace your core and keep your back straight.
- Press your arms forward until they are fully extended.
- Avoid leaning your trunk forward as you press.
- Slowly return your hands to chest level.
- Perform 3 sets of 10 controlled reps.
Keep the movement smooth and controlled. If your shoulders feel tight, reduce the range or switch to a lighter band.
5. Gentle Arm Circles for Shoulder Mobility
Gentle arm circles are a simple way to keep your shoulders moving well during crutch use. They are not meant to build major strength, but they can reduce stiffness before upper-body exercises.
This move is especially helpful because crutches can make the front of the shoulders feel tight. Small circles help warm the joint without forcing the shoulder into a stressful position.
Step-by-step:
- Sit or stand tall in a stable position.
- Extend both arms out to the sides at shoulder height.
- Keep your shoulders relaxed and away from your ears.
- Make small, slow circles forward for 20 seconds.
- Keep your core lightly braced.
- Reverse the direction and circle backward for 20 seconds.
- Avoid large, fast circles that strain the shoulder joint.
- Repeat for 1 to 2 rounds before upper-body work.
Use this before rows, presses, or shadow boxing. If you feel pinching in the shoulder, make the circles smaller or stop.
6. Seated Torso Twists
Seated torso twists help keep your core and spine mobile while your lower body activity is limited. This can reduce the stiff, locked-up feeling that often comes from sitting more during recovery.
They also train the obliques, which help control your trunk while walking with crutches. Better trunk control can make movement feel steadier and less awkward.
Step-by-step:
- Sit upright on a sturdy chair.
- Keep your spine tall and shoulders relaxed.
- Cross your hands lightly over your chest.
- Brace your core gently.
- Slowly rotate your upper body to the right.
- Keep your hips facing forward as you twist.
- Return to the center with control.
- Rotate to the left and return to center.
- Perform 2 sets of 10 rotations per side.
Move slowly and stay within a comfortable range. This should feel like gentle core work, not a deep stretch in your lower back.
7. Chair Crunch Holds
Chair crunch holds are useful because they train the core without requiring leg movement or floor exercises. That makes them a good option when getting down to the floor is difficult or unsafe.
This is an isometric exercise, meaning you hold tension instead of moving through a big range. It helps keep the deep abdominal muscles active during recovery.
Step-by-step:
- Sit near the front of a sturdy chair.
- Lean back slightly without resting fully on the backrest.
- Keep your spine long and your chest lifted.
- Draw your lower abdomen inward.
- Hold the contraction for 5 seconds while breathing normally.
- Relax your core without slumping.
- Repeat each hold with slow control.
- Perform 3 sets of 10 five-second holds.
The key is breathing normally while holding tension. If you hold your breath, the exercise becomes less useful and more stressful.
8. One-Leg Glute Squeezes (If Medically Approved)
One-leg glute squeezes help keep the hip muscles active when walking and standing are limited. The glutes play a major role in balance, posture, and returning to normal walking after recovery.
This exercise looks small, but it can help prevent the inactive feeling that develops when one leg has been protected for several weeks.
Step-by-step:
- Sit on a chair or lie comfortably on your back.
- Keep your body relaxed and supported.
- Focus on the glute muscle of your uninjured side.
- Squeeze that glute firmly for 5 seconds.
- Keep your lower back relaxed during the hold.
- Release the contraction slowly.
- Repeat on the recovering side only if medically approved.
- Perform 2 to 3 sets of 10 holds per approved side.
Do not force the injured side if it has not been cleared for activation. Even training the uninjured side helps maintain some hip strength.
9. Supported Leg Raises for Circulation
Supported leg raises are mainly used to maintain gentle movement and circulation. During recovery, long periods of sitting can make the legs feel heavy or stiff, so approved movement can help.
This exercise should be done carefully because the wrong range or wrong leg may not be appropriate for every injury. Medical clearance matters here.
Step-by-step:
- Sit tall on a sturdy chair.
- Keep your hands on the chair for support.
- Slowly straighten and raise the approved leg forward.
- Lift only to a comfortable height.
- Keep the knee straight if allowed.
- Pause briefly at the top.
- Lower the leg slowly with control.
- Stop if you feel pressure, pain, or pulling near the injury.
- Perform 2 sets of 8 to 10 reps on the approved side.
Think of this as a circulation exercise, not a strength test. Smooth movement is more important than lifting the leg high.
10. Seated Knee Lifts
Seated knee lifts gently activate the hip flexors, lower abs, and thighs without placing body weight through the leg. They can help maintain coordination while normal walking is limited.
This move is simple, but it should still match your recovery stage. Some injuries allow knee lifting early, while others need more time.
Step-by-step:
- Sit upright on a sturdy chair.
- Keep your hands on the chair for balance.
- Brace your core gently.
- Slowly lift one knee toward your chest.
- Keep the movement small and controlled.
- Pause briefly at the top.
- Lower the foot back down slowly.
- Alternate sides only if both sides are medically approved.
- Perform 2 sets of 8 to 10 reps per approved side.
Keep the lift small at first. If the movement pulls near the injured area, stop and ask your provider before trying again.
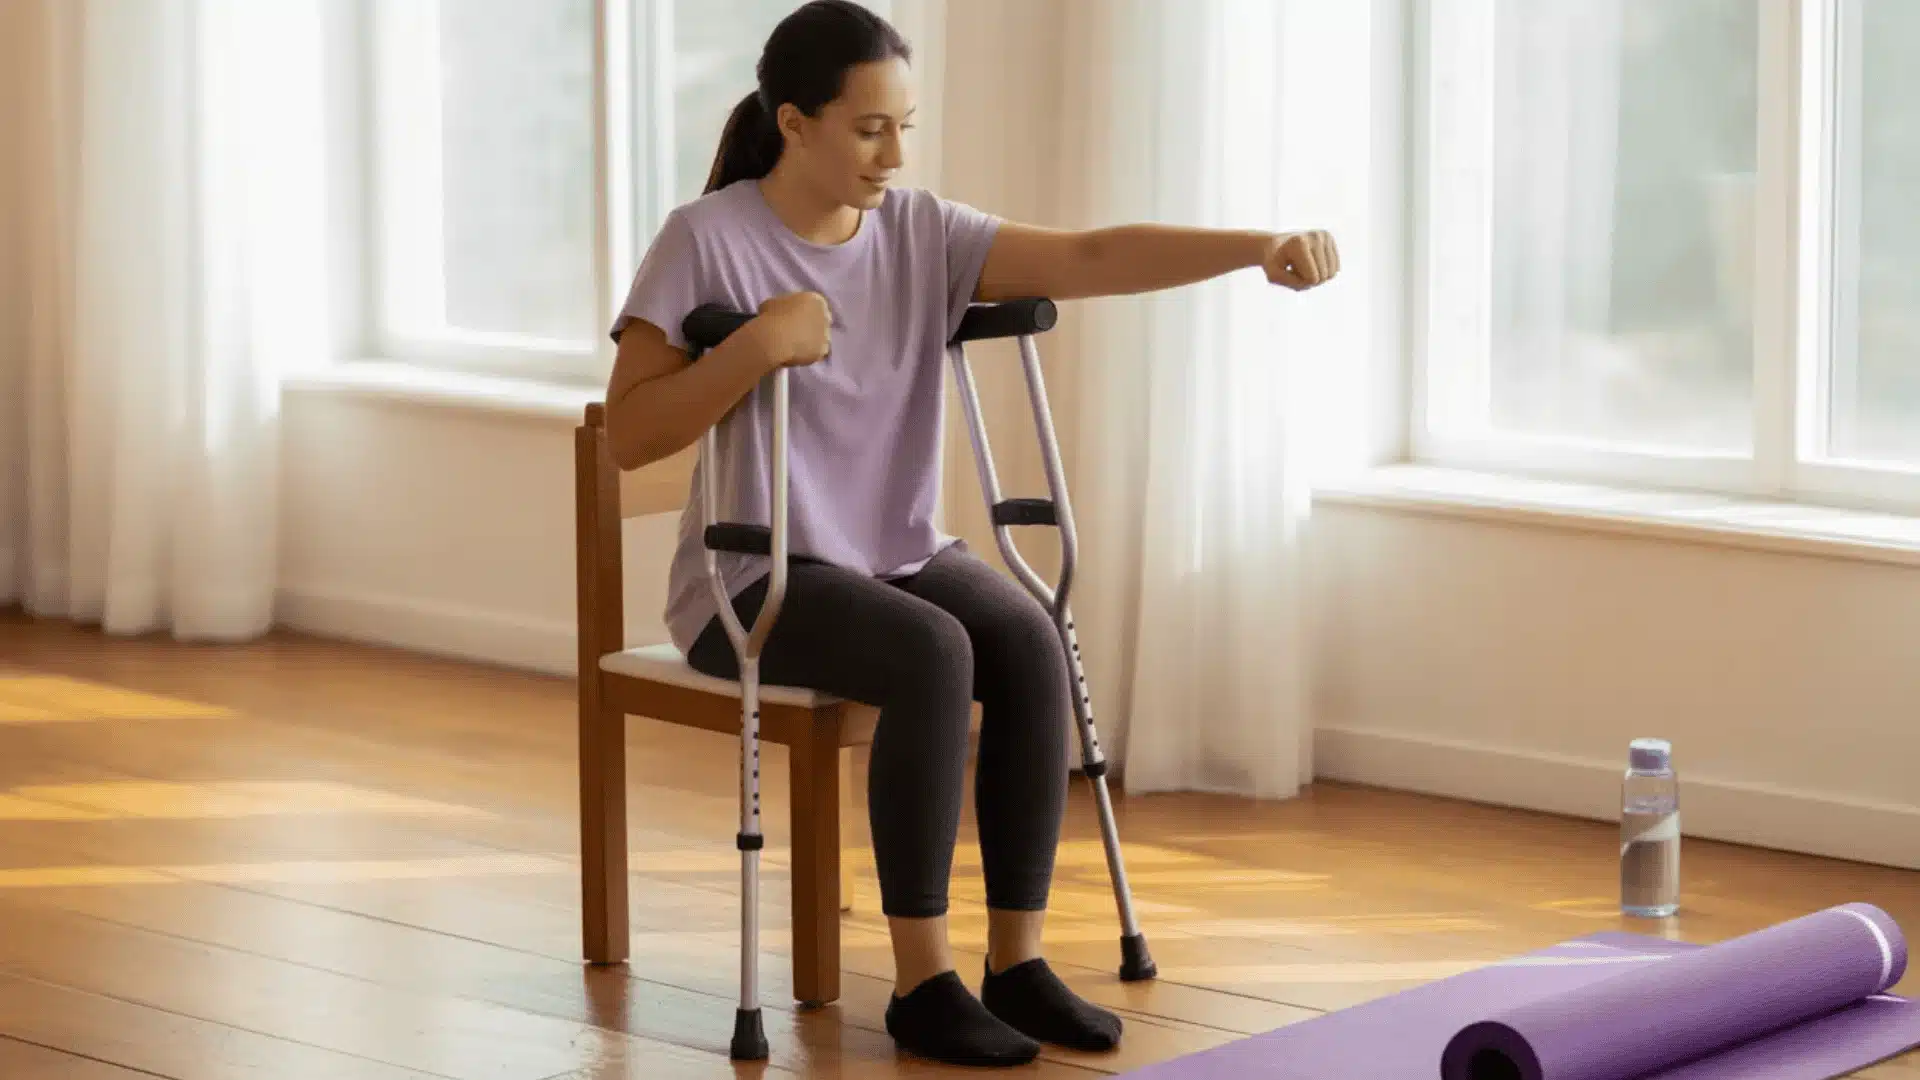
11. Seated Shadow Boxing
Seated shadow boxing is one of the more interesting crutches workout options because it adds a cardio element without standing. It trains the shoulders, chest, triceps, core, and coordination together.
It can also help with the frustration of being less active during recovery. A short round can raise your heart rate and make the workout feel more energizing.
Step-by-step:
- Sit tall on a sturdy chair.
- Keep your feet supported if medically allowed.
- Bring both hands up near your chest in a guard position.
- Brace your core lightly.
- Punch one arm forward with control.
- Bring that arm back before switching sides.
- Alternate right and left punches at a steady pace.
- Keep your shoulders relaxed and avoid twisting aggressively.
- Continue for 1 to 2 minutes at a moderate pace.
- Rest, then repeat for another round if tolerated.
Keep the punches controlled instead of fast and wild. The goal is safe movement, light conditioning, and stress relief during recovery.
What to Avoid During a Crutches Workout
Knowing what to skip is as important as knowing what to do. These are the movements I consistently see cause setbacks during crutch-assisted recovery.
- Standing barbell or dumbbell work: Any exercise requiring you to support a load while standing on one leg or using crutches for balance distributes force unpredictably and significantly increases fall risk.
- Plyometric or impact-based movements: Jumping, hopping, or any explosive movement is off the table entirely until full weight-bearing clearance is given and strength is rebuilt progressively.
- Heavy overhead pressing: Maximal loading of the shoulders during the same period that they are already under daily crutch strain risks rotator cuff impingement. Keep weights light throughout recovery.
- Machines requiring leg resistance: Leg press, leg curl, and leg extension machines should only be used when your physical therapist has introduced them as part of a supervised rehabilitation protocol.
- Any workout that produces next-day swelling: Post-exercise swelling in the injured area is a signal that the tissue is not ready for that load. Scale back and report to your provider.
Crutches Workout Progression: When to Advance
Recovery is not linear, but there are reliable indicators that you are ready to progress. These criteria apply to the workout itself, not to weight-bearing clearance, which always requires medical sign-off.
Beginner phase (weeks 1 to 2): Focus exclusively on arm circles, seated shoulder presses, resistance band rows, glute squeezes, and chair crunch holds. Sessions should last no longer than 15 minutes. If any exercise produces shoulder soreness lasting more than 24 hours, reduce the volume by half.
Intermediate phase (weeks 3 to 4): Add seated chest press, torso twists, and shadow boxing. Increase from 2 sets per exercise to 3 sets. Introduce light resistance bands if only bodyweight or water bottles were used initially. Understanding the right rep ranges for strength helps make these decisions more deliberate rather than guesswork as you move into higher-load sessions.
Criteria to advance from beginner to intermediate: Zero pain during or after each beginner-phase exercise for two consecutive sessions, no swelling or fatigue increase in the injured limb after workouts, and confirmation from your physical therapist that upper body conditioning is appropriate at this stage of your recovery.
Criteria to advance beyond this program entirely: Medical clearance for partial or full weight bearing, which shifts exercise selection into standing and functional movements that belong in a graduated rehabilitation program designed with your physical therapist.
Sample Weekly Crutches Workout Schedule
This schedule balances strength work, circulation days, and adequate rest. At no point should seven consecutive days of exercise be attempted during crutch-assisted recovery.
| Day | Focus | Recommended Activities | Duration |
|---|---|---|---|
| Day 1 | Upper body and core | Arm circles (warm-up), seated shoulder press, resistance band rows, chest press, chair crunch holds | 15 to 20 min |
| Day 2 | Rest or light mobility | Optional: slow arm circles, gentle seated stretching, deep breathing work | 5 to 10 min optional |
| Day 3 | Light strength | Two or three seated upper-body exercises, one core movement, longer rest breaks between sets | 15 to 20 min |
| Day 4 | Circulation focus | Supported leg raises (if approved), torso twists, glute squeezes, seated knee lifts (if approved) | 10 to 15 min |
| Day 5 | Short full routine | Arm circles, one pushing exercise, one pulling exercise, one core movement, shadow boxing | About 20 min |
| Weekend | Full rest or light stretch | Prioritize recovery. Very light stretching only if stiffness occurs. | As needed |
Following this structure over two to four weeks builds consistency without pushing the body beyond what the recovery phase allows. If any day feels like too much, skip the session and add an extra rest day. Progress is measured in weeks during injury recovery, not individual sessions.
Tips to Support Recovery and Maintain Fitness
The workout itself is only part of the picture. These four habits will make a measurable difference in how well your body responds to the exercise you are doing.
- Consistency over intensity: A 15-minute seated workout done four days per week beats an aggressive session done once. At this stage of recovery, frequency and adherence matter far more than effort level.
- Protein intake to preserve muscle: The body needs adequate protein to maintain muscle mass during a period of reduced activity. Aim for at least 1.2 g of protein per kilogram of body weight per day from sources like eggs, Greek yogurt, fish, poultry, legumes, or cottage cheese. Research published in the Journal of Cachexia, Sarcopenia and Muscle (2016) found that higher protein intake during immobilization significantly reduced muscle loss compared to standard intake. Knowing the signs of gaining muscle helps you track whether your nutrition and light training are actually doing their job during this period.
- Sleep as the primary recovery tool: Sleep gives the body time to repair itself. Growth hormone release, tissue repair, and inflammatory regulation all peak during deep sleep. Seven to nine hours per night is not a recommendation to consider; it is the primary recovery intervention available to you.
- Track the small wins: Reduced morning stiffness, an extra rep on the shoulder press, or easier crutch walking to the kitchen are all meaningful progress markers. Writing them down weekly keeps motivation calibrated to reality during a recovery that may feel slow day to day.
Frequently Asked Questions
Can I do core workouts while on crutches?
Yes, seated core workouts are often a safe option during crutch recovery if they do not involve leg pressure or twisting near the injured area. Chair crunch holds, seated torso twists, and gentle bracing can help maintain core strength. Always follow your provider’s limits.
How often should I do crutches workouts?
Most people do well with three to four short sessions per week. Keep workouts around 15 to 20 minutes and include rest days between harder sessions. Crutch use already strains the shoulders and wrists, so recovery time matters as much as the exercises.
What equipment do I need for crutches workouts?
You only need a sturdy chair to start. Light dumbbells, water bottles, or a resistance band can add variety later. Avoid unstable benches, slippery floors, or heavy weights. The safest setup keeps your injured leg supported and your crutches within easy reach.
Can crutches workouts help circulation?
Yes. Approved seated movements can support circulation by keeping muscles gently active while your lower body heals. Supported leg raises, seated knee lifts, glute squeezes, and light upper-body movement may help reduce stiffness. Stop if swelling, pressure, or pain increases after exercise.
Should I work out both arms equally?
Yes. Training both arms evenly helps prevent strength imbalance during recovery. Crutch use can make one side feel more dominant, especially if your movement pattern is uneven. Use light resistance, controlled reps, and equal sets on both sides unless a provider says otherwise.
Can I stretch while using crutches?
Yes, gentle seated stretching can help with stiffness from sitting and crutch walking. Focus on the neck, shoulders, chest, wrists, and upper back. Avoid deep lower-body stretches unless cleared. Stretching should feel mild and calming, not sharp, painful, or unstable.
What if my wrists hurt from crutches?
Wrist discomfort is common because crutches place pressure through the hands. Check crutch height, keep elbows slightly bent, and avoid gripping too hard. During workouts, choose exercises that do not worsen hand pressure. Persistent numbness, tingling, or weakness needs medical advice.
Can I lose fitness while using crutches?
Some fitness loss is normal when lower-body training stops, but seated strength work can reduce the decline. Upper-body exercises, core holds, light circulation drills, and enough protein help preserve strength. The goal is maintenance, not full training intensity, until weight-bearing returns.
Final Verdict
Recovering on crutches can feel slow, and I know it’s easy to feel like your fitness is slipping away. But even small, controlled workouts can help you keep strength, protect your joints, and stay mentally positive during recovery.
You don’t need long or intense sessions; simple seated exercises done regularly can make a real difference. The most important thing is to stay patient, follow your medical advice, and build your routine step by step.
Healing takes time, but staying safely active helps your body bounce back stronger. If you found this helpful, share it with someone who might need it, and comment if any questions remain unanswered.
Sources
Dirks, M.L., et al. “Neuromuscular electrical stimulation prevents muscle disuse atrophy during leg immobilization in humans.” Journal of Applied Physiology, 2014. https://journals.physiology.org/doi/full/10.1152/japplphysiol.01168.2013
Deutz, N.E.P., et al. “Protein intake and exercise for optimal muscle function with aging.” Journal of Cachexia, Sarcopenia and Muscle, 2016. https://www.ncbi.nlm.nih.gov/pmc/articles/PMC5014121/
American College of Sports Medicine. “Exercise prescription for patients with musculoskeletal injuries.” ACSM Guidelines for Exercise Testing and Prescription, 11th ed. https://www.acsm.org/
National Institute of Health, National Library of Medicine. “Principles of Rehabilitation.” StatPearls, 2023. https://www.ncbi.nlm.nih.gov/books/NBK470312/