

| Disclaimer: This article is for informational and educational purposes only. It does not constitute medical advice and should not replace consultation with a qualified healthcare provider. Always consult a doctor before beginning a new yoga practice, especially if you have wrist, shoulder, elbow, or joint injuries. |
| Difficulty | Beginner to Intermediate |
| Duration | Hold 5 to 30 seconds; practice 5 to 10 minutes total |
| Props Needed | Yoga mat; optional blocks or folded blanket |
| Best Time | Morning or after a general warm-up; avoid on a full stomach |
| Avoid If | Wrist, shoulder, or elbow injury; carpal tunnel syndrome; high blood pressure; vertigo; pregnancy |
Crow pose, known in Sanskrit as Kakasana (bent-arm version) or Bakasana (straight-arm version), is one of the first arm balances most yoga students attempt.
It teaches you to shift your center of gravity onto your hands, engage the core, and use your whole body to fly rather than relying on arm strength alone. That combination of physical skill and focused attention is what makes crow pose both challenging and genuinely rewarding to learn.
In this guide, I’ll walk you through the exact mechanics of how the pose works, a five-step instruction sequence, beginner-friendly progressions, common mistakes with specific fixes, and safe practice strategies.
If you’re attempting your first lift or refining a pose you’ve been working on for months, there’s something here to sharpen your crow.
Why Crow Pose Works: The Physical Mechanism
Crow pose works because it combines strength, balance, and precise body coordination in a single movement pattern.
The pose shifts your center of gravity forward while your core, hips, and arms work together to maintain stability. This is what makes crow one of the most effective beginner-to-intermediate balance yoga poses, since it trains both physical control and mental focus at the same time.
Instead of relying on raw arm strength, the body learns how to distribute weight evenly through the hands while engaging the inner thighs and core.
This coordination pattern is what allows the feet to lift off the ground and stay suspended with control rather than collapse forward or fall backward.
Preparatory Poses: Build the Foundation First
Preparatory poses build essential strength, balance, and mobility needed for the crow pose, helping prevent wrist collapse, elbow flare, and loss of control during lift attempts. These four preparatory poses directly target what the crow requires.
- Malasana (Deep Squat): Builds hip opening and squat depth needed for crow. Holding for one to two minutes improves knee positioning, chest lift, and trains you to place knees securely against your upper arms. If your heels lift or your chest collapses, those same restrictions follow you directly into crow pose.
- Plank Pose: Strengthens wrists, shoulders, and core stability required for crow. Hold for 30 to 60 seconds, pressing firmly through every knuckle rather than sinking into the heel of the hand. This is the same full-hand engagement you will need the moment your feet leave the mat.
- Chaturanga Dandasana: Develops triceps strength and elbow alignment essential for arm balancing. The inward elbow tracking you practice in Chaturanga carries directly into crow, elbows that flare outward in Chaturanga will do the same in crow, collapsing the arm shelf your knees depend on.
- Navasana (Boat Pose): Activates the core and hip flexors needed to lift your feet in crow. If you cannot hold Navasana steadily for five breaths without the lower back rounding, that is the work to do before attempting the full lift. Abdominal control here is what prevents the lower back from compensating when your feet leave the ground
Step-by-Step Crow Pose Instructions
Work through these five steps in sequence. Don’t rush to Step 5. Spending several sessions on Steps 3 and 4 builds the strength and confidence that make the full pose feel stable rather than panicked.
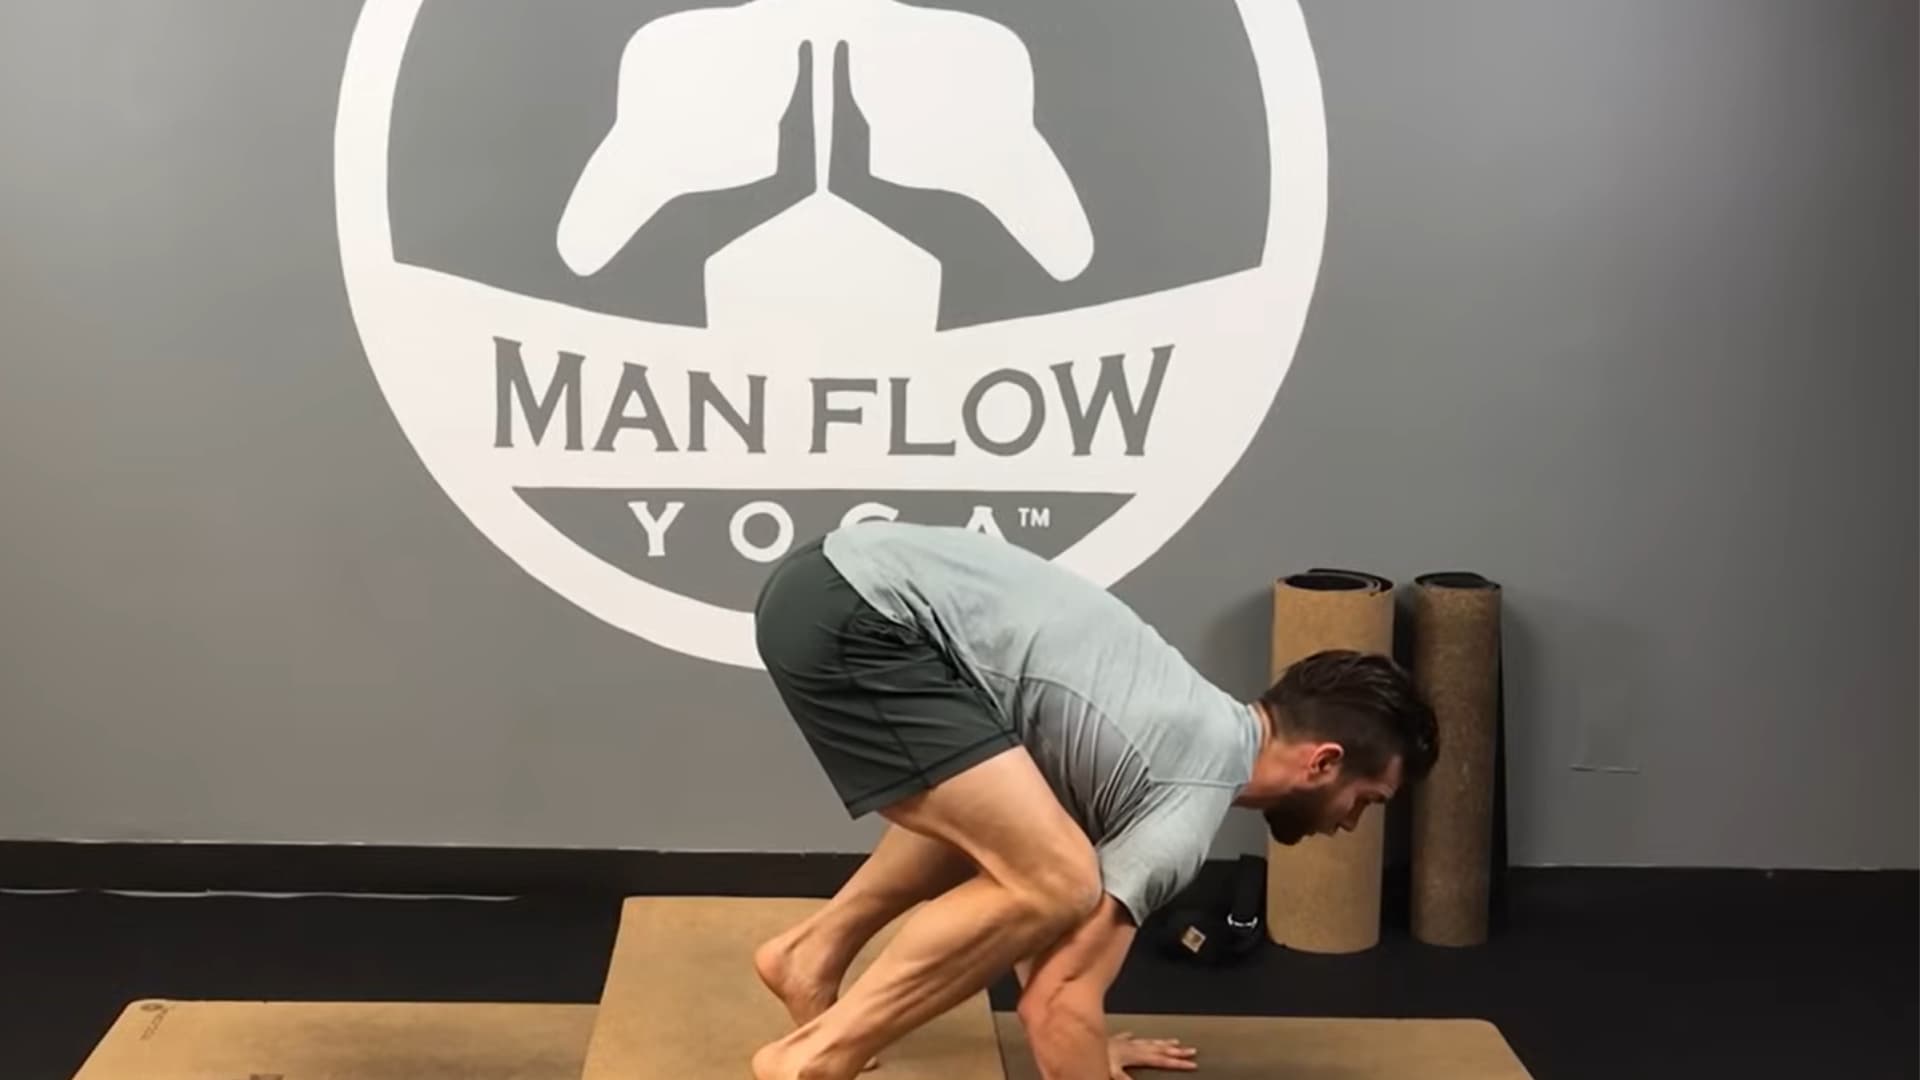
Step 1: Set Up Your Squat
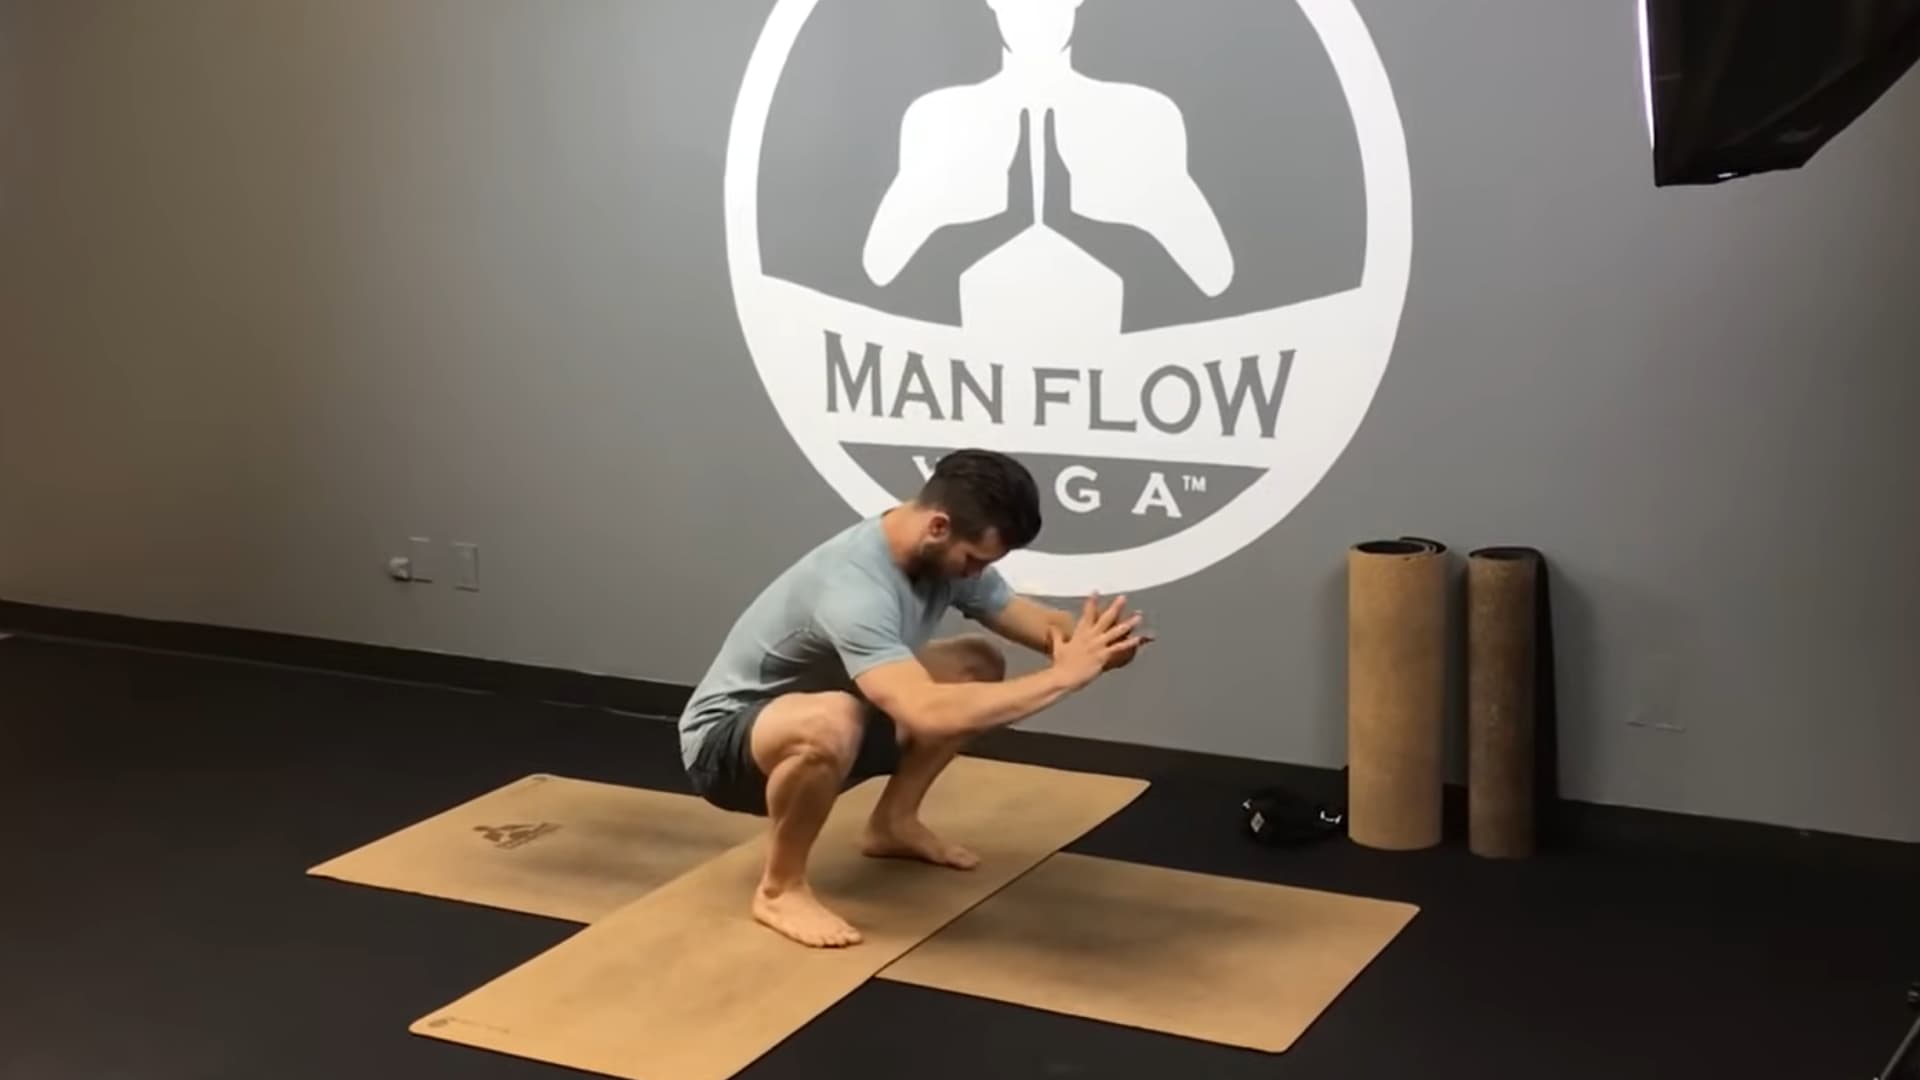
Start in a low squat with your feet hip-width apart and slightly turned out. Lift your chest, lengthen your spine, and draw your belly in. Your hips should be low and your knees pointing outward over your toes.
Rise onto the balls of your feet. From here, walk the knees as high up your upper arms as possible, aiming toward the armpits. The higher the knees sit, the better the grip point for the lift. This is not a resting squat; keep the body active throughout.
Step 2: Plant Your Hands
Place both hands shoulder-width apart on the mat, six to eight inches in front of your feet. Spread the fingers wide, middle finger pointing forward, and press firmly through every knuckle and fingertip.
Bend the elbows to about 90 degrees, wrapping them so the forearms are roughly vertical. Think of the arm position as early-stage Chaturanga: elbows hugging in, not splaying to the sides. This arm shelf is what your knees will rest on.
Step 3: Shift Your Weight Forward and Engage
Begin to tip your body weight forward onto your hands. Your gaze should move forward, not down at the floor. Looking down shifts weight forward too fast; looking out keeps you balanced over your center of gravity.
As you lean, squeeze your inner thighs into your upper arms and draw your navel firmly toward your spine. Feel the belly lift. Keep your chest lifted rather than rounding the upper back to collapse. This forward shift should feel deliberate and controlled, not like a fall.
Step 4: Lift One Foot at a Time
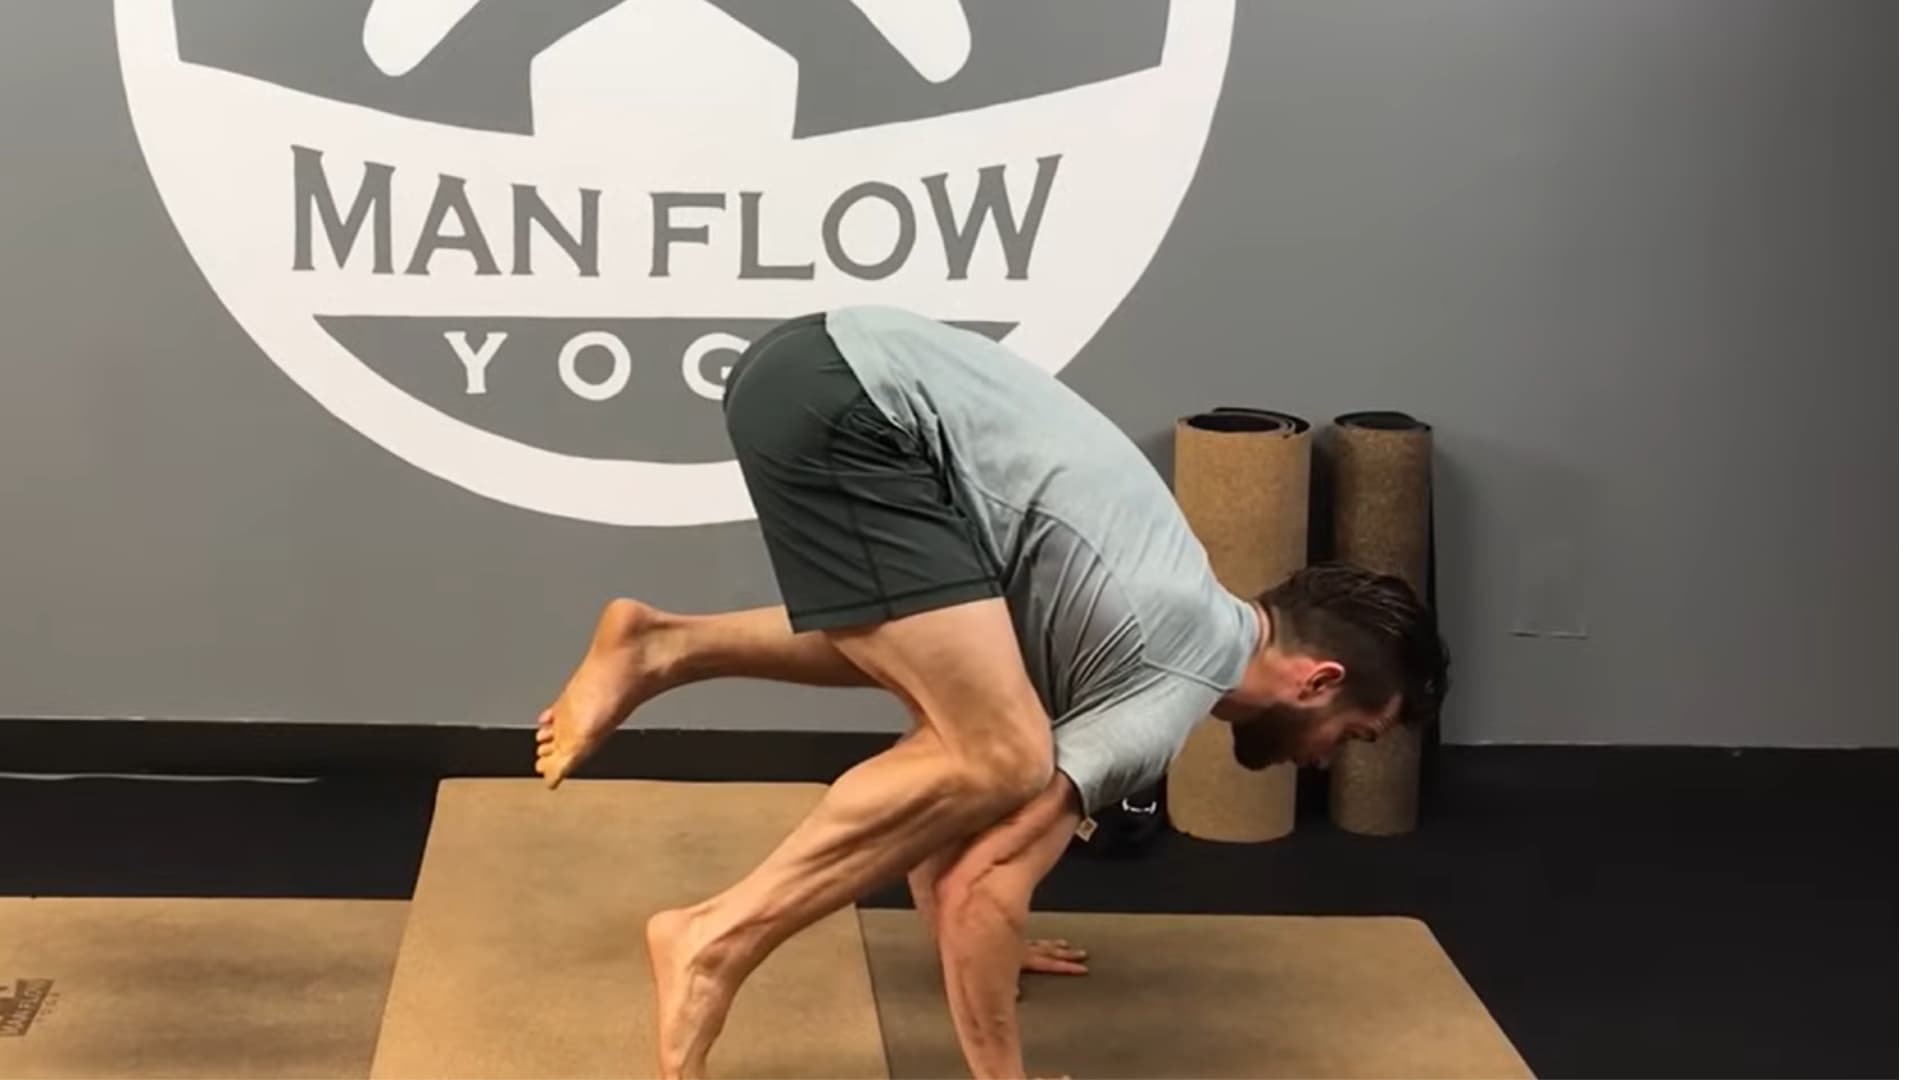
Once your weight is loaded into your hands and your inner thighs are pressing actively against your arms, lift one heel toward your glutes. Keep that leg active rather than just dangling. Feel how the single-leg lift changes the weight distribution.
Hold for one to three breaths. Lower, reset, and try the other side. Only when single-leg holds feel genuinely stable should you attempt lifting both feet at once. Spend several sessions here if needed. This step is where most beginners short-circuit the process by rushing.
Step 5: Hold the Full Pose
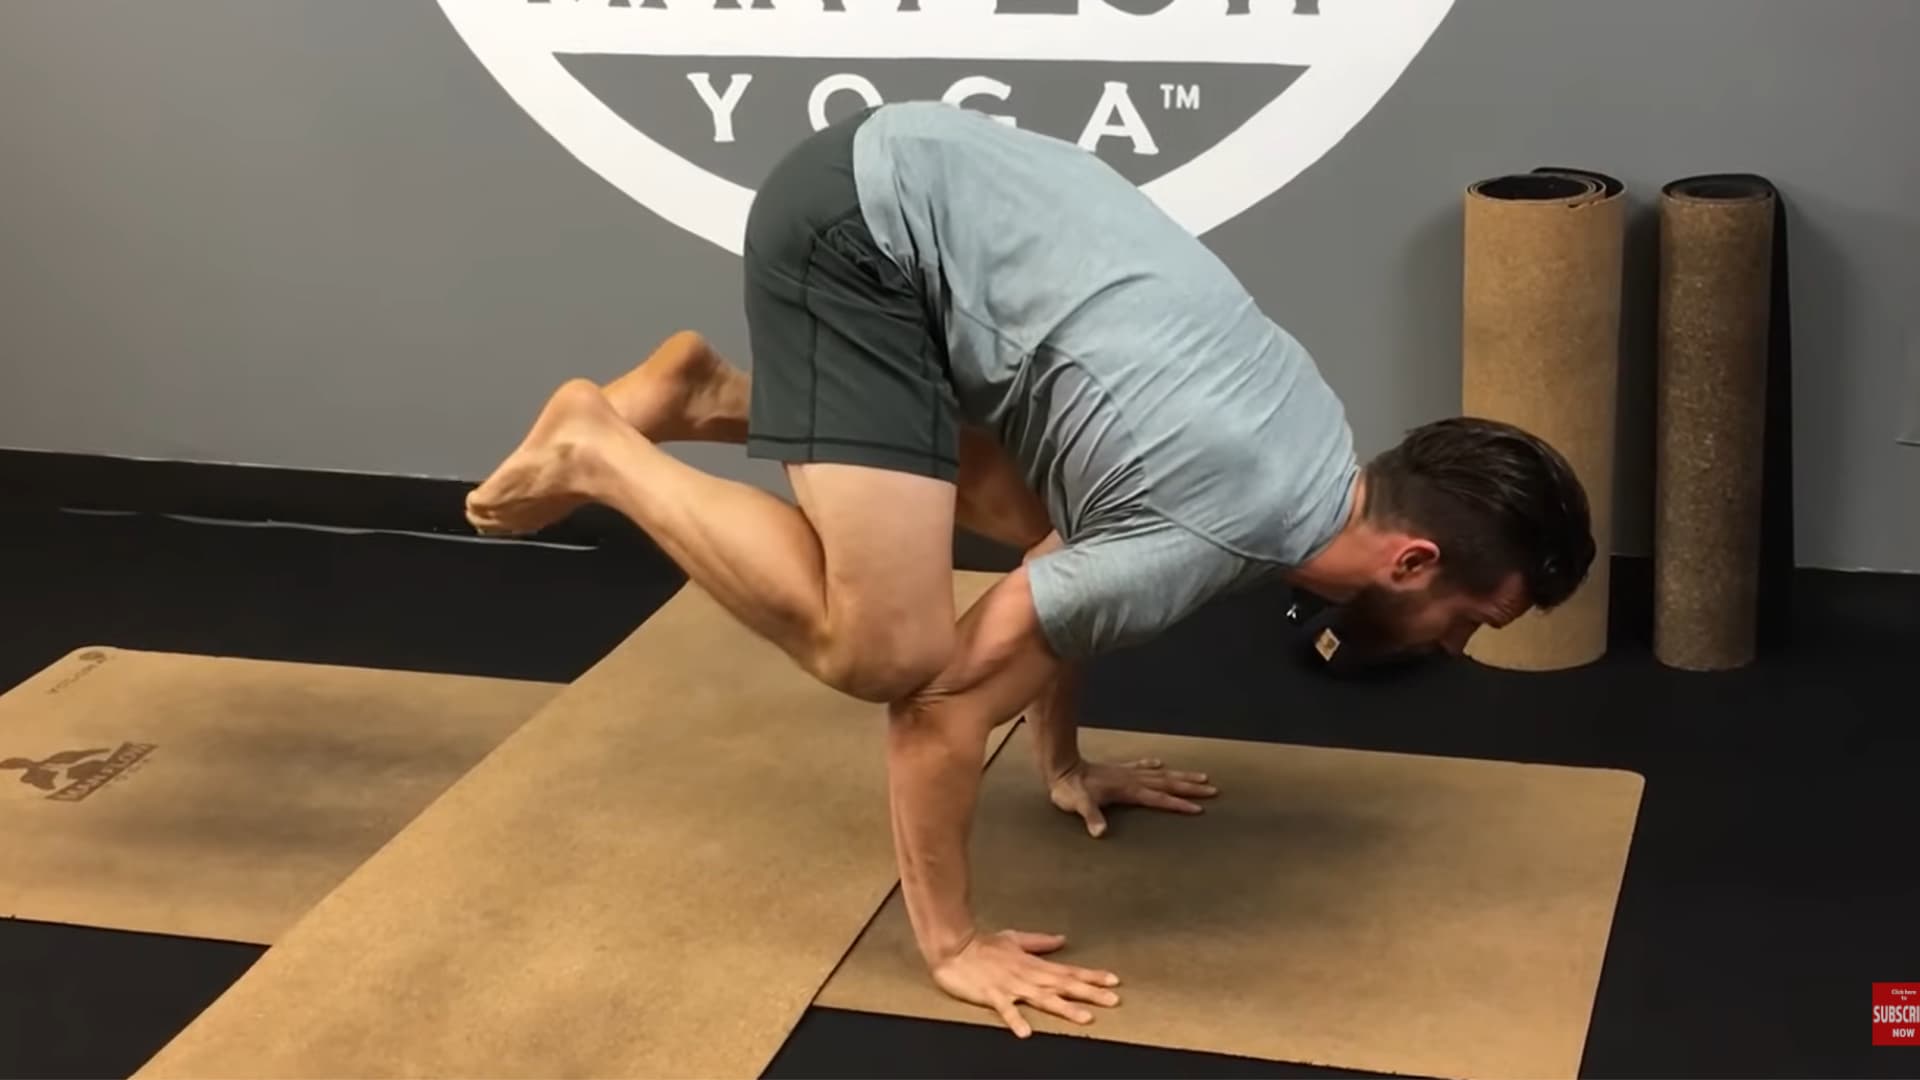
Bring both heels toward your glutes simultaneously, maintaining the inner thigh press and the belly lift. Distribute weight evenly across all ten fingers, not just the heel of the hand.
Keep your shoulders pulling slightly away from your ears rather than shrugging up. Breathe steadily: an exhale that forces the belly to hollow is actually helpful here. Start with a goal of three full breaths. That’s enough to build real muscle memory.
| Exiting Safely: Lower one foot at a time back to the squat rather than dropping both feet at once. Keep the core and arms engaged through the landing. Shake out your wrists and take a few breaths in Child’s Pose before your next attempt. |
Modifications for Beginners and Injury-Adapted Practice
Crow pose is accessible at different levels of strength and mobility. Here are three versions to match where you actually are, not where you think you should be.
Beginner: Feet on Blocks
Stack two blocks under your feet in the squat position. The added height brings your hips higher and lets your shins ride further up your upper arms. This makes the balance point easier to find without requiring as much core strength to initiate the lift.
Use this modification consistently until you can hold three to five breaths, then gradually reduce the block height.
Modification for Wrist Sensitivity
If you have mild wrist discomfort but no acute injury, try placing a rolled blanket or yoga wedge under the heel of your hand to reduce the wrist extension angle.
Pressing more actively through the fingertips also redirects load away from the joint. Stop if pain increases during practice.
Advanced: Baby Crow Pose (Bala Kakasana)
Lower your forehead lightly to the mat and practice the same knee-on-arm position with minimal weight on the head. This allows you to feel the arm shelf and inner thigh squeeze without the full balance challenge.
It’s also a useful drill for those who have tried crow for months without lifting off, as it isolates the compression mechanics.
Crow Pose Variations and How to Sequence Them
Once the full crow pose holds for five or more breaths consistently, these variations and flow options extend what the pose can do for your practice.
| Variation or Flow | How to Practice It | What It Trains | Key Cue |
| Side Crow (Parsva Bakasana) | From a squat, twist and stack both knees onto the outer upper arm of the same side. Lean weight forward and lift. | Obliques, spinal rotation control, and unilateral shoulder stability. | Keep both knees stacked, not spread. The squeeze holds the twist. |
| One-Legged Crow (Eka Pada Kakasana) | From full crow, slowly extend one leg back while maintaining the other knee on the upper arm. | Core control, coordination, and prepares for more advanced arm balances. | Only extend once the base feels completely stable. Move slowly. |
| Crow in a Vinyasa Flow | Plank to Chaturanga to Crow to Downward Dog, moving with the breath. | Upper body endurance, timing, and body awareness across transitions. | Keep the flow slow until each transition is clean before adding speed. |
Side crow and one-legged crow both deserve the same gradual approach as the full pose. Practice near a soft landing surface and move incrementally.
Side crow and one-legged crow both deserve the same gradual approach as the full pose. Practice near a soft landing surface and move incrementally.
Common Mistakes and How to Fix Them
Even with careful practice, beginners (and sometimes even experienced practitioners) often encounter challenges when attempting Crow Pose. These mistakes can slow progress, cause frustration, or even lead to minor injuries if not addressed properly.
- Collapsing Forward: This happens when your weight shifts too far ahead, causing loss of balance. Correction: Keep your gaze slightly forward rather than down, and distribute weight evenly through your hands and fingers.
- Elbows Splaying Out: When your arms are not aligned, the elbows can flare outward, reducing stability. Correction: Tuck your elbows close to your body and engage your core to maintain proper alignment.
- Rushing the Pose: Impatience or insufficient preparation often leads to attempts without proper setup. Correction: Focus on building a solid foundation with partial lifts and preparatory poses before trying the full Crow Pose.
- Wrist Discomfort: Poor hand placement or overuse can cause pain or strain. Correction: Spread your fingers wide, press through your fingertips, and adjust your hand position for better support and comfort.
Safe Practice Tips for Steady Progress
Crow pose rewards consistency more than intensity. These habits reduce injury risk and accelerate progress.
| Habit | Why It Matters |
| Warm up wrists, shoulders, and hips before every session. | Cold joints under load are how strains happen. Five minutes of wrist circles, Cat-Cow, and Malasana changes the risk profile significantly. |
| Place a folded blanket or cushion in front of you during early practice. | Knowing there’s a soft landing removes much of the fear that creates tension. Fear of falling is the main reason beginners rush the pose. |
| Practice for 5 to 10 minutes daily rather than one long session weekly. | Neuromuscular learning happens through repetition, not duration. Short daily exposure builds balance faster. |
| Track small wins: lifted one foot, held three breaths, elbows stayed in. | Crow pose progress is granular. Tracking it keeps motivation realistic and prevents the “I’m not getting anywhere” dropout pattern. |
| Follow the crow with Child’s Pose or Downward Dog. | Counter-poses release the wrist, shoulder, and spine compression built up in the arm balance. |
The mental side of this pose matters more than most people expect. Approaching crow pose with patience, like any mindfulness practice that asks you to stay present with discomfort, tends to produce more consistent progress than forcing it through brute strength.
Frequently Asked Questions About Crow Pose
These are the questions I hear most often from students working on crow pose for the first time.
How long should beginners hold the crow pose?
Start with three breaths, roughly five to ten seconds. That’s long enough to register the balance sensation without fatiguing the wrists. Add one breath per week as the pose feels more stable. Duration matters far less than quality of engagement: a controlled three-breath hold builds more than a sloppy ten-second one.
Can I practice the crow pose with wrist pain?
It depends on the source. Mild discomfort from muscle fatigue is normal early on. Acute pain, sharp sensations, or anything that persists after practice signals a problem worth addressing before continuing. If you have carpal tunnel syndrome, existing wrist injuries, or post-surgical recovery in progress, modify or skip the pose and consult a healthcare provider first.
What muscles does the crow pose strengthen?
The primary muscles are the triceps, serratus anterior, rotator cuff stabilizers, transverse abdominis, hip flexors (psoas and iliacus), and adductors. Secondary engagement includes the deltoids, pectorals, and wrist flexors. This is why the pose feels like total-body effort rather than just an arm exercise.
What are the best preparatory poses for the crow pose?
Malasana (deep squat), Plank, Chaturanga Dandasana, and Navasana (Boat Pose). Each targets a different component: Malasana builds the squat position and hip openness, Plank builds wrist tolerance, Chaturanga teaches elbow alignment, and Navasana builds the hip flexor and core strength for the actual lift.
How often should I practice the crow pose?
Five to ten minutes daily is more effective than one long session per week. Frequent short exposures train the nervous system’s balance response faster. Rest days remain important; if your wrists feel strained, take a day off from weight-bearing poses.
Is the crow pose suitable for beginners?
Yes, with appropriate preparation and modifications. The bent-arm version (Kakasana) is the most accessible entry point. Using blocks under the feet and a blanket in front for a safe landing makes the pose manageable for most beginners who have a basic level of wrist and core strength. If you’re brand new to yoga, spend four to six weeks building wrist capacity through Plank and Chaturanga practice before attempting the full lift.
What is the difference between the crow pose and the crane pose?
Technically, Kakasana (crow pose) uses bent elbows with the knees resting on the upper arms near the armpits. Bakasana (crane pose) uses straighter arms with the knees tucked close to the shoulders. In Western yoga studios, the terms are used interchangeably, but crane pose requires more arm strength and hip flexibility. Crow with bent elbows is the appropriate starting point for most practitioners.
Final Thoughts
Crow pose is less about strength alone and more about coordination, control, and steady progress through small steps.
Once you understand how the body shifts weight onto the hands, engages the core, and uses inner thigh pressure, the pose becomes far more accessible than it first appears.
Consistent practice with preparatory poses, mindful alignment, and patient repetition is what builds real stability. I’ve found that most progress comes from short, focused sessions rather than forcing longer holds too early.
If you stay patient and listen to your body, improvements will show up gradually but reliably.
Try integrating crow pose into your weekly practice, test the variations, and share your experience or challenges in the comments so I can help you refine your technique further.