Feeling like you’re constantly running on empty? I totally get it.
Between juggling work, family, and everything else life throws our way, finding moments of real peace can feel impossible.
That’s exactly why I fell in love with restorative yoga. It’s like hitting the reset button for your nervous system, using cozy props and gentle poses that let you completely melt into relaxation.
In this blog, I will share some simple and beginner-friendly restorative yoga poses that will help you relax. These easy poses will help you slow down, breathe deeper, and give your body the restorative love it deserves.
What is Restorative Yoga?
If regular yoga is like going for a brisk walk, restorative yoga is like sinking into your favorite armchair with a warm cup of tea. It focuses on rest, relaxation, and restoration rather than strength or flexibility.
In a typical yoga class, you might hold poses for 30 seconds to a few minutes while actively engaging your muscles.
In restorative yoga, you settle into poses for 5-20 minutes, using props to support your body, allowing your muscles to completely relax.
Think of it as active rest, you’re doing something beneficial for your body without any effort or strain.
This makes restorative yoga perfect for beginners who might feel intimidated by more active styles. It’s also ideal for anyone dealing with stress, recovering from illness or injury, or simply wanting to add more peace to their day.
Important Props for Restorative Yoga
Before we get into the poses, let’s discuss your support team and the props that make restorative yoga so wonderfully comfortable.
The main props of restorative yoga:
- Yoga Bolster: This firm, cylindrical pillow is like a supportive best friend for your body
- Cushions and Pillows: Any firm pillows from your home work great
- Folded Blankets: Perfect for warmth and creating gentle support
- Yoga Blocks: Lightweight foam blocks that provide stable support
- Yoga Strap: Helps you reach poses comfortably without straining
- Chair: Yes, a regular chair can be a great yoga prop!
Don’t have yoga props? No problem! You can absolutely create a restorative practice with household items.
Use couch cushions instead of bolsters, stack books wrapped in towels for blocks, or grab a belt or scarf as a strap. The key is having items that provide comfortable, stable support.
Easy and Effective Restorative Yoga Poses
1. Supported Child’s Pose (Balasana)
This pose is like giving yourself a comforting hug. It calms your mind, gently stretches your lower back, and creates a sense of safety and security.
How to do it:
- Kneel on your mat with your big toes touching and knees about hip-width apart
- Place a bolster or stack of pillows lengthwise between your thighs
- Fold forward and rest your torso on the bolster, turning your head to one side
- Let your arms relax wherever feels comfortable, alongside the bolster or wrapped around it
- Stay here for 3-5 minutes, then turn your head to the other side for balance
Prop variations: No bolster? Try a stack of firm pillows or even fold a thick blanket several times. You can also place a rolled blanket under your ankles if kneeling feels uncomfortable.
2. Reclining Bound Angle Pose (Supta Baddha Konasana)
This heart-opening pose gently stretches your inner thighs and chest while promoting deep relaxation. It’s like lying in a comfortable nest.
How to do it:
- Sit with your back against a bolster or stack of pillows
- Bring the soles of your feet together, letting your knees fall out to the sides
- Slowly recline back onto your support, adjusting the height until it feels just right
- Place pillows or blocks under each knee for support
- Rest your hands on your belly or out to the sides
- Close your eyes and stay for 5-10 minutes
Prop variations: Use a folded blanket along your spine if you don’t have a bolster. Books wrapped in towels work great under your knees, or simply let gravity support your legs without props if that feels comfortable.
3. Legs Up the Wall Pose (Viparita Karani)
Perfect after a long day of standing or sitting, this pose relieves tired legs and promotes healthy circulation. Plus, it feels great!
How to do it:
- Find a clear wall space and place a bolster or folded blanket about 6 inches from the wall
- Sit sideways on your support with one hip touching the wall
- Swing your legs up the wall as you lie back, scooting your sitting bones close to the wall
- Rest your arms by your sides and close your eyes
- Stay for 5-15 minutes. This one feels so good, you might want to stay longer!
Prop variations: Skip the bolster if you prefer lying flat on the floor. You can also do this pose on your bed with legs up the headboard. If the stretch is too intense, scoot further away from the wall.
4. Supported Bridge Pose (Setu Bandhasana)
This gentle backbend opens your chest and can help relieve back tension while being completely passive and restorative.
How to do it:
- Lie on your back with knees bent and feet hip-width apart
- Lift your hips and slide a yoga block under your sacrum (the bony area at the base of your spine)
- Let your weight rest completely on the block
- Extend your arms by your sides, palms facing up
- Hold for 3-5 minutes, breathing deeply
Prop variations: Use a firm pillow or folded blanket instead of a block. Start with lower support and add height as it becomes comfortable. You can also try a bolster under your thighs for a different variation.
5. Reclined Twist (Supta Matsyendrasana)
Twists are wonderful for releasing tension in your spine and can even help with digestion. This supported version allows you to enjoy all the benefits with minimal effort.
How to do it:
- Lie on your back with arms stretched out in a T-shape
- Draw both knees to your chest, then let them fall to your right side
- Place a pillow or bolster between your legs for support
- Turn your head to the left (opposite your knees)
- Hold for 3-5 minutes, then repeat on the other side
Prop variations: Use any soft pillow between your knees. If your shoulder lifts off the ground, place a small pillow under it for support. You can also try this twist with just one knee crossed over.
6. Supported Forward Fold (Paschimottanasana Variation)
This calming pose stretches your spine gently while promoting a sense of inner peace and mental clarity.
How to do it:
- Sit with legs extended in front of you
- Place a bolster or stack of pillows on your thighs and shins
- Slowly fold forward, resting your forehead and arms on your support
- Don’t worry about how far you fold. Comfort is key
- Breathe deeply and hold for 3-5 minutes
Prop variations: Stack as many pillows as you need to comfortably rest your head. You can also sit on a folded blanket to uplift your hips, making it easier to fold forward.
7. Supported Fish Pose (Matsyasana Variation)
This heart-opening pose increases breathing and gently opens your chest and shoulders. It’s like lying on a cloud that happens to be great for your posture.
How to do it:
- Place a bolster vertically on your mat
- Sit in front of the bolster with your knees bent
- Slowly lie back so the bolster supports your spine from your mid-back to your head
- Let your arms rest out to the sides, palms facing up
- You can keep your knees bent or extend your legs, whatever feels better
- Stay for 5-10 minutes
Prop variations: Use a firm pillow or rolled blanket lengthwise under your spine. If your head doesn’t reach the support, add a small pillow to raise it. This pose should feel opening, not straining.
8. Savasana with Props (Corpse Pose)
The ultimate relaxation pose! This is often considered the most important pose in any yoga practice, and adding props makes it even better.
How to do it:
- Lie on your back with legs slightly apart and arms a few inches from your sides
- Place a small pillow or folded blanket under your head
- You can also put a bolster under your knees to release lower back tension
- Cover yourself with a blanket for warmth
- Consider using an eye pillow or a small towel over your eyes
- Let every part of your body relax completely for 10-20 minutes
Prop variations: Experiment with what feels best. Some people love lots of props, others prefer just a simple head pillow. The goal is complete comfort so your body can truly let go.
9. Constructive Rest Pose
This simple pose is good for relieving lower back tension and calming your nervous system. It’s so easy, yet so effective.
How to do it:
- Lie on your back with knees bent and feet flat on the floor, hip-width apart
- Let your knees lean against each other for support
- Rest your hands on your belly or by your sides
- Close your eyes and focus on your breathing
- Stay here for 5-10 minutes
Prop variations: This pose works beautifully without props, but you can place a pillow under your head or a blanket over your body for extra comfort. Some people like a small pillow between their knees.
10. Reclined Hero Pose (Supta Virasana with Support)
This pose provides a deep, gentle stretch for your thighs while promoting calm, steady breathing. It’s all about finding the right support for your body.
How to do it:
- Kneel with your knees together and feet slightly wider than your hips
- Sit back between your feet (not on them)
- Place a bolster or several pillows behind you
- Slowly recline back onto your support, using your hands for guidance
- Only go as far back as feels comfortable; you might stay upright or recline fully
- Hold for 3-5 minutes
Prop variations: This pose requires lots of props for most people. Use as many pillows as needed behind you, and consider placing cushions under each ankle. If kneeling is uncomfortable, try sitting on a block or cushion first.
11. Supported Wide-Legged Fold (Upavistha Konasana Variation)
This pose gently stretches your inner thighs, creating a lovely sense of grounding and calm.
How to do it:
- Sit with your legs spread wide apart (only as wide as feels comfortable)
- Place a bolster or stack of pillows in front of you
- Slowly fold forward, walking your hands toward your support
- Rest your forearms and forehead on your props
- Don’t force the stretch; let gravity do the work
- Hold for 3-5 minutes
Prop variations: Use as many pillows as you need to comfortably rest your head and arms. You can also sit on a folded blanket to uplift your hips, making the forward fold easier.
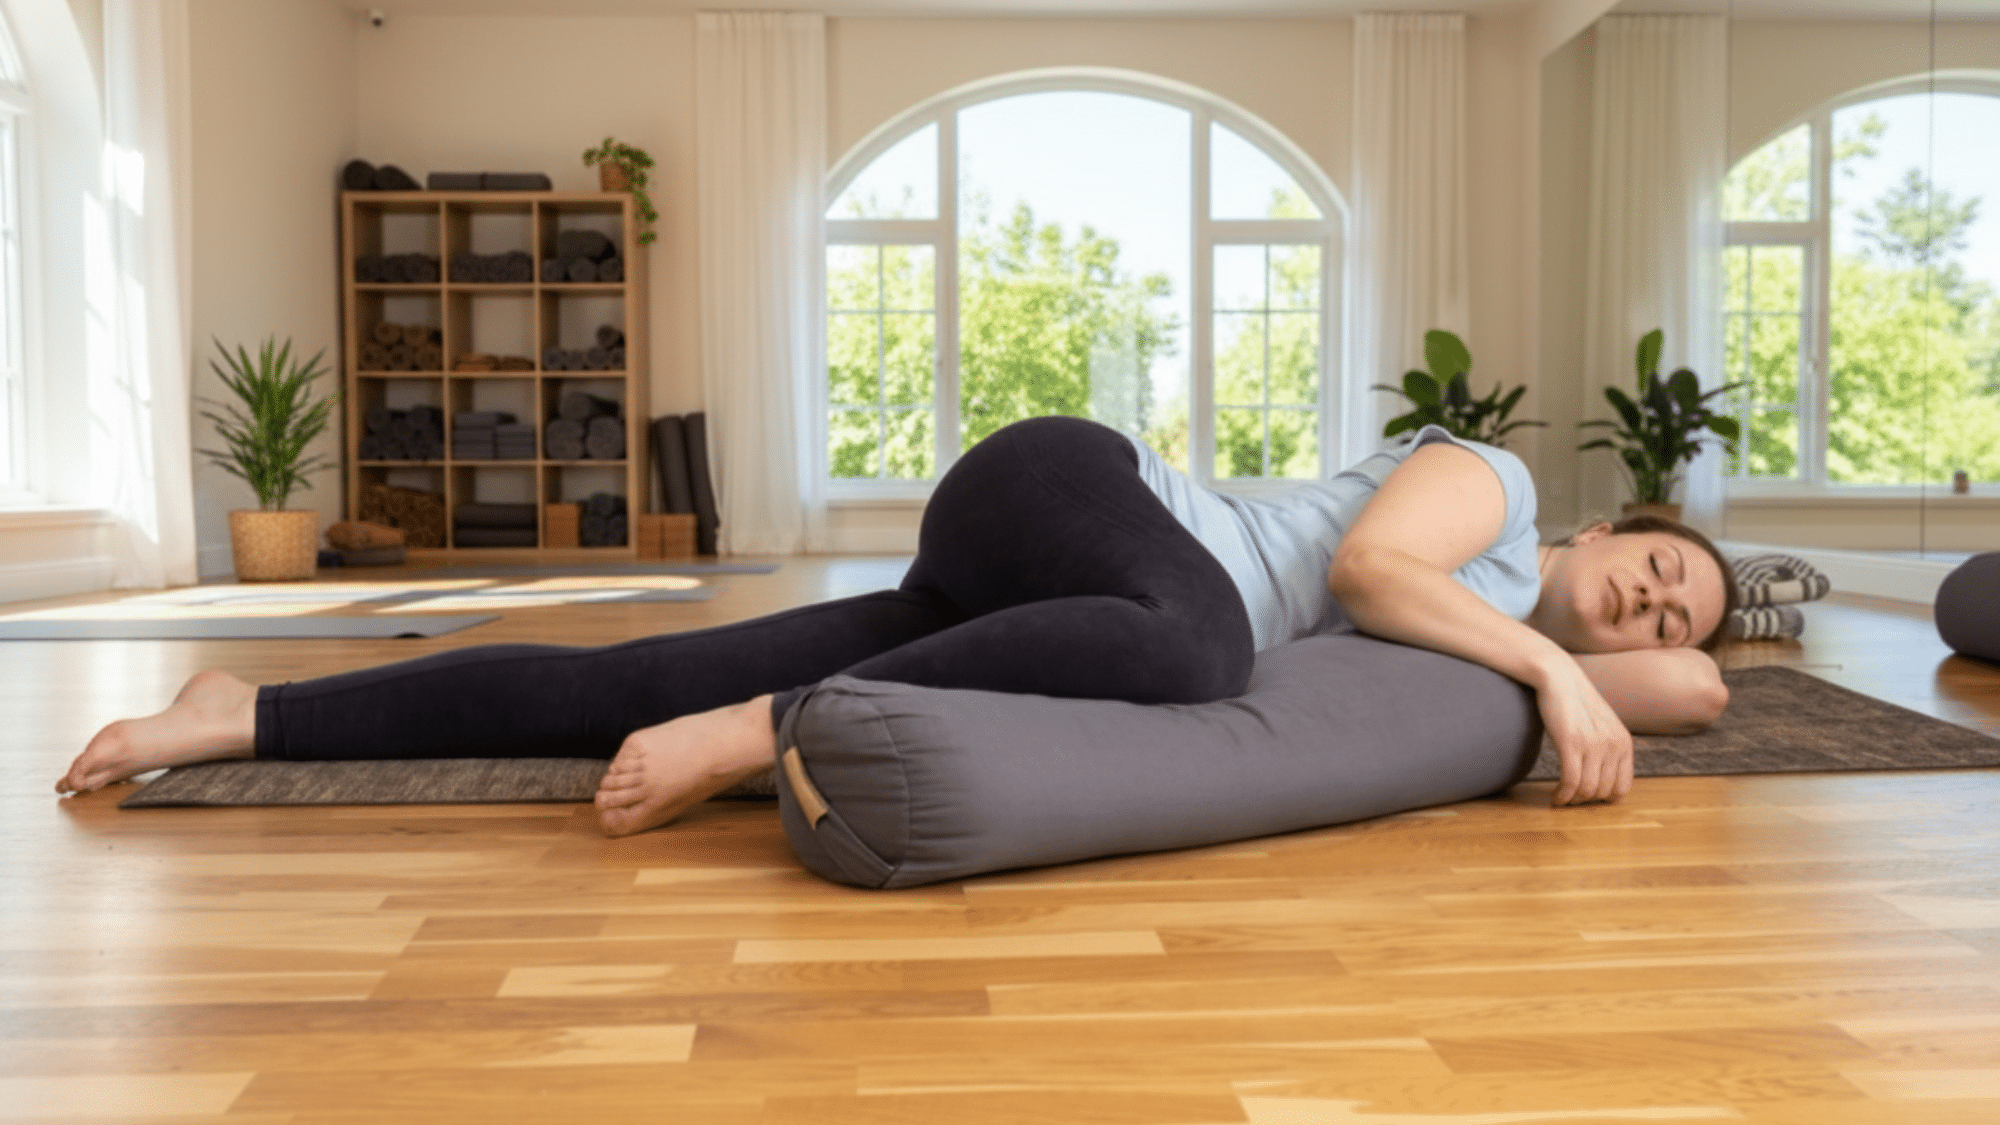
12. Supported Side-Lying Relaxation
This nurturing pose is ideal for pregnancy, digestive issues, or when lying on your back feels uncomfortable. It creates a cozy, safe feeling.
How to do it:
- Lie on your right side with your legs bent at a comfortable angle
- Place a bolster or firm pillow lengthwise between your legs
- Hug another pillow or bolster to your chest with your top arm
- Rest your head on a folded blanket or pillow
- Stay here for 5-10 minutes, then switch to your left side
Prop variations: You can stack multiple pillows between your knees for added support. Some people love placing a small rolled towel under their waist for extra comfort.
13. Supported Pigeon Pose (Eka Pada Rajakapotasana Variation)
This hip opener releases deep tension in your hips and lower back. The supported version lets you relax completely into the stretch without any strain.
How to do it:
- Start on all fours and bring your right knee forward behind your right wrist
- Slide your left leg back, keeping your hips as level as possible
- Place a bolster or stack of pillows under your right hip and thigh for support
- Fold forward over your front leg, resting on another bolster or pillows
- Turn your head to one side and breathe deeply for 3-5 minutes
- Repeat on the other side
Prop variations: Stack pillows high under your hip until there’s no strain. You can also place a blanket under your back knee for cushioning. If this feels too intense, try the figure-four stretch while lying on your back instead.
14. Supported Seated Forward Fold with Chair
This variation is wonderful if sitting on the floor feels challenging. It provides all the calming benefits of a forward fold with added ease.
How to do it:
- Sit on the edge of a sturdy chair with your feet flat on the floor
- Place a bolster or several pillows on your thighs
- Slowly fold forward, draping your torso over your props
- Let your arms hang down or rest on your legs
- Allow your head to rest completely on the support
- Hold for 3-5 minutes, breathing slowly
Prop variations: Use a kitchen chair or any sturdy seat. Add more pillows until your head rests comfortably without straining. You can also place blocks under your feet if they don’t reach the floor easily.
15. Supported Crocodile Pose (Makarasana)
This belly-down pose is incredibly calming for your nervous system and helps deepen your breathing naturally. It’s like taking a gentle nap on your stomach.
How to do it:
- Lie face down on your mat with your legs hip-width apart
- Let your toes turn in or out, whatever feels natural
- Stack your hands or forearms and rest your forehead on them
- You can also turn your head to one side if that’s more comfortable
- Close your eyes and feel your belly pressing into the floor with each breath
- Stay here for 5-10 minutes, switching sides if you turn your head
Prop variations: Place a folded blanket or pillow under your hips if your lower back feels any tension. You can also put a small cushion under your ankles for comfort. Some people love placing a bolster lengthwise under their torso for extra support.
7-Day Restorative Yoga Routine for Beginners
Here’s a simple weekly plan to help you include restorative yoga in your life. Each day focuses on a different area, from calming your mind to opening your heart, using poses from the list above.
All sessions can be done in 20–25 minutes (or shorter if needed).
| Day | Routine Name | Key Focus / Poses |
|---|---|---|
| Day 1 | Gentle Grounding | Supported Child’s Pose and Constructive Rest Pose to release tension and connect with your breath. |
| Day 2 | Heart Opener | Supported Fish Pose, Reclining Bound Angle Pose, and Supported Bridge Pose to open the chest and relieve upper-body tightness. |
| Day 3 | Hip & Lower Back Relief | Supported Pigeon Pose and Reclined Twist to gently release tight hips and ease back discomfort. |
| Day 4 | Calm & Center | Supported Forward Fold and Supported Crocodile Pose to soothe the mind and calm the nervous system. |
| Day 5 | Restore & Rejuvenate | Legs Up the Wall Pose and Supported Bridge Pose to refresh tired legs and boost circulation. |
| Day 6 | Deep Relaxation | Supported Wide-Legged Fold, Supported Side-Lying Relaxation, and Savasana with Props for total body rest. |
| Day 7 | Rest Day | Take a break, journal, or simply focus on mindful breathing. Your body integrates healing best through rest. |
Tips for Building a Restorative Yoga Sequence
Implement these tips during your restorative yoga to get the best results:
- Timing is everything: Hold each pose for 3-10 minutes, depending on your level of comfort and the amount of time available. If it’s uncomfortable, adjust your props or try something else.
- Sequence suggestions: Start with gentle warm-up poses, such as Constructive Rest or Supported Child’s Pose. Move into deeper stretches, like the supported twists or forward folds, and always end with Savasana.
- Create the right atmosphere: Dim the lights, play soft music if you enjoy it, and make sure you won’t be interrupted. This is your time to completely unwind.
- Breathe and be present: The beauty of restorative yoga is that you don’t have to “do” anything except breathe and allow yourself to relax. If your mind wanders, gently bring your attention back to your breath or the sensations in your body.
Wrapping It Up
Here’s the beautiful truth about restorative yoga: it’s not about being perfect or flexible. It’s simply about showing up for yourself and saying “yes” to rest in a world that never stops moving.
I promise that even 10 minutes with these gentle poses can shift your entire day, helping you feel more grounded, peaceful, and restored.
Your body has been working so hard for you; now it’s time to return the favor.
Ready to give it a try? Pick your favorite pose from the list and create your own little sanctuary tonight. You deserve this moment of peace.

