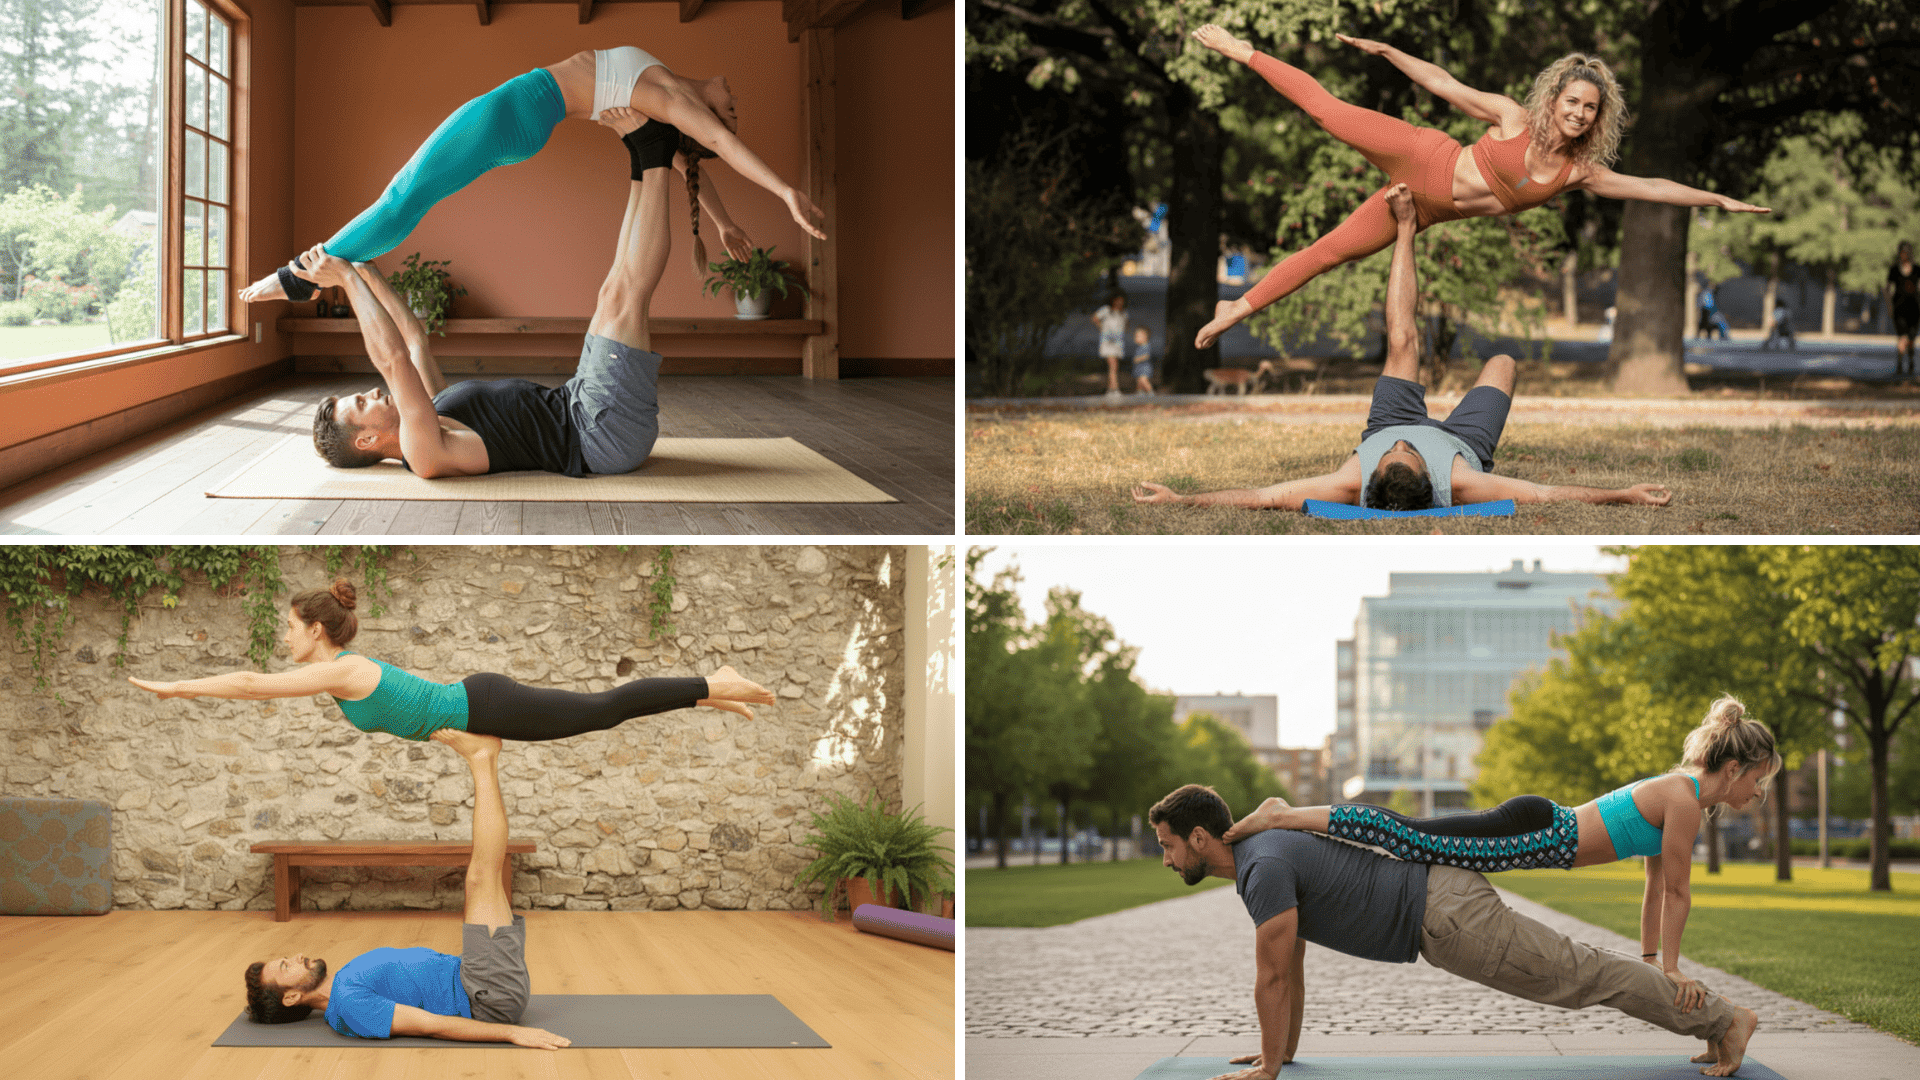
Want to try flying with a partner safely and confidently? I’ve put together everything you need to start acro yoga without the overwhelm or fear of falling flat on your face.
I’ll walk you through beginner acro yoga poses with clear step-by-step instructions, essential safety cues, and proper spotting techniques so you feel secure from your very first lift.
What you’re getting isn’t just about nailing poses. It’s about building real strength, balance, and core stability while deepening trust with your partner.
Plus, I’m including a progression plan to help you advance at your own pace and a free printable cheat sheet you can use for at-home practice.
Ready to defy gravity together? Let’s get started.
Why Start with AcroYoga for Beginners?
Starting with acro yoga builds more than just physical fitness. You’ll strengthen your core, shoulders, and hips while developing better balance and body control.
Beyond the physical gains, acro yoga changes how you connect with others. It teaches trust as you literally put your weight in someone else’s hands, sharpens communication as you coordinate movements, and fosters genuine teamwork.
The social aspect is equally rewarding. You’ll bond deeply with your partner, find a welcoming community, and rediscover playful interaction that most adults have lost. It’s fitness, connection, and fun rolled into one practice.
A gentle reminder: Always start slow and use mats for cushioning. Work with a spotter, especially during your first attempts, to keep everyone safe and confident.
Safety First: 5 Golden Rules
Before attempting any acro yoga poses, follow these essential safety guidelines to protect yourself and your partner:
- Warm Up Properly: Focus on wrists, shoulders, and core to prepare your body for the demands of partner lifts
- Clear Your Practice Area: Remove obstacles and use padded mats to cushion any unexpected falls
- Always Use a Spotter for New Poses: Have a third person ready to assist and catch if balance is lost
- Communicate Clearly: Use simple cues like “ready,” “up,” “down,” and “weight” so everyone stays coordinated
- Progress Gradually: Don’t skip foundational poses or regressions, even if they seem too easy at first
Following these rules creates a safe environment where you can focus on learning rather than worrying about injuries.
Beginner-Friendly Foundational AcroYoga Poses
Start with these grounding poses that establish communication, alignment, and body awareness. These foundational movements prepare you for more dynamic flying poses.
1. Plank on Plank (Stacked Plank)

This partner core activation pose builds strength and teaches proper alignment for both base and flyer.
Roles:
- Base: Holds a strong plank position on the ground
- Flyer: Stacks on top in plank position, hands on base’s ankles, shins on base’s shoulders
- Spotter: Stands beside to support the flyer’s torso if balance wavers
How to Perform:
- Step 1: Base gets into a solid plank position with hands directly under shoulders and body in a straight line
- Step 2: Flyer places hands on base’s ankles and carefully steps shins onto base’s shoulder blades
- Step 3: Both partners engage their cores and hold the stacked position for 10-30 seconds
- Step 4: Flyer carefully steps down one leg at a time while the spotter provides support
Difficulty Level: ★★☆☆☆ (2/5)
Variation/Progression: Try high-five taps or synchronized push-ups once stable.
2. Double Plank (Stacked Tabletop)

A stability drill that strengthens shoulders and teaches weight distribution for more complex poses.
Roles:
- Base: Holds tabletop position on hands and knees
- Flyer: Places hands on base’s ankles and feet on base’s shoulders in plank
- Spotter: Supports flyer’s hips and watches for collapse
How to Perform:
- Step 1: Base assumes tabletop position with flat back, hands under shoulders, knees under hips
- Step 2: Flyer places hands firmly on base’s ankles and positions one foot at a time on base’s shoulder blades
- Step 3: Flyer straightens into plank position while base maintains stable tabletop
- Step 4: Hold for 15-30 seconds, then the flyer steps down carefully with spotter assistance
Difficulty Level: ★★☆☆☆ (2/5)
Variation/Progression: Base can lift one arm or leg for added challenge once stable.
3. Throne (Chair Pose)

The throne acroyoga pose is perfect for building confidence as the flyer sits on the base’s feet with hands for balance.
Roles:
- Base: Lies on back with feet in the air, supporting flyer’s sit bones
- Flyer: Sits on base’s feet, holding base’s hands for stability
- Spotter: Stands behind the flyer, ready to support the lower back
How to Perform:
- Step 1: Base lies on its back, knees bent, and extends its feet upward while the flyer stands near the base’s head
- Step 2: Flyer holds base’s hands and carefully steps one foot onto each of base’s feet
- Step 3: Base straightens legs as the flyer shifts weight to the sitting position on the base’s feet
- Step 4: To exit, the base bends knees slightly as the flyer stands back up with spotter support
Difficulty Level: ★★☆☆☆ (2/5)
Variation/Progression: Flyer releases hands and balances independently, or adds a gentle backbend.
Flying Poses: Introduction to Airborne Movement
These poses introduce the sensation of flying while maintaining connection and control. They build confidence and prepare you for more advanced transitions.
4. Front Bird (Flying Superman)

The classic front bird acroyoga pose, where the flyer extends horizontally like Superman in flight.
Roles:
- Base: Lies on back with feet supporting flyer’s hip bones and hands holding flyer’s shoulders
- Flyer: Lies face down horizontally, arms extended forward or out to the sides
- Spotter: Stands at flyer’s side, hands ready to support torso
How to Perform:
- Step 1: Base lies on its back with knees bent, flyer stands facing base near their feet
- Step 2: Base places feet on flyer’s hip bones as flyer leans forward into base’s hands
- Step 3: Base straightens legs as the flyer lifts into a horizontal flying position, extending arms
- Step 4: To exit, the base bends the knees, bringing the flyer down as the spotter supports the descent
Difficulty Level: ★★★☆☆ (3/5)
Variation/Progression: Flyer releases base’s hands and flies freely, or base removes hands for foot-only support.
5. Back Bird (Reverse Superman)

This chest-down variation opens the chest and offers a different flying sensation with arms spread wide.
Roles:
- Base: Lies on back with feet on flyer’s chest and hands supporting flyer’s thighs
- Flyer: Lies face down with chest lifted, arms extended like wings
- Spotter: Stands at flyer’s head, ready to support shoulders
How to Perform:
- Step 1: Base lies on its back, the flyer stands facing away from the base near their feet
- Step 2: Flyer sits back toward base as base places feet on flyer’s upper back/chest area
- Step 3: Base straightens legs as the flyer leans back, extending arms out to the sides
- Step 4: Base bends knees to bring flyer down gently with spotter guiding the descent
Difficulty Level: ★★★☆☆ (3/5)
Variation/Progression: Flyer grabs ankles for a deeper backbend, or base removes hand support.
6. Whale Pose (Supported Backbend)

A gentle, restorative backbend that stretches the front body while building trust between partners.
Roles:
- Base: Lies on back with shins supporting flyer’s upper back
- Flyer: Drapes backward over the base’s shins in a supported backbend
- Spotter: Supports the flyer’s head and monitors the neck position
How to Perform:
- Step 1: Base lies on back with knees bent and shins parallel to the ground
- Step 2: Flyer stands near the base’s head and sits on the base’s feet, then holds the base’s hands
- Step 3: Flyer slowly leans back, draping upper back over base’s shins as base straightens legs
- Step 4: To exit, the base bends the knees as the flyer curls forward, and the spotter supports the transition
Difficulty Level: ★★☆☆☆ (2/5)
Variation/Progression: Flyer extends arms overhead for a deeper stretch, or base gently rocks side to side.
7. Straddle Throne (Open-Leg Throne)

This variation of throne acroyoga prepares you for transitions by opening the hips and changing leg position.
Roles:
- Base: Lies on back with feet supporting flyer’s inner thighs
- Flyer: Sits on base’s feet with legs in a wide straddle position
- Spotter: Stands behind the flyer to support the back and prevent backward falls
How to Perform:
- Step 1: Start in regular throne position with flyer sitting on base’s feet
- Step 2: Flyer carefully opens legs wide into a straddle position while maintaining hand connection
- Step 3: Base adjusts feet slightly inward to support flyer’s inner thighs
- Step 4: Hold position for several breaths, then close legs and step down with spotter support
Difficulty Level: ★★★☆☆ (3/5)
Variation/Progression: Flyer releases hands and balances independently, or adds a forward fold.
Transitional & Advanced Beginner Poses: Balance & Flow
These poses challenge your balance and coordination while preparing you for flowing sequences. They’re milestone achievements for beginner practitioners.
8. Shoulderstand on Shins

An inversion practice pose that builds upper body strength and introduces flyers to being upside down.
Roles:
- Base: Lies on back with shins vertical, supporting flyer’s shoulders
- Flyer: Performs a shoulder stand with shoulders resting on the base’s shins
- Spotter: Stands at flyer’s hips ready to stabilize and prevent tipping
How to Perform:
- Step 1: Base lies on back with knees bent and shins vertical, flyer sits on base’s feet facing away
- Step 2: Flyer leans back as base places shins under flyer’s shoulder blades
- Step 3: Flyer extends legs upward into the shoulderstand position while base supports with hands on hips
- Step 4: To exit, the flyer lowers their legs as the base guides them back to the seated position with spotter assistance
Difficulty Level: ★★★★☆ (4/5)
Variation/Progression: Flyer moves legs into different positions (straddle, pike, single leg) once stable.
9. Side Star

A rotational balance pose is a major milestone that requires coordination and core strength from both partners.
Roles:
- Base: Lies on side with feet supporting flyer’s hip and shoulder
- Flyer: Balances sideways in star position with limbs extended
- Spotter: Stands behind the flyer, ready to catch the torso if the balance fails
How to Perform:
- Step 1: Base lies on its side with the bottom arm extended overhead, the top leg bent with the foot planted
- Step 2: Flyer stands facing the base and places the hip on the base’s bottom foot
- Step 3: Base places top foot on flyer’s shoulder as flyer extends opposite arm and leg like a star
- Step 4: Hold briefly, then base bends knees to bring flyer down with spotter guiding the exit
Difficulty Level: ★★★★☆ (4/5)
Variation/Progression: Flyer transitions from side star to other poses, or the base and flyer switch sides.
10. Reverse Throne

Flyer sits facing away from the base in this variation that prepares you for linking multiple poses together.
Roles:
- Base: Lies on back with feet supporting flyer’s sit bones from behind
- Flyer: Sits on base’s feet, facing away, hands on base’s shins for balance
- Spotter: Stands in front of the flyer, ready to support the chest and prevent forward falls
How to Perform:
- Step 1: Base lies on its back with knees bent and feet ready, the flyer stands facing away near the base’s head
- Step 2: Base places feet on flyer’s sit bones as flyer holds base’s shins for support
- Step 3: Base straightens legs, lifting flyer into reverse sitting position
- Step 4: To exit, the base bends the knees as the flyer steps forward with spotter support
Difficulty Level: ★★★☆☆ (3/5)
Variation/Progression: Flyer releases hands and balances freely, or transitions to other poses from this position.
11. Foot-to-Foot Balance

A standing counterbalance pose that’s playful, photo-friendly, and teaches weight distribution principles.
Roles:
- Base: Stands with one leg extended, foot pressing into flyer’s foot
- Flyer: Stands on one leg, pressing the foot into the base’s foot while holding hands
- Spotter: Stands between partners, ready to support either person if the balance fails
How to Perform:
- Step 1: Partners stand facing each other at arm’s length and hold both hands firmly
- Step 2: Each lifts one leg and presses the sole of that foot against the partner’s foot
- Step 3: Both lean back slightly, creating counterbalance through connected feet and hands
- Step 4: Hold for several breaths, then carefully lower legs while maintaining hand connection
Difficulty Level: ★★★☆☆ (3/5)
Variation/Progression: Release one hand, then both hands for advanced balance, or try with opposite legs.
AcroYoga: 4-Week Beginner Progression Plan
This structured progression plan takes you from foundational stability to linking multiple poses together. Each week builds on the previous one, gradually increasing complexity while keeping safety at the forefront.
| Week | Primary Focus | Poses to Master | Session Structure (30-45 min) |
|---|---|---|---|
| 1 | Foundation & Trust Building | Plank on Plank, Double Plank, Throne | Warm-up (10 min) → Drills (15 min) → Poses (15 min) → Cooldown (5 min) |
| 2 | Flying & Flexibility | Front Bird, Back Bird, Whale Pose, Straddle Throne | Warm-up (10 min) → Drills (15 min) → Poses (15 min) → Cooldown (5 min) |
| 3 | Inversions & New Angles | Reverse Throne, Shoulderstand on Shins (with spotter) | Warm-up (10 min) → Drills (15 min) → Poses (15 min) → Cooldown (5 min) |
| 4 | Flow & Transitions | Side Star, Foot-to-Foot Balance, Linking poses together | Warm-up (10 min) → Drills (10 min) → Poses (20 min) → Cooldown (5 min) |
Follow this plan at your own pace with two to three sessions per week. Repeat any week as needed, and remember that consistency builds confidence faster than rushing through fundamentals.
Spotting & Communication Cues for Safe Practice
Effective spotting and clear communication keep acro yoga safe and enjoyable. Understanding these elements s your practice from risky to confident.
Spotter Placement & Verbal Cues
The spotter’s position changes based on the pose. For foundational poses, stand beside the flyer supporting their torso. During flying poses, position yourself at their core.
For inversions, stand at the hips to prevent tipping. Use consistent verbal cues: “ready” confirms preparation, “up” signals lifting, “down” instructs lowering, and “weight” alerts discomfort.
Keep cues short and clear. The base waits for the flyer’s “ready” before any movement begins.
Safe Exits & Bailout Techniques
Practice controlled exits every session so they become automatic. For sitting poses, the flyer grips the base’s hands and steps down one foot at a time while the base bends its knees.
In flying poses, the base lowers by bending the knees as the spotter guides the descent. Never jump off suddenly.
For inversions, flyer tucks chin and rolls to one side with spotter support. Anyone can call “down” immediately if something feels wrong, ensuring everyone’s safety throughout the practice.
Common Mistakes & How to Fix Them
Even beginners make predictable errors that can slow progress and increase injury risk. Recognizing and correcting these mistakes early keeps your practice safe and effective.
- Base Pushing With Arms Instead of Bone Stacking: Focus on leg strength and alignment through cue drills that emphasize vertical shin position.
- Flyer Collapsing Core During Poses: Practice hollow body holds on the ground to build core engagement awareness.
- Poor Communication Between Partners: Slow down and use stepwise repetitions with verbal cues for every single movement.
- Trying Advanced Moves Too Early: Stick to the progression plan and master foundational poses before attempting harder variations.
- Inconsistent Spotter Presence: Always use a spotter for new poses, even if they feel easy at first.
Focus on one correction at a time rather than trying to fix everything at once, and remember that slow, mindful repetitions build better habits than rushing through poses.
Best Resources for Learning AcroYoga
Learning acro yoga becomes easier when you tap into the right resources. These options provide guidance, community support, and opportunities to practice safely with experienced instructors.
Online Tutorials & Video Resources
- Yogabatics 10-Part Series: Professionally produced instructional videos covering basics to advanced moves with clear progression.
- AcroBhakti (Boris and Nina): Therapeutic flying techniques showing both men and women as bases and flyers.
- AcroYoga International YouTube: Comprehensive beginner playlists with foundational poses, safety techniques, and proper form.
Local Classes & AcroYoga Jams
- ClassPass: Search for acro yoga classes at local studios and fitness centers nationwide.
- Mindbody: Find and book acro yoga classes with real-time availability and reviews.
- Meetup.com: Join local jam events through groups like Austin AcroYoga and Acroyoga Los Angeles.
These resources work best when combined. Use online tutorials for technique guidance, attend local jams for hands-on practice, and connect with community groups for ongoing support.
The Bottom Line
You now have everything you need to start your acro yoga practice safely and confidently.
The poses range from simple foundational moves to more challenging balances, all designed to build strength, trust, and connection with your partner.
Remember to always warm up, communicate clearly, and use a spotter when trying new poses. Follow the progression plan at your own pace and listen to your body along the way.
Acro yoga is about the experience, not perfection. Take it slow, have fun, and enjoy the process of learning together.
Have you tried acro yoga before? What’s been your biggest challenge or favorite moment? Share your experience in the comments below!

