
| Style | Hatha / Vinyasa / All levels |
| Level | Beginner to Intermediate |
| Duration | 3–5 breaths per side (30–60 seconds) |
| Props Needed | Yoga mat; optional: yoga block, strap for bound variation |
| Best Time | Mid-sequence, after Warrior II; suitable morning or evening |
| Avoid If | Knee, hip, or shoulder injury; migraines; high or low blood pressure (use caution) |
A good side stretch should feel open, not collapsed. That is where the extended side angle pose can surprise you.
I used to think this pose was mainly about reaching one arm long and getting the lower hand closer to the floor. But the more I practiced it, the more I realized the real work starts much lower. Your front knee has to stay steady. Your back foot has to press down. Your ribs need space. Your chest has to stay open without forcing the shoulder.
That is why this pose is such a useful teacher. It shows you where your body is strong, where it needs support, and where you may be sinking instead of lengthening.
Here, you will learn what the extended side angle pose is, how to practice it safely, which muscles it works, its benefits, common mistakes, and the best variations for your body.
| Disclaimer: This article is for informational and educational purposes only. It does not constitute medical advice. Always consult a qualified healthcare provider before starting a new exercise, nutrition, or wellness program. |
Basics of Extended Side Angle Pose
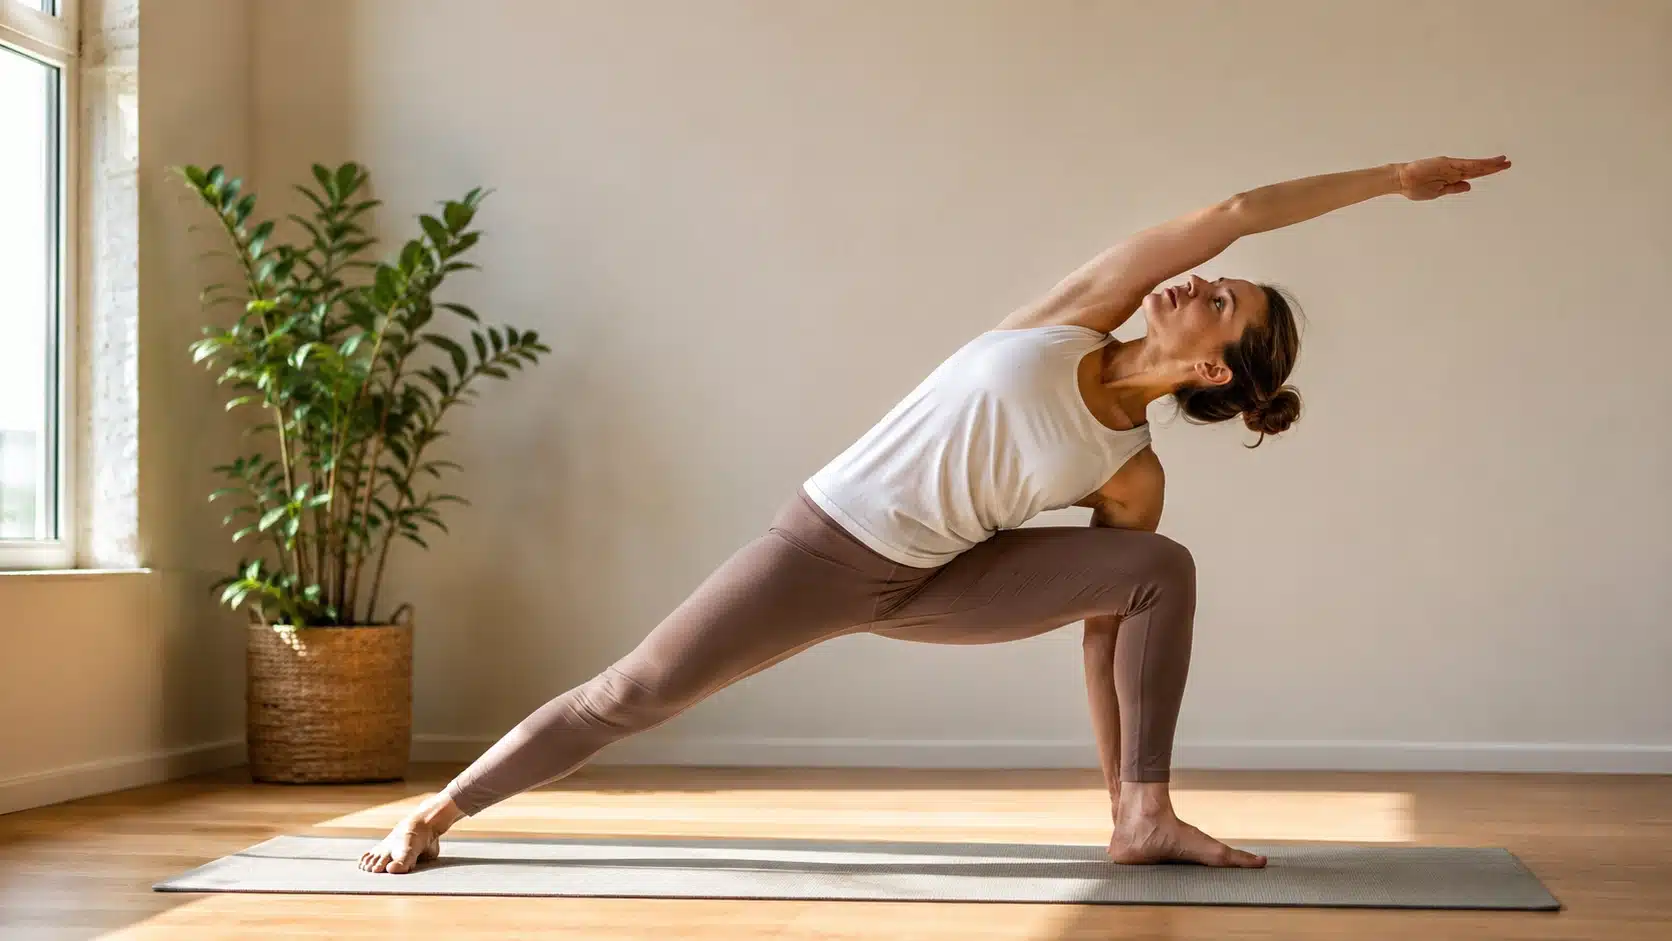
The extended side angle pose is a standing yoga pose also called Utthita Parsvakonasana. It is usually practiced from Warrior II, with the front knee bent, the back leg strong, and the top arm reaching overhead.
The Sanskrit name is pronounced oo-TEE-tah parsh-vah-koh-NAH-suh-nuh. “Utthita” means extended, “Parsva” means side, “Kona” means angle, and “Asana” means pose. The name describes the shape well. Your body forms a long side angle from the back foot, through the ribs, and out through the top fingertips.
This pose is a staple in Hatha, Vinyasa, and beginner yoga classes because it trains several qualities at once: lower-body strength, hip opening, lateral spinal extension, core stability, and chest expansion.
It is also a useful reference point for anyone weighing Pilates vs yoga; the standing strength work here is one of the clearest examples of what yoga builds that Pilates does not emphasize in the same way. The goal is never how low the hand goes. The goal is how long and open the body stays.
Benefits of the Extended Side Angle Pose
The extended side angle pose works the whole body in a single shape, building strength in the lower body, creating length through the side waist, and opening the chest all at once.
- Strengthens the legs: The front quadriceps, hamstrings, glutes, and ankle stabilizers all work actively to hold the bent-knee position throughout the pose.
- Opens the hips and inner thighs: The wide stance and front-knee bend create a sustained hip flexor and inner-thigh stretch that builds over multiple breaths.
- Stretches the obliques and intercostals: As the top arm reaches overhead, the muscles between the ribs and along the waist lengthen, a stretch that shallow-breathing habits rarely reach.
- Builds core stability: The obliques and deep abdominals engage to keep the torso lifted and prevent the weight from collapsing into the lower arm.
- Opens the chest and shoulders: The top arm sweeps alongside the ear while the chest rotates upward, improving shoulder mobility and posture.
- Improves balance and proprioception: Coordinating the legs, hips, spine, arms, and gaze in one steady shape trains body awareness over time.
- Supports spinal health: The lateral extension of the spine — rather than compression or rounding — can ease mild low-back tension and promote better posture.
- Creates breathing space: The rib expansion in this pose encourages deeper diaphragmatic breathing, which can benefit practitioners who tend to breathe shallowly at rest.
These benefits are most accessible when the legs stay active, the torso stays lifted, and the breath remains steady throughout the hold. Collapsing into the lower hand or forcing the arm overhead prematurely will reduce all of them.
Anatomical Insight of Extended Side Angle Pose
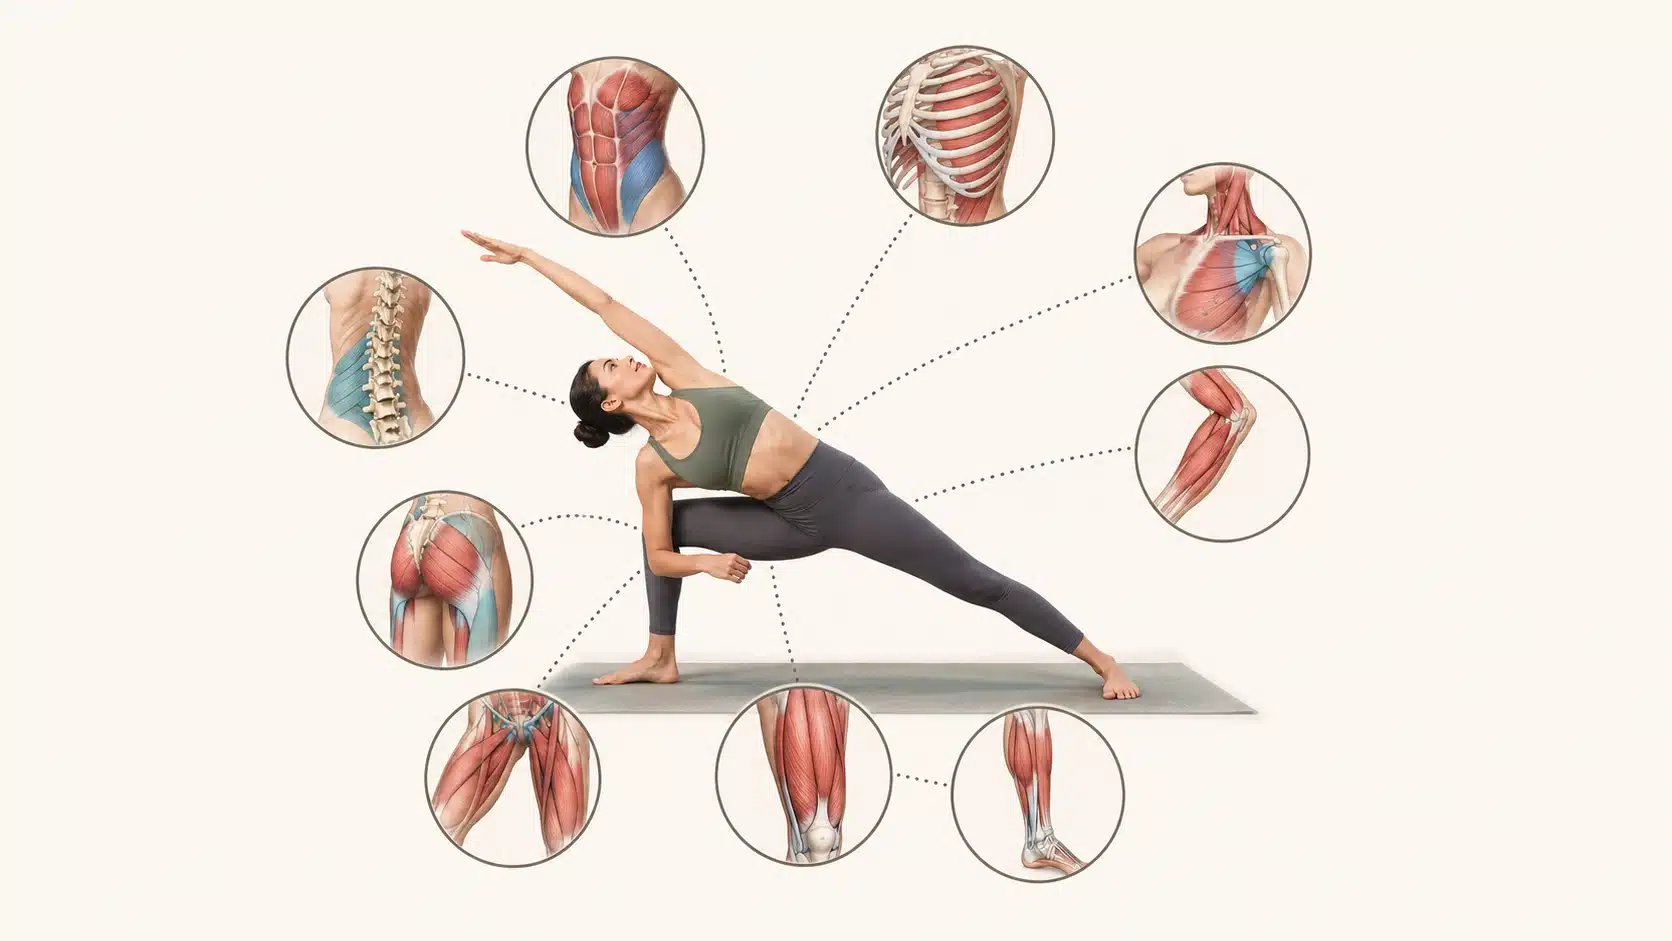
Understanding what the body is doing anatomically helps you feel the pose more clearly and correct it more quickly when something is off.
- Front leg: The quadriceps contract to sustain the bent-knee position. The hamstrings and glutes stabilize the hip. The ankle stabilizers activate to prevent the knee from rolling inward.
- Back leg: Stays straight, internally rotated slightly, with the outer edge of the foot pressing firmly into the mat. The calf and hip abductors keep the back side of the body grounded.
- Hips and hip flexors: The wide stance puts both hip flexors into a sustained stretch. The front hip creases deepen as the torso extends over the bent leg.
- Core and obliques: The lateral trunk muscles — obliques and quadratus lumborum — engage to support the side-bending action and prevent the lower ribs from dropping toward the floor.
- Side waist and intercostals: The muscles between the ribs on the upper side lengthen as the top arm reaches. This is the defining stretch of the pose.
- Chest and shoulders: The upper chest rotates toward the ceiling. The lower shoulder stays lifted away from the ear. The top arm extends with external rotation.
- Spine: Stays long through lateral extension rather than compressing sideways. The neutral lumbar curve is maintained or gently supported.
- Neck and gaze: Should stay relaxed. Looking up is optional — looking forward or slightly downward is equally valid and reduces strain for anyone with neck issues.
When these areas cooperate, the pose feels spacious rather than cramped. The signal that alignment is right is when both sides of the waist feel long, not just the top one.
How to Do Extended Side Angle Pose Step by Step
Start from Warrior II, and focus on maintaining length through both sides of the waist rather than dropping the hand as low as possible.
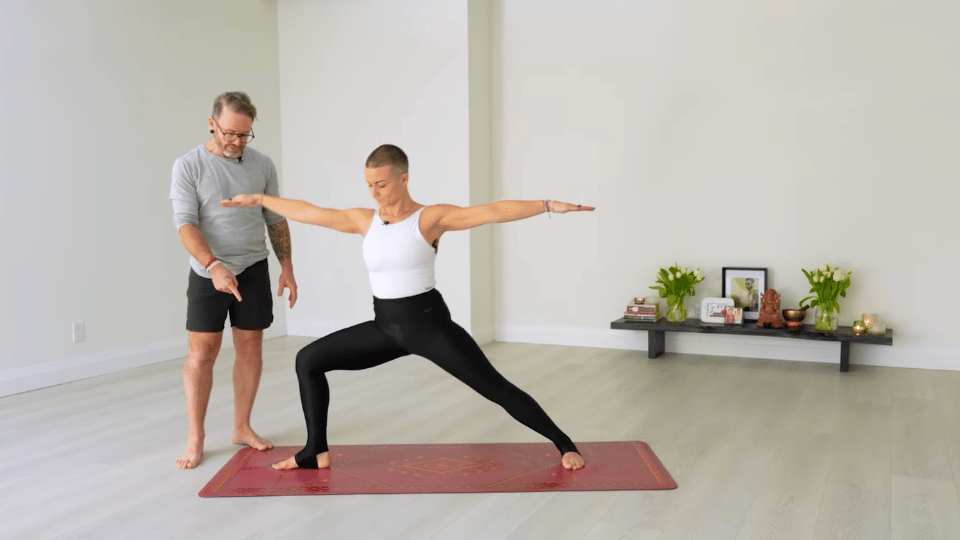
Step 1: Start in a Wide Standing Stance

Stand with your feet wide apart on the mat — roughly the length of one of your legs. Turn your front toes forward and angle your back foot in about 45 degrees.
Press evenly through both feet, especially the outer edge of the back foot. Keep the spine tall, the chest open, and the arms wide before bending the knee. A strong, grounded base here makes every part of the pose above it more accessible.
Step 2: Bend the Front Knee to 90 Degrees
Bend your front knee until it stacks over the ankle — the shin should be approximately vertical. Keep the knee tracking in the same direction as the second and third toes, not rolling inward.
The back leg stays straight, firm, and fully extended. Press through both feet simultaneously: the front foot into the floor, the back outer edge into the mat. This dual-grounding action stabilizes the pose and keeps the lower body working rather than passive.
Step 3: Lower the Front Arm and Reach the Top Arm Overhead
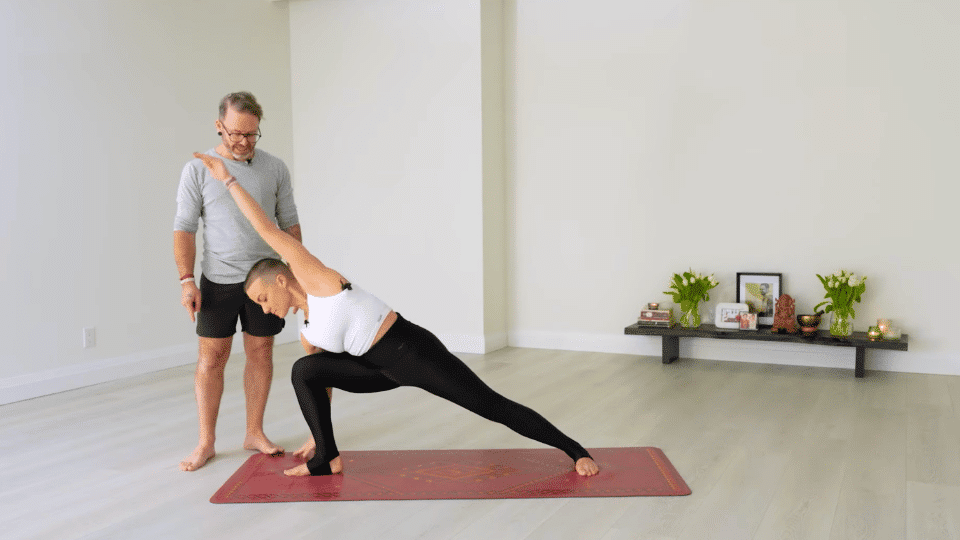
Bring your front forearm to rest on your front thigh, or place your hand on a yoga block beside the foot. Keep the lower arm light, do not sink your full body weight into it. The legs and core should be doing the supporting work.
Reach the top arm alongside your ear with the palm facing down. Create one long diagonal line from the outer back heel, through the hip, along the ribs, through the shoulder, and out through the fingertips.
The chest should rotate open, ribs turning slightly upward, not collapsing toward the floor. Let each inhale lengthen the top side of the body; let each exhale root the back foot more firmly.
| Instructor Tip: If you feel the top shoulder creeping up toward the ear, draw the shoulder blade down the back before lifting the arm again. A clear, open chest matters far more than how high the arm reaches. |
Step 4: Hold, Breathe, and Release
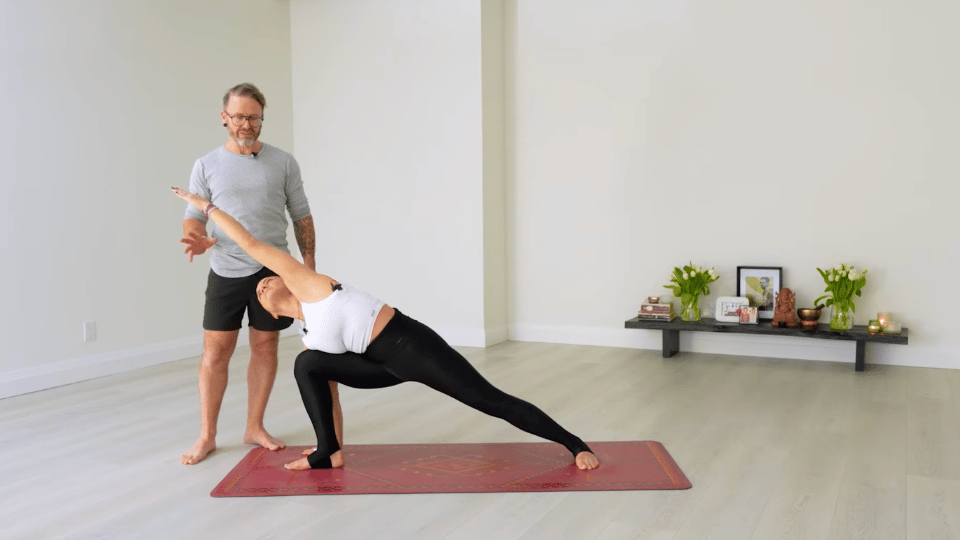
Hold for three to five steady breaths. Use each inhale to lengthen through the top side, feel the ribs expand. Use each exhale to root both feet and engage the core slightly more. Keep the front knee controlled and the back leg fully active throughout.
To release: press through both feet, lift the torso back to upright, and straighten the front knee on an inhale. Return briefly to Warrior II or a standing position before switching sides. Take equal time on both sides every practice.
For a visual walkthrough, this video demonstrates the setup well:
How Long Should You Hold the Extended Side Angle Pose?
For most practitioners, three to five breaths per side, roughly 30 to 60 seconds, is the right working range. That duration is long enough to feel the lateral stretch develop and the lower body work steadily, but short enough that the form does not deteriorate.
In a strength-focused Vinyasa flow, you may move through the pose in three breaths and repeat it multiple times across the sequence.
In a slower Hatha or yin-influenced practice, holding for up to 90 seconds on each side builds more endurance in the hips and thighs and deepens the intercostal stretch. If the front knee starts to wobble or the back foot lifts before the time is up, come out early and reset.
Extended Side Angle Pose Variations
Each variation below adjusts one element of the pose to make it more accessible, more challenging, or more targeted. Choose based on where you are today, not where you want to be.
1. Forearm on Thigh (Beginner)
This is the recommended entry point for most beginners, or for anyone who feels tightness in the hips, shoulders, or lower back.
Place the front forearm on the bent thigh and keep the arm light; it is a resting point, not a prop for your body weight. This variation keeps the torso lifted, reduces lumbar compression, and lets you focus on opening the chest and rooting through both feet without the distraction of reaching low.
2. Block Under the Front Hand (Supported)
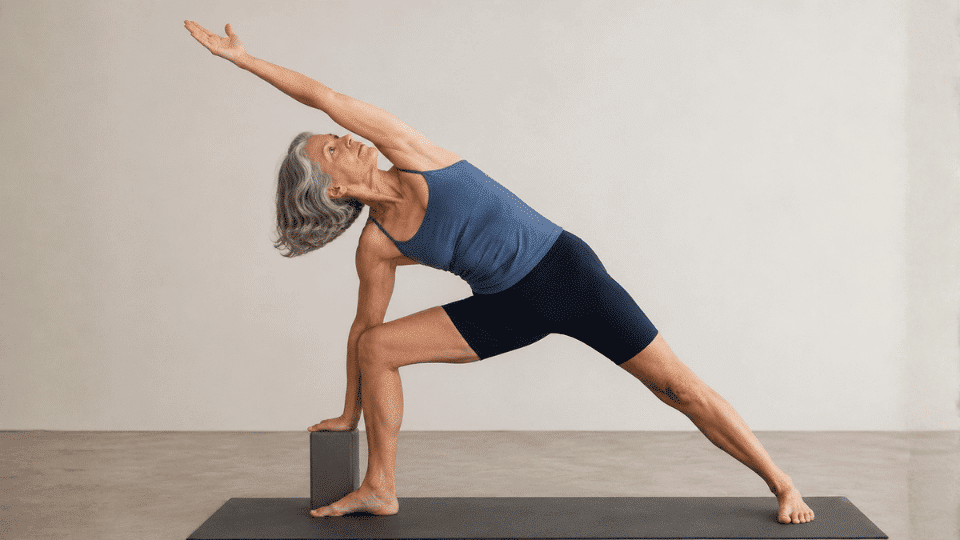
Place a yoga block on its tallest, medium, or lowest setting beside your front foot and rest the lower hand on it. This gives you the benefits of a lower hand position, more lateral extension, and greater hip opening, without requiring the flexibility to reach the floor cleanly.
Many experienced practitioners prefer this variation because it lets the spine stay long, and the chest stay open, while still deepening the pose.
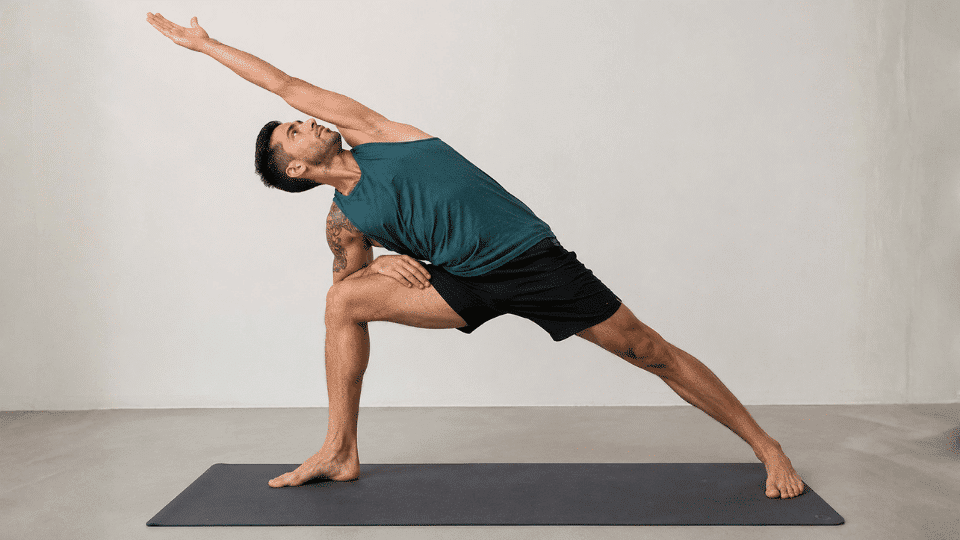
3. Hand to Floor (Full Expression)
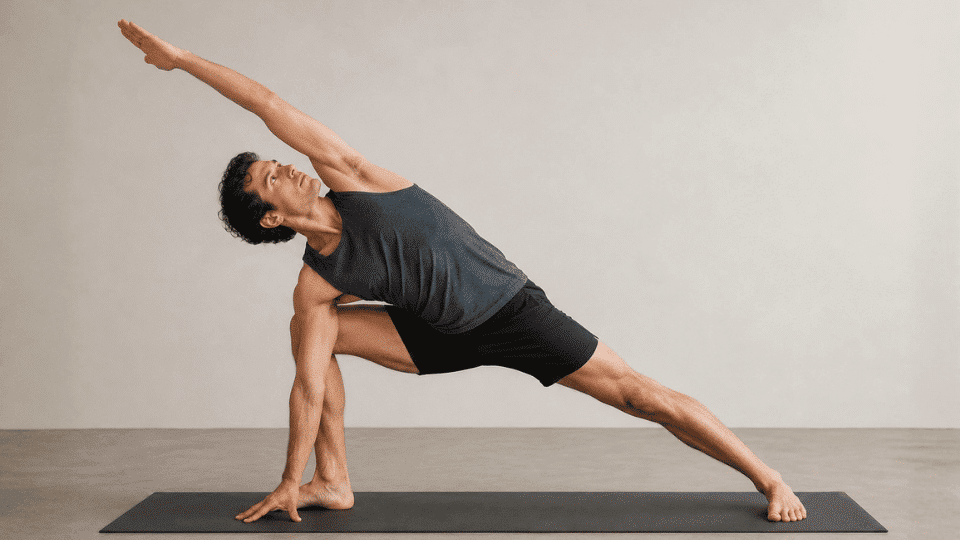
The lower hand comes inside or alongside the front foot. This requires genuine hip mobility, lateral spinal length, and core control.
Only move into this version if you can maintain an open chest and a long spine at the floor position, if the back rounds or the lower shoulder collapses, return to a block. Reaching the floor is not the goal; maintaining the shape is.
4. Bound Extended Side Angle Pose (Advanced)
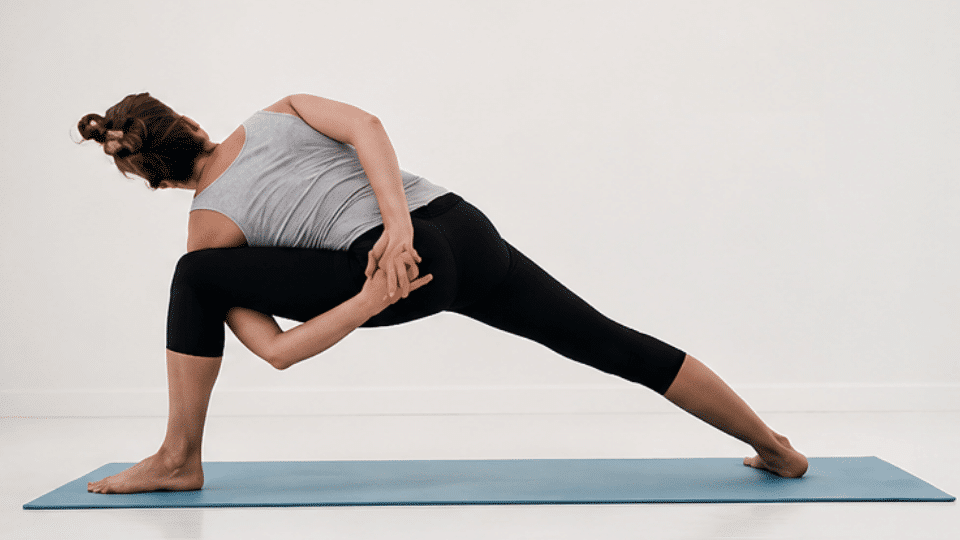
Wrap the lower arm under the front thigh and bring the top arm behind the back to clasp the hands together. This bound variation, sometimes called Baddha Parsvakonasana, adds significant shoulder and chest opening and requires hip mobility and spinal rotation that most beginners will not have yet.
If the hands do not meet, use a yoga strap across the lower back. Never force the bind, the strain tends to land in the shoulder and elbow in ways that persist.
5. Extended Side Angle at the Wall (Alignment Practice)

Practice with your back body near a wall to give yourself real-time alignment feedback. The wall will immediately tell you if the back hip is drifting forward, the chest is turning toward the floor, or the back foot is lifting.
This variation is particularly useful early in learning the pose and during any period when you are resetting ingrained habits. Keep the back of the body lightly brushing the wall while the legs stay active and independent.
Alignment Tips for Extended Side Angle Pose
Small alignment adjustments make a large difference in how the pose feels and what it protects. These are the cues I return to most consistently in class.
- Stack the front knee directly over the ankle; it should not track past the toes or cave inward.
- Press the outer edge of the back foot firmly into the mat to keep the back leg fully active.
- Lengthen both sides of the waist, the lower side tends to collapse; actively lift and extend it.
- Rotate the chest so the top ribs turn slightly upward rather than toward the floor.
- Keep the lower arm light, whether on the thigh, block, or floor, so the core does the supporting work.
- Extend through the top fingertips without raising or tensing the shoulder.
- Choose a gaze direction that is comfortable for the neck: looking down, straight ahead, or gently upward are all valid options.
Working through this list in order, from base to top, will resolve most alignment problems faster than trying to fix several things at once.
What Common Mistakes Should You Avoid
The most common errors in the extended side angle pose all share the same root: the base becomes passive while the upper body tries to carry the pose. Here are the five patterns I see most often, and the fix for each.
- Front knee falling inward: The knee should track toward the second toe throughout the hold. If it collapses inward, reduce the bend slightly and press the inner thigh outward with intention. Strengthening the hip abductors outside of yoga practice helps this over time.
- Back foot lifting or rolling: The outer edge of the back foot needs to press firmly into the mat. When it lifts, the entire pose loses its anchor. If this keeps happening, widen the stance slightly or shorten the hold until the foot stays grounded.
- Collapsing into the lower arm: This is the most universal mistake in the pose. The lower arm or hand should feel almost weightless. If you feel the arm carrying you, re-engage the core and press the feet down more firmly — let the legs do the work they are meant to do.
- Chest turning toward the floor: The top shoulder and ribcage should rotate upward, not down. If the chest closes, use the forearm-on-thigh variation or place a block under the hand and focus entirely on the rotation rather than the reach.
- Forcing the top arm overhead: If the shoulder feels compressed or the neck shortens when you reach the arm up, place the top hand on the hip instead. A clear, open chest with the hand on the hip is better alignment than a forced arm line with a closed chest.
Correcting these errors is not just cosmetic; each one affects what muscles the pose actually trains. Once the base is grounded and the torso stays lifted, the pose delivers its full benefits.
Who Should Avoid the Extended Side Angle Pose
The extended side angle pose is safe for most healthy adults, but there are specific situations where caution or avoidance is appropriate.
- Knee injuries: The sustained bent-knee position places load on the knee joint. Anyone already managing knee pain when squatting should get clearance from a physiotherapist before practicing, or work with the forearm-on-thigh variation and a reduced range of bend.
- Hip injuries: The wide stance and hip-opening demand can aggravate acute hip injuries. Practice at reduced intensity or skip the pose during recovery.
- Shoulder or neck injuries: If raising the top arm is painful or causes nerve symptoms, keep the hand on the hip and avoid turning the head upward. Look straight ahead or downward instead.
- High blood pressure: Avoid looking upward in this pose, as it can affect blood pressure in sensitive individuals. Keep the gaze neutral and do not hold the breath.
- Migraine or headache: The inverted neck position and physical effort can worsen migraines. Skip or rest until symptoms resolve.
- Pregnancy (second and third trimester): The deep side stretch and wide stance may be uncomfortable as the pregnancy progresses. A prenatal fitness guide and a qualified instructor can recommend appropriate modifications for each stage.
If you are unsure whether this pose is appropriate for your current condition, speak with a healthcare provider or a qualified yoga instructor before practicing.
How to Sequence Extended Side Angle Pose
This pose sits naturally in the middle of a standing-pose sequence, after the body is warm and the hips have already begun to open. Here is a reliable sequencing framework.
Preparatory Poses
These poses build the strength, hip openness, and body awareness needed for the extended side angle pose to feel safe and accessible:
- Mountain Pose (Tadasana): Establishes grounding and upright spinal alignment.
- Warrior I and Warrior II: Open the hips, strengthen the legs, and establish the wide stance that the extended side angle pose requires. Warrior II is the most direct entry point.
- Low Lunge (Anjaneyasana): Warms the hip flexors and opens the groin before the wide-stance demand.
- Goddess Pose: Builds inner-thigh and hip-opening capacity in a similar wide stance.
Follow-Up Poses
After the extended side angle pose, these poses complement and deepen the work already done:
- Reverse Warrior (Viparita Virabhadrasana): Flows naturally from the Warrior II stance and takes the side body in the opposite direction, creating a balanced lateral stretch on both sides.
- Triangle Pose (Trikonasana): Uses the same wide stance with a straight front leg. Moving from an extended side angle to a triangle gives the legs strength first, then length.
- Half Moon Pose (Ardha Chandrasana): A natural progression for practitioners ready for a more challenging balance challenge from the same hip-opening position.
- Seated Forward Fold (Paschimottanasana) or Reclined Twist: Completes the sequence by releasing the outer hip and lower back after the standing work. These fit naturally into a set of restorative yoga poses after a stronger standing practice.
Treating extended side angle as part of a sequence, not an isolated posture, is one of the best ways to access its full benefits and practice it safely.
Extended Side Angle Pose vs. Triangle Pose: What Is the Difference?
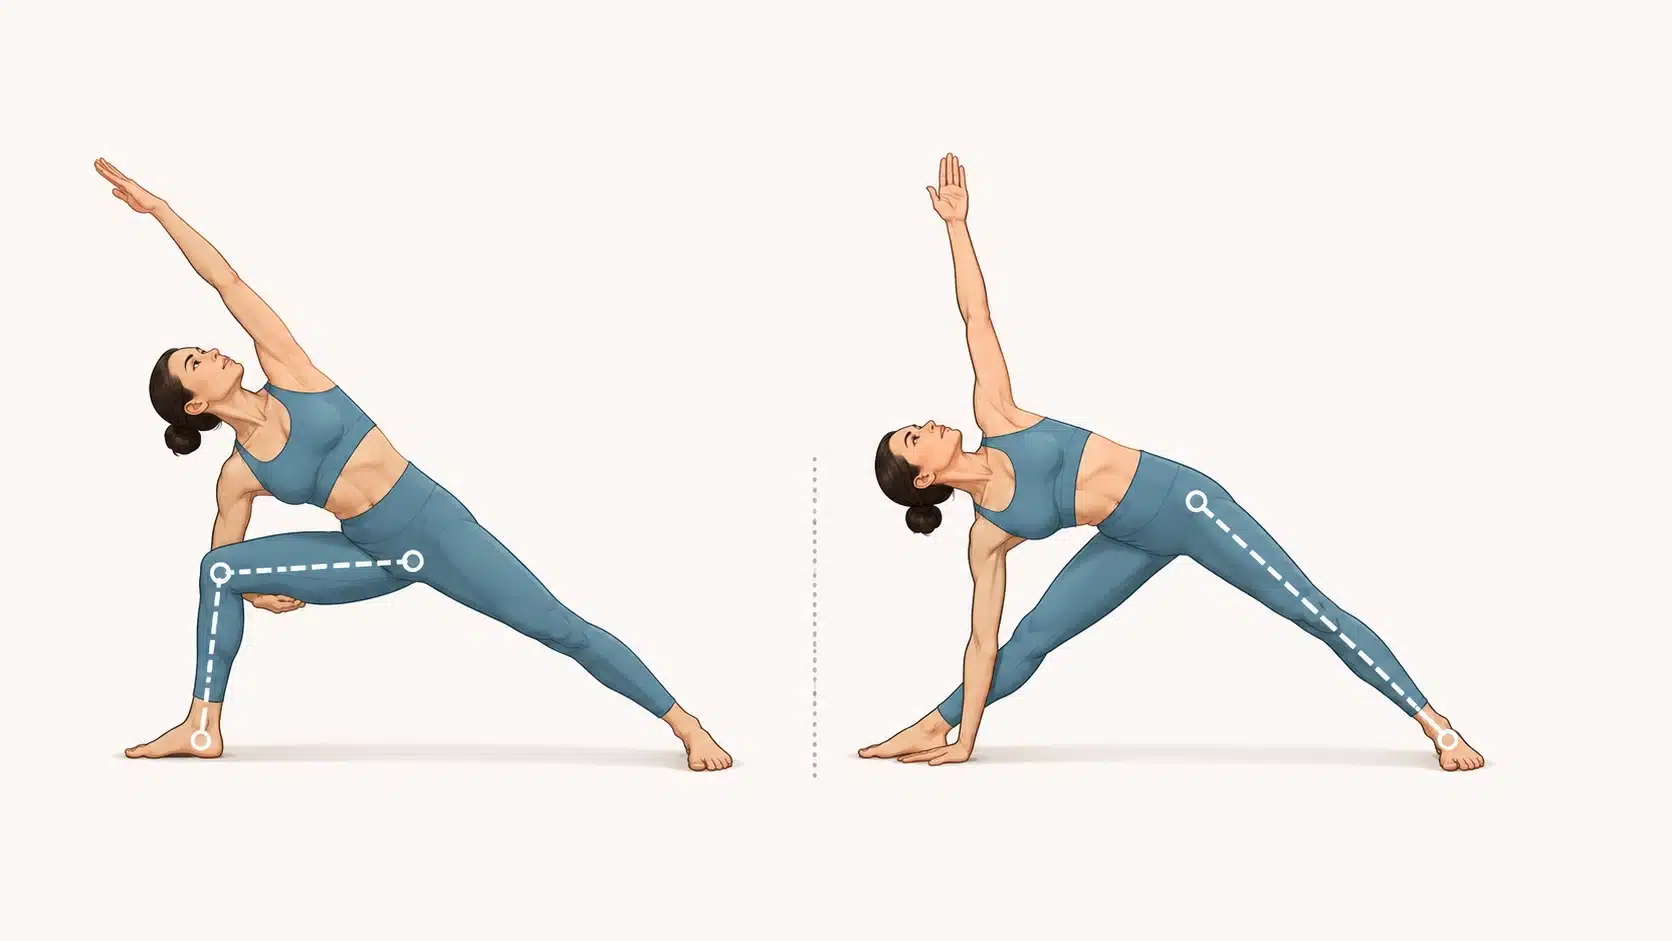
The most fundamental difference is the front knee. The extended side angle pose keeps the front knee bent at roughly 90 degrees; the triangle pose keeps the front leg straight. Both use a wide stance and reach for a long side-body line, but the demands they place on the body are quite different.
| Factor | Extended Side Angle Pose | Triangle Pose |
|---|---|---|
| Front knee | Bent at 90 degrees | Straight |
| Main focus | Strength plus side stretch | Hamstring and side-body stretch |
| Lower body | Greater leg strength demand | Greater hamstring lengthening |
| Core demand | Stronger stabilizing requirement | Moderate stabilizing requirement |
| Best for | Building heat and lower-body endurance | Improving length and spinal alignment |
Practically speaking, an extended side angle tends to produce more heat and fatigue in the front thigh because the quadriceps are under sustained load. The triangle pose often creates a sharper sensation in the hamstrings because of the straight-leg position. Many sequences use both in order — extended side angle first for strength, triangle second for length — which is an effective pairing for a complete standing practice.
Frequently Asked Questions
What is the extended side angle pose good for?
The extended side angle pose strengthens the legs and glutes, opens the hips and inner thighs, stretches the obliques and intercostals, and improves chest and shoulder mobility — all in one standing shape. It is especially useful for practitioners who sit for long periods, as it directly addresses the hip flexor tightness, lateral trunk stiffness, and rounded upper back that come with prolonged desk posture.
What muscles does the extended side angle pose work?
The primary muscles working in this pose are the quadriceps (front leg), glutes and hip abductors (both legs), obliques and lateral core, hip flexors (stretched), intercostals and side waist (stretched on the top side), and the shoulder rotators on the top arm. The back leg engages the calf and outer hip throughout to maintain grounding.
Is the extended side angle pose good for back pain?
For mild, non-specific low back tension, an extended side angle can provide relief by lengthening the lateral trunk muscles and creating space in the lumbar spine through lateral extension rather than compression. However, if the lower hand carries too much body weight, this can increase lumbar load. Use the forearm-on-thigh variation if you have any history of back issues, and consult a physiotherapist if you have a specific diagnosis before using yoga poses therapeutically.
Is the extended side angle pose good for sciatica?
Some practitioners find that the hip opening and lateral extension in the extended side angle provides temporary relief from sciatic tension — particularly the piriformis stretch created by the wide stance and hip external rotation. That said, sciatica has several possible causes, and a pose that helps one root cause may aggravate another. Always get a proper diagnosis and work with a qualified instructor or physiotherapist before using this pose to address sciatica.
Who should avoid the extended side angle pose?
Anyone with a current knee, hip, shoulder, or neck injury should approach this pose with caution or skip it temporarily. People with migraines, high blood pressure, or vertigo should avoid the upward gaze variation. Those in the second or third trimester of pregnancy should consult a prenatal yoga instructor before practicing. When in doubt, speak with a healthcare provider first.
How do you modify the extended side angle pose for beginners?
The forearm-on-thigh variation is the most practical entry point for beginners. It keeps the torso lifted, reduces strain on the lower back, and lets you focus on the foundational elements, knee alignment, back-foot grounding, chest rotation — without the challenge of reaching lower. Once those fundamentals are consistent, add a yoga block under the lower hand as the next step before moving toward the floor.
What poses come before and after the extended side angle pose?
Warrior II is the most natural preparatory pose, it establishes the stance, opens the hips, and warms the legs. Low lunge and Goddess Pose also prepare the hips well. After an extended side angle, Reverse Warrior provides a counter-stretch, Triangle Pose continues the wide-stance work with a straight leg, and a reclined twist or forward fold completes the release of the outer hip and lower back.
What is the difference between the extended side angle pose and Parsvakonasana?
They refer to the same pose. Parsvakonasana is the shortened Sanskrit name; Utthita Parsvakonasana is the full name, with utthita meaning extended. In most yoga classes and written guides, all three terms, extended side angle pose, Parsvakonasana, and Utthita Parsvakonasana, describe the same standing posture with a bent front knee and a long lateral extension through the side body.
Final Verdict
Unlocking space in your side body requires patience, but the rewards are worth the effort.
Moving mindfully through this posture helps you build a highly resilient lower body, deep core stability, and excellent postural habits that serve you well beyond the yoga mat.
Finding true length means honoring where your body is right now, utilizing blocks when needed, and letting your breath guide your depth. Practicing the extended side angle pose consistently will teach you to find ease within effort.
What variation felt best in your body today? Drop your thoughts in the comments below, or try incorporating our alignment tips into your next practice session.