Have you ever grabbed a towel or belt during a stretch because you couldn’t quite reach?
That’s when yoga strap stretches can help. I started using a strap to make my stretches easier and safer, and it quickly became one of my favorite tools.
In this guide, I’ll show you how yoga strap stretches work, which muscles they target, and why they’re useful for building flexibility.
You’ll also get simple examples you can try at home, even if you’re just starting out. By the end, you’ll know how to add these stretches into your routine so your body feels more open, relaxed, and supported without pushing too hard.
What is a Yoga Strap and Why Use It?
A yoga strap is exactly what it sounds like: a long, flat strap made from sturdy cotton, hemp, or nylon.
Most straps are about 6 to 10 feet long and come with some kind of buckle or ring system that lets you create loops or adjust the length.
For beginners, a yoga strap is like having a helpful friend in your practice. Here’s why it’s so valuable when you’re starting out:
- It improves your posture by helping you maintain proper alignment even when your flexibility is still developing
- It extends your reach so you can access poses without straining or compromising your form
- It increases safety by preventing you from forcing your body into positions it’s not ready for
Choosing the Right Yoga Strap
Walking into a yoga store can feel overwhelming with all the strap options available. Let’s break it down simply:
Length: For most beginners, an 8-foot strap is perfect. It’s long enough for most poses but not so long that you’re constantly dealing with excess material. If you’re taller than 6 feet or have longer limbs, consider a 10-foot strap.
Material: The cotton straps are soft, comfortable, and easy to grip, making them perfect for beginners. Hemp straps are more eco-friendly and get softer with use. Nylon straps are the most durable, but can be a bit slippery when you’re sweaty.
Buckle types:
- D-ring straps are the most common and easiest to adjust quickly during practice
- Buckle straps hold their position really well, but take longer to adjust
- No-buckle straps are simple and lightweight, though you’ll need to tie knots to create loops
For beginners, I’d recommend starting with a cotton D-ring strap. It’s user-friendly, affordable, and will serve you well as your practice develops.
Yoga Strap Stretches Poses for All Skill Levels
Using a strap makes stretching easier and more comfortable, especially if you’re new to yoga. Here are some simple strap stretches you can start with:
1. Seated Forward Fold Stretch (Hamstrings & Lower Back)
This seated fold uses a strap to help you hinge from your hips and lengthen your spine while reaching your feet, perfect for loosening tight hamstrings and easing tension in your lower back.
How to do it:
- Sit on the floor with legs straight out in front
- Loop the strap around the balls of your feet
- Sit up tall, lengthening your spine
- Pull the strap gently to keep the spine long as you fold forward from the hips
- Keep legs extended and knees soft if needed
- Hold for 30 seconds to 2 minutes, breathing deeply
Skill level: Beginner
Key benefits: This stretch targets tight hamstrings and helps decompress your lower back. It’s also great for improving your posture by lengthening your spine.
2. Reclined Hamstring Stretch with Band (Leg Flexibility & Release)
This reclined position gently supports your leg while you stretch, letting the strap do the work of holding so your hamstrings and hip flexors can release without strain.
How to do it:
- Lie on your back, knees bent, feet on the floor
- Loop the strap around the ball of your right foot
- Hold the ends of the strap with both hands
- Slowly straighten the right leg toward the ceiling, keeping your shoulders relaxed
- Use the strap to gently pull the leg closer to the chest
- Hold 1-2 minutes, then switch sides
Skill level: Beginner
Key benefits: This stretch releases tension in your hamstrings and hip flexors while being super gentle on your back. It’s perfect for evening routines or whenever your legs feel tight.
3. Shoulder Stretch (Opening the Chest & Shoulders)
This simple upper-body opener uses the strap behind your back to create more space across your chest and shoulders, countering the rounded posture from desks and screens.
How to do it:
- Sit or stand comfortably
- Hold the strap with one hand, reaching behind the lower back, other overhead
- Pull gently with your lower hand to deepen the chest and shoulder stretch
- Keep spine tall and shoulders relaxed
- Hold 30 seconds to 1 minute, then switch sides
Skill level: Beginner–Intermediate
Key benefits: This stretch opens up tight chest muscles and improves shoulder mobility. It’s fantastic for counteracting the forward head posture that often results from excessive screen time.
4. Bound Angle Pose with Strap (Hip Opener)
This supported hip opener stabilizes your legs and spine so you can lean forward without collapsing, giving your inner thighs and hips a steady, comfortable stretch.
How to do it:
- Sit and bring the soles of your feet together
- Loop the strap around the balls of the feet
- Hold the strap ends and gently pull forward, keeping your spine straight
- Use the strap to support you as you fold forward
- Hold for 1-2 minutes
Skill level: Beginner
Key benefits: This pose opens your hips and inner thighs while supporting good posture. It’s also really calming and meditative.
5. Supported Boat Pose (Core Activation with Support)
This variation of boat pose uses the strap to hold your legs in place, allowing you to build core strength and balance gradually without straining your lower back.
How to do it:
- Sit with knees bent, feet flat
- Loop the strap around the lower legs below the knees
- Grip strap ends, lean back slightly
- Lift your feet off the floor using the strap for support
- Straighten legs if comfortable
- Hold 10-30 seconds, gradually increasing time
Skill level: Beginner–Intermediate
Key benefits: This pose builds core strength while the strap provides stability and support. It’s a great way to work toward the full boat pose without straining your back.
6. Quad Stretch (Front of Thigh Release)
This side-lying strap stretch brings your heel toward your glutes in a controlled way, making it easier to release tension in your quads and hip flexors.
How to do it:
- Lie on the right side, legs extended
- Bend the left knee, loop the strap around the left foot
- Hold the strap ends in your left hand
- Gently pull heel toward glutes, keeping knees together
- Keep hips stacked
- Hold 1-2 minutes, then switch sides
Skill level: Beginner
Key benefits: This stretch releases tension in your quadriceps and hip flexors. It’s excellent for relieving knee discomfort and improving leg circulation.
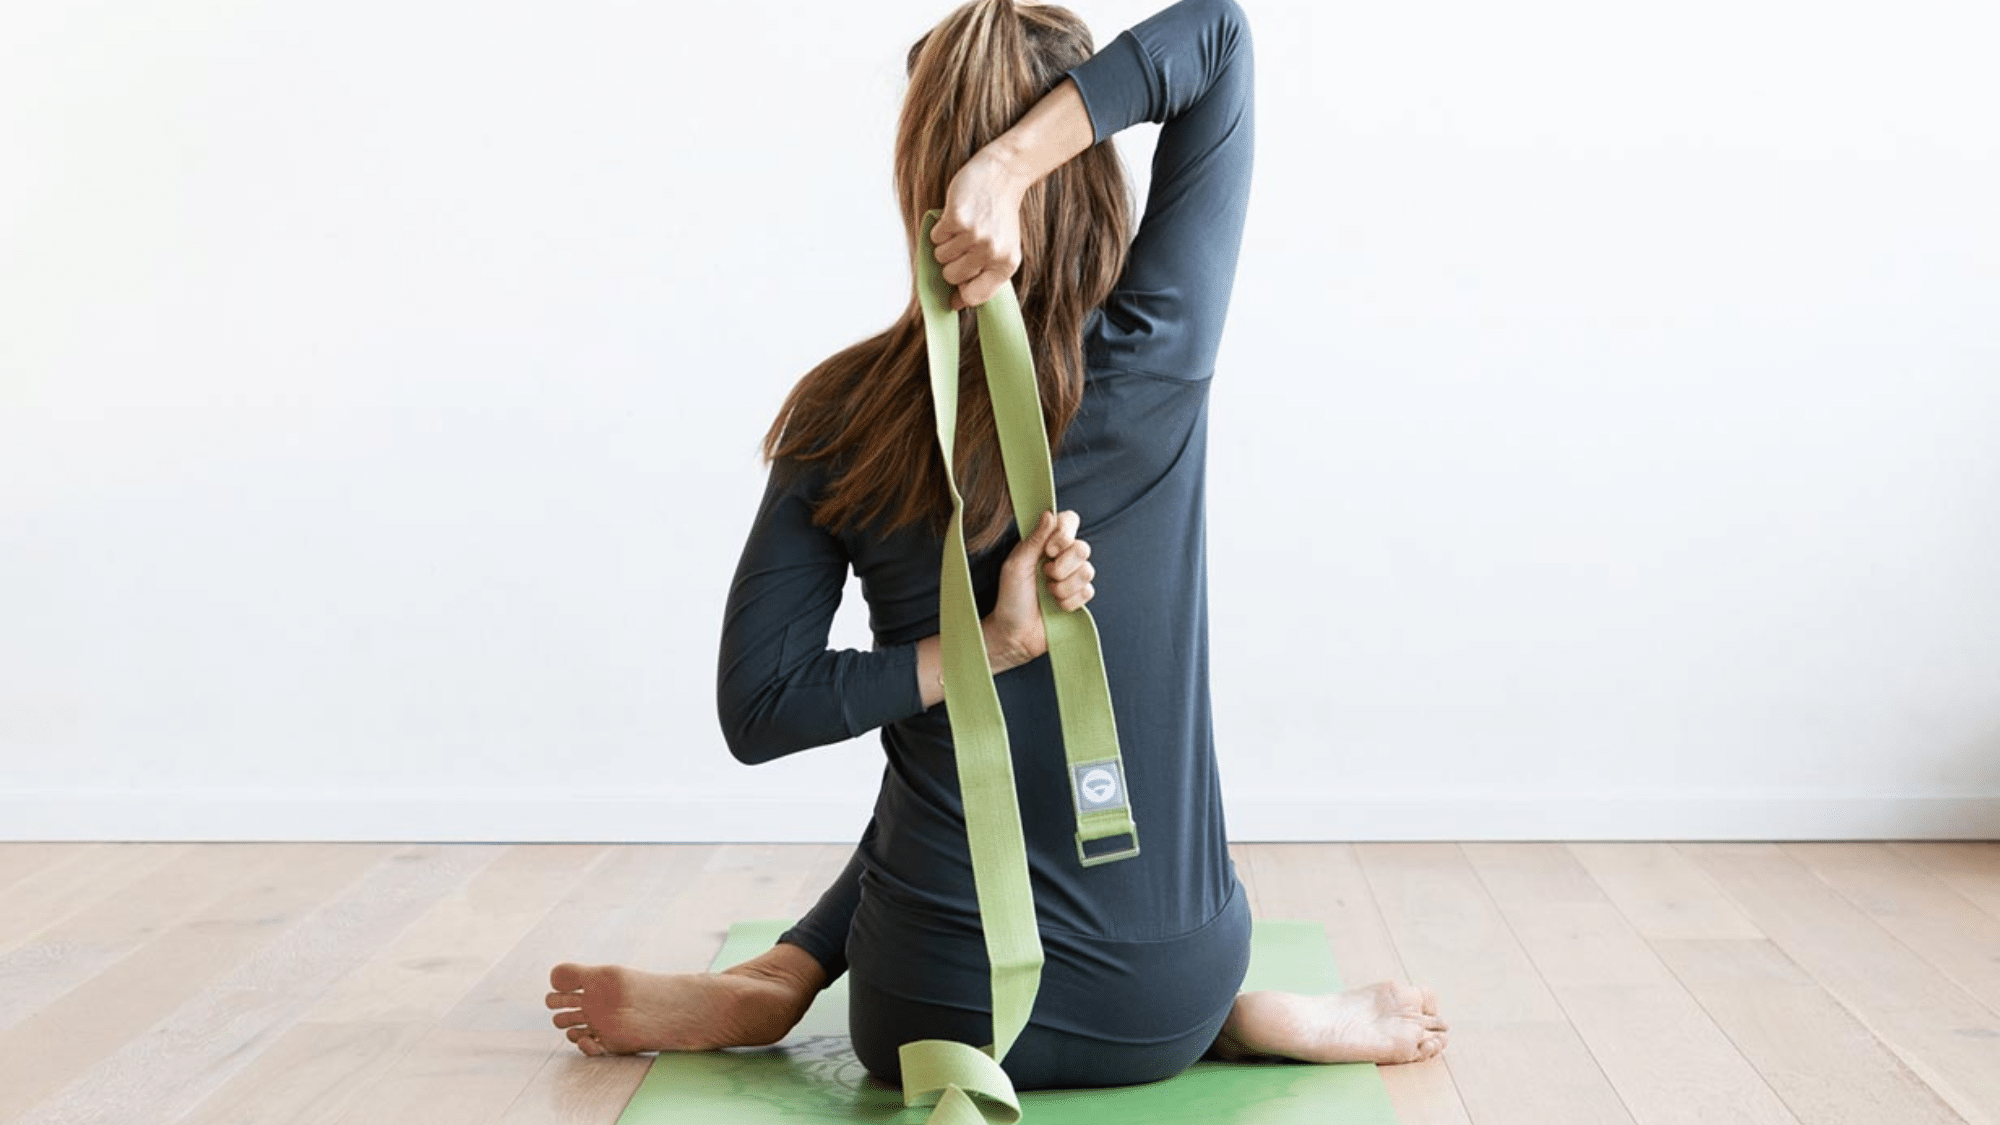
7. Cow Face Arms with Strap (Shoulder Mobility)
This shoulder stretch uses the strap between your hands to close the gap behind your back, making it easier to improve flexibility and open your chest.
How to do it:
- Sit or stand feet hip-width apart
- Hold the strap overhead in the right hand
- Bend the right elbow, letting the strap hang behind the back
- Reach left hand behind back to grab the strap lower down
- Walk hands closer along the strap gradually
- Hold 30 seconds to 1 minute, then switch sides
Skill level: Beginner–Intermediate
Key benefits: This pose improves shoulder flexibility and opens your chest. It’s wonderful for addressing rounded shoulders and improving posture.
8. Reclining Spinal Twist (Lower Back & Hip Release)
This gentle twist uses the strap to guide your knee across your body, easing tension in your hips and lower back without forcing the movement.
How to do it:
- Lie on your back, knees bent
- Loop strap above right knee, hold ends in left hand
- Extend the right arm to the side
- Use the strap to gently guide the right knee across the body to the left
- Keep right shoulder grounded
- Hold 1-2 minutes, then switch sides
Skill level: Beginner
Key benefits: This twist releases tension in your lower back and hips while gently massaging your internal organs. It’s deeply relaxing and perfect before bed.
9. Side Stretch with Strap (Lateral Body Opening)
This seated lateral stretch uses the strap overhead to help you reach farther, lengthening your side body and ribs for deeper breathing.
How to do it:
- Sit cross-legged or comfortably seated
- Hold the strap overhead with arms wide
- Inhale to lengthen spine
- Exhale, lean right, keeping sitting bones grounded
- Feel a stretch along the left side body
- Hold 30 seconds to 1 minute, then switch sides
Skill level: Beginner
Key benefits: This pose stretches your intercostal muscles between your ribs, improving breathing capacity. It also releases tension in your obliques and lower back.
10. Dancer’s Pose with Strap (Balance & Backbend)
This standing backbend uses the strap to hold your foot so you can safely open your chest and hips while improving balance and focus.
How to do it:
- Stand on the left foot
- Hold the strap in your right hand, loop around the right foot
- Kick right foot back/up, creating a backbend gently
- Extend the left arm forward for balance
- Hold 20-40 seconds, then switch sides
Skill level: Advanced
Key benefits: This pose improves balance, opens your hip flexors and chest, and strengthens your standing leg. It’s energizing and builds concentration.
11. Triangle Pose with Strap (Side Body & Leg Stretch)
This foundational standing pose uses the strap to maintain alignment and extend your reach, making it easier to stretch your legs, hips, and side body.
How to do it:
- Stand feet wide, right foot turned out
- Loop the strap around the right shin or ankle
- Extend arms at shoulder height
- Reach right hand down, holding the strap
- Extend left arm up, chest open
- Legs straight, hold 30 seconds to 1 minute, then switch sides
Skill level: Beginner–Intermediate
Key benefits: This pose strengthens your legs while stretching your hamstrings, hips, and side body. It also improves balance and focus.
12. Reclined Big Toe Pose (Leg Extension with Control)
This classic reclined pose uses the strap to lift and straighten your leg, allowing a deep hamstring stretch without lifting your shoulders off the mat.
How to do it:
- Lie on your back, legs extended
- Loop the strap around the right foot ball
- Hold the strap ends in your right hand
- Straighten the right leg toward the ceiling
- Flex feet, engage thighs
- Hold 1-2 minutes, then switch sides
Skill level: Beginner
Key benefits: This stretch improves hamstring flexibility and strengthens your legs. It’s also excellent for improving posture and relieving lower back tension.
13. Side Lying Bend
This side-lying stretch uses the strap overhead to help you bend toward your extended leg, opening your hamstrings, inner thighs, and side body all at once.
How to do it:
- Lie with legs extended wide in V
- Hold the strap overhead in both hands
- Inhale lengthen spine
- Exhale, bend toward the right leg
- Walk hands along the strap to adjust the stretch
- Hold 30 seconds to 1 minute, then switch sides
Skill level: Beginner–Intermediate
Key benefits: This pose stretches your hamstrings, inner thighs, and side body simultaneously. It’s wonderful for improving spinal flexibility and breath awareness.
14. King Pigeon Prep with Strap (Quad & Hip Flexor Release)
This low-lunge variation uses the strap to draw your back foot in, safely deepening the stretch in your hip flexors and quadriceps.
How to do it:
- Start in low lunge, right foot forward
- Lower left knee down
- Bend the left knee, loop the strap around the left foot
- Hold the strap with your left hand behind your back
- Pull the foot gently toward the body
- Keep the right knee stacked over the ankle
- Hold 1-2 minutes, then switch sides
Skill level: Advanced
Key benefits: This deep hip opener releases your hip flexors and quadriceps while gently opening your chest. It’s therapeutic for people who sit for long periods.
15. Reclined Hand-to-Big-Toe Pose with Side Stretch
This reclined variation uses the strap to lower your leg to the side, stretching your outer hip, IT band, and inner thigh with control.
How to do it:
- Lie on your back with the strap around your right foot
- Straighten the right leg toward the ceiling
- Hold the strap ends in the right hand
- Slowly lower the leg to the right side
- Keep left hip grounded, left leg extended
- Turn your head left if comfortable
- Hold 1-2 minutes, then switch sides
Skill level: Beginner–Intermediate
Key benefits: This stretch releases tension in your outer hip, IT band, and inner thigh. It’s excellent for runners and cyclists who experience hip tightness.
16. Seated Twist with Strap (Spinal Rotation Support)
This seated twist uses the strap to anchor your foot, helping you lengthen your spine and rotate more safely through your torso.
How to do it:
- Sit with legs extended
- Bend right knee, place right foot outside left thigh
- Loop the strap around the right foot
- Hold the strap with your left hand
- Right hand behind back
- Inhale, lengthen spine, exhale twist right
- Hold 30 seconds to 1 minute, then switch sides
Skill level: Beginner–Intermediate
Key benefits: This twist improves spinal mobility and massages your internal organs. It’s energizing and helps with digestion.
17. Bridge Pose with Strap (Supported Backbend)
This strap-supported backbend helps keep your knees aligned so you can lift your hips higher, strengthening your back and opening your chest.
How to do it:
- Lie on your back, knees bent, feet hip-width apart
- Loop strap above knees
- Hold the strap taut to keep the knees aligned
- Press feet, lift hips
- Keep thighs parallel, knees over ankles
- Hold 30 seconds to 1 minute
Key benefits: This pose strengthens your glutes, hamstrings, and back while opening your chest and hip flexors. The strap helps maintain proper knee alignment.
18. Supine Butterfly with Strap (Restorative Hip Opener)
This restorative pose uses the strap to gently hold your feet together, allowing your hips and inner thighs to release completely as you relax.
How to do it:
- Lie on your back and bring the soles of your feet together
- Loop the strap around your lower back, across your hips, and under your feet
- Adjust the strap so it gently holds your feet together
- Let your knees fall open to the sides
- Rest your arms out to the sides or on your belly
- Hold for 2-5 minutes, breathing deeply
Skill level: Beginner
Key benefits: This restorative pose gently opens your hips and inner thighs without effort. It’s wonderfully calming and perfect for stress relief.
19. Pyramid Pose with Strap (Deep Hamstring Stretch)
This standing forward fold uses the strap to extend your reach so you can hinge from your hips and deeply stretch your hamstrings and calves.
How to do it:
- Stand with right foot forward, left foot back
- Hips facing forward
- Loop the strap around the right foot ball
- Hold strap ends
- Hinge forward from the hips, keeping the spine long
- Use the strap to deepen the fold without rounding back
- Hold 30 seconds to 1 minute, then switch
Skill level: Beginner
Key benefits: This pose deeply stretches your hamstrings and calves while strengthening your legs. It also improves balance and concentration.
20. Supported Camel Pose (Gentle Backbend)
This kneeling backbend uses the strap for support behind your legs so you can arch safely, opening your front body while strengthening your back.
How to do it:
- Kneel knees hip-width apart
- Loop the strap behind the ankles or thighs
- Hold strap ends
- Engage core, gently arch back
- Use strap support instead of reaching heels
- Keep hips aligned over knees
- Hold 20-40 seconds, breathe steadily
Skill level: Advanced
Key benefits: This pose opens your entire front body, strengthens your back, and improves spinal flexibility. It’s energizing and mood-lifting.
Why Props Like Straps Make Yoga Smarter?
A lot of people think using a prop means they’re “cheating” in yoga, but the opposite is true. A strap isn’t about avoiding work; it’s about practicing with better alignment and less strain.
When you loop a strap around your feet or hold it behind your back, you bring the pose to where your body is today instead of forcing yourself into a position you’re not ready for.
This keeps your joints safe, helps you stay in poses longer, and actually deepens your flexibility over time. Even advanced practitioners use straps to refine technique and unlock new ranges of motion without risking injury.
Tips for Practicing with a Yoga Strap
A yoga strap can make your stretches safer and more effective, but how you use it matters. Keep these simple tips in mind while practicing:
- Breathe like you mean it: When you’re stretching with a strap, your breath is your best friend. Take slow, deep breaths and use your exhales to gently deepen into poses.
- Support, don’t force: The strap should feel like a helpful assistant, not a torture device. Use it to maintain good alignment and gradually deepen stretches, rather than yanking yourself into positions your body isn’t ready for.
- Listen to your body’s wisdom: Your body is incredibly smart and will tell you what it needs if you listen. Mild tension and stretching sensations are good; sharp pain or intense discomfort are not.
- Timing matters: Strap stretches work beautifully as part of your warm-up to prepare your body for deeper poses, or as part of your cool-down to help your muscles relax and lengthen after more active practice.
Remember, flexibility isn’t a race. Some days you’ll feel more open, other days more tight, and that’s completely normal.
Common Mistakes to Avoid when Using a Yoga Strap
Even though a strap is designed to make yoga safer and more accessible, how you use it determines whether it truly helps or causes problems. These are some of the most common mistakes you’ll want to avoid when practicing with a strap:
- Many people pull too hard on the strap instead of letting it support them, which can lead to strain.
- Some hold their breath while stretching with a strap, which prevents muscles from releasing tension.
- Others round their back when using the strap, rather than keeping a long spine for safe alignment.
- Using the wrong strap length can either cause unnecessary strain or make the strap get in the way.
- Skipping a quick warm-up before strap work reduces flexibility and increases the chance of discomfort.
By keeping these points in mind, you’ll let the strap act like a supportive partner rather than something that pushes your body too far, too soon.
Wrapping Up
I’ve noticed that adding yoga strap stretches to my practice makes a big difference. They help me reach further without strain, relax into poses, and feel more supported.
Using a strap has taken pressure off my joints and given me more confidence to hold stretches longer. Even a few minutes with a strap has left me feeling looser and calmer.
Now it’s your turn to give it a try. Think about one or two stretches where a strap might help you. Start small, listen to your body, and stay consistent. Over time, you’ll feel more flexible and at ease.
If this post was helpful, check out other blogs on the website for more simple tips to improve strength, mobility, and balance every day!


