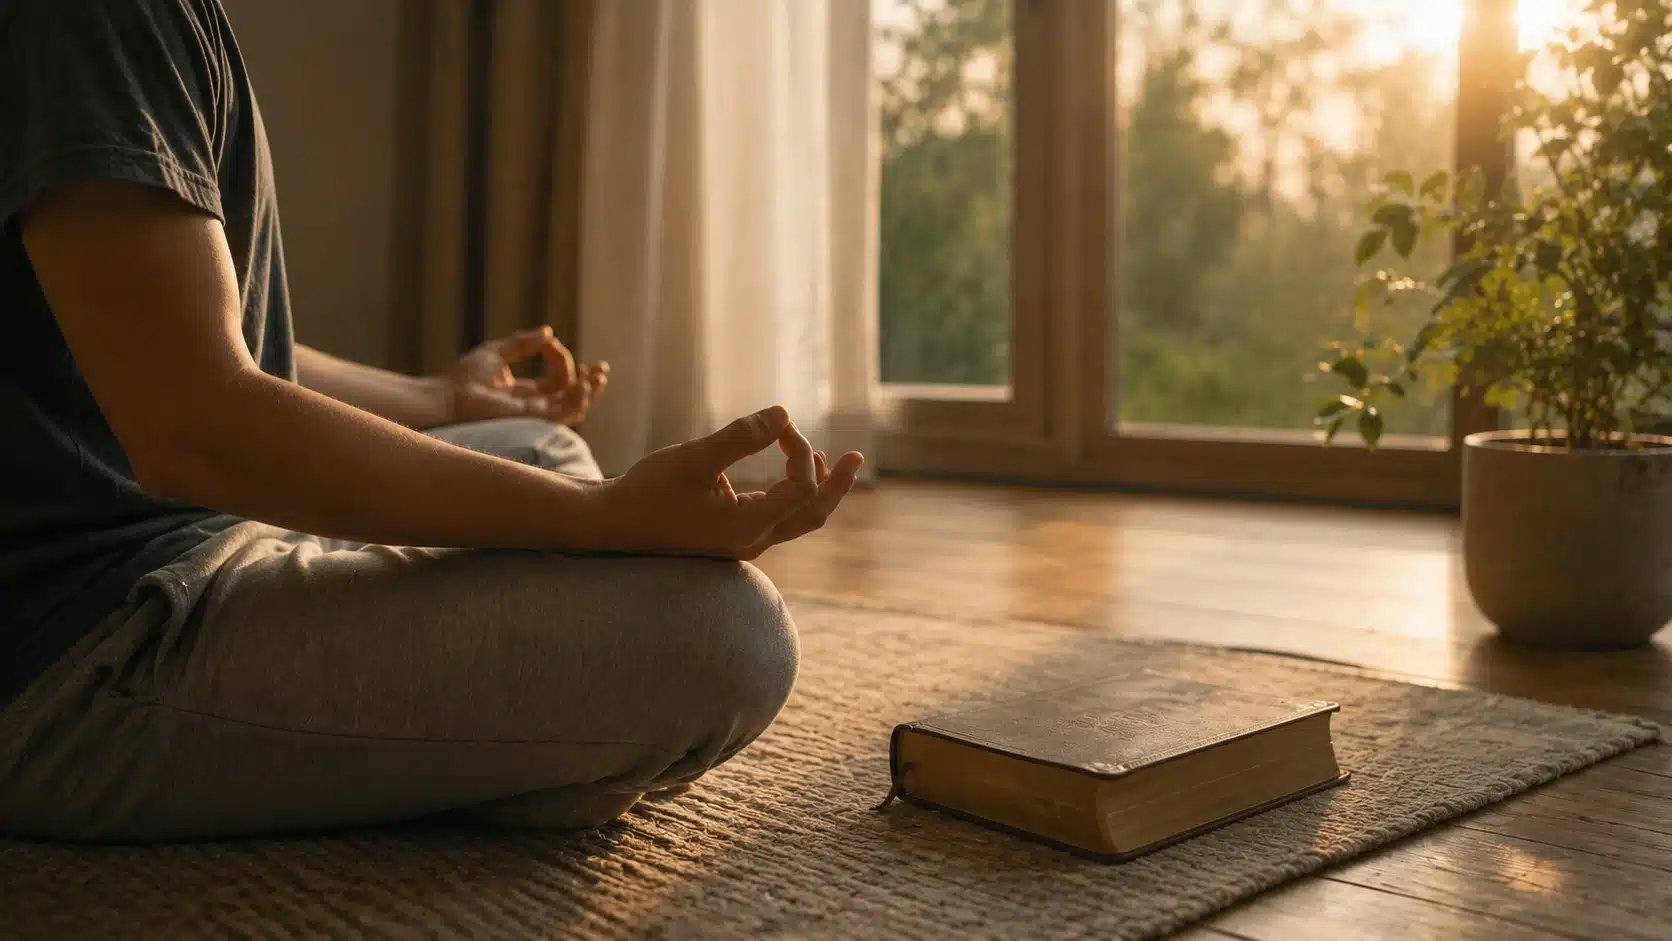
If you’ve ever walked past a yoga studio and seen people dripping with sweat in a heated room, chances are they were practicing Bikram Yoga.
So, what is Bikram Yoga? In simple terms, it’s a type of hot yoga that follows a set sequence of 26 poses and two breathing exercises, all performed in a room heated to approximately 105°F.
I still remember being curious the first time I came across Bikram Yoga. The idea of a heated room and a strict set of poses sounded intense, but it also made me want to understand what made it so popular.
But the idea is to stretch deeper, strengthen the body, and build mental focus.
In this blog, I will walk you through the principles, benefits, and how it’s different from other yoga styles.
What is Bikram Yoga?
Bikram Yoga is a style of hot yoga created by Bikram Choudhury. It is always done in a heated room set to about 105°F (40.5°C) with 40% humidity.
Each class lasts 90 minutes and follows the same sequence every time: 26 specific poses and 2 breathing exercises. The heat helps muscles stretch more safely, encourages sweating, and supports flexibility.
The routine focuses on building strength, balance, and concentration while also calming the mind.
Since the sequence remains constant, it enables you to track your progress over time and deepen your practice.
Bikram Yoga is challenging, but many people find it rewarding for both physical health and mental focus, making it a consistent and structured workout.
Core Principles of Bikram Yoga
These principles explain why the practice takes place in a heated room and why the same sequence of poses is repeated each time. Understanding them will give you a clearer view of how the practice is designed and what makes it different from other styles of yoga:
1. Consistency Through Structure: Bikram Yoga operates on the foundation that repetition breeds mastery. Every session follows an identical blueprint, allowing practitioners to measure their development and deepen their understanding of each movement over time.
2. Heat as a Therapeutic Tool: The practice harnesses controlled heat at 105°F with 40% humidity as a deliberate therapeutic element. This environmental condition serves multiple purposes: it prepares muscles for safer extension, promotes detoxification through perspiration, and creates an internal challenge that builds mental resilience.
3. Mind-Body Integration: The discipline emphasizes the connection between physical endurance and mental fortitude. Each pose demands both muscular engagement and psychological presence, training practitioners to maintain focus under challenging conditions.
4. Progressive Development: Rather than seeking immediate perfection, the practice encourages gradual advancement. Students learn to work within their current capabilities while consistently pushing boundaries in a controlled manner.
5. Systematic Breathing: Controlled respiration forms the backbone of the practice. The specific breathing techniques bookend each session and support practitioners throughout the pose sequence, serving as both a physical and mental anchor.
6. Disciplined Duration: The 90-minute time commitment represents a principle of sustained effort. This extended period challenges practitioners to maintain dedication and concentration well beyond their comfort zones.
7. Universal Accessibility: Despite its intensity, the practice maintains that the sequence can benefit individuals across different fitness levels and backgrounds, with modifications and rest periods built into the philosophy.
8. Holistic Wellness: The practice views physical conditioning as inseparable from mental clarity and emotional stability, treating the body as a complete system rather than focusing on isolated improvements.
These principles work together to create a comprehensive practice that challenges practitioners on multiple levels while providing a consistent framework for growth and self-discovery.
The Sequence of Bikram Yoga
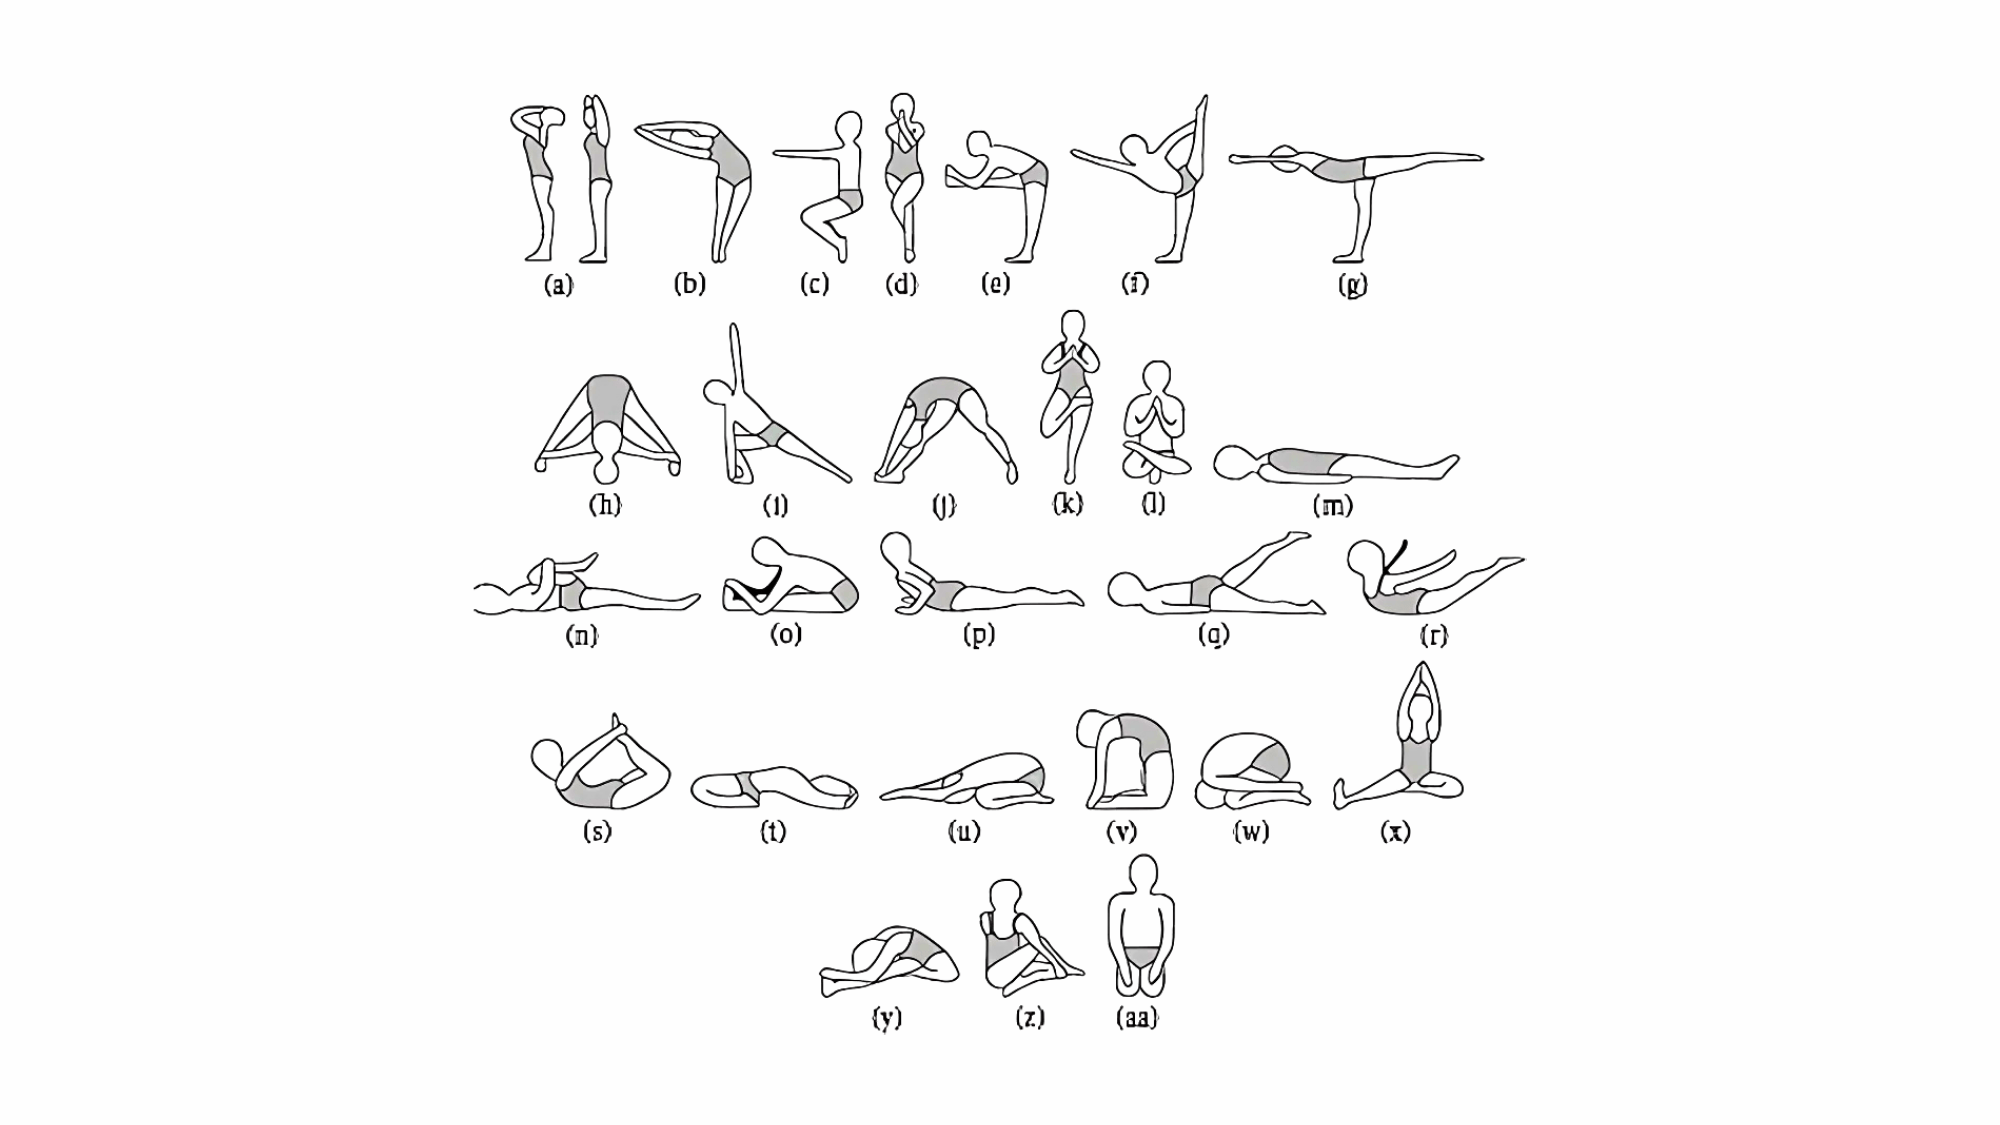
In Bikram Yoga, the 26 poses with 2 breathing exercises are always performed in the same order. The class begins with Pranayama (standing deep breathing) and ends with Kapalabhati (blowing in firm).
Each posture is usually held for 30 to 60 seconds, depending on whether it’s standing or floor-based.
This structured timing, combined with the heated room, helps the body gradually open up, build stamina, and maintain balance throughout the 90-minute practice.
Before going into the 26 core Bikram postures, begin with Standing Deep Breathing (Pranayama).
1. Standing Deep Breathing (Pranayama)

This introductory exercise helps expand lung capacity, promotes better blood flow, clears toxins, and calms the mind, setting you up for the rest of your session.
Steps:
- Inhale slowly, keeping your spine tall and your abdomen slightly drawn in. This lifts your ribcage and maximizes lung space.
- Exhale fully, tilting the head back gently with eyes open.
- Keep your hips aligned under your shoulders, engaging your glutes slightly to maintain your posture.
- Empty the lungs completely with each breath to release stale air.
It’s normal to feel lightheaded or experience a mild tug in the shoulders; this indicates that the exercise is working. Continue for a few minutes before progressing to the main poses.
2. Half Moon with Hands-to-Feet (Ardha Chandrasana + Pada Hastasana)
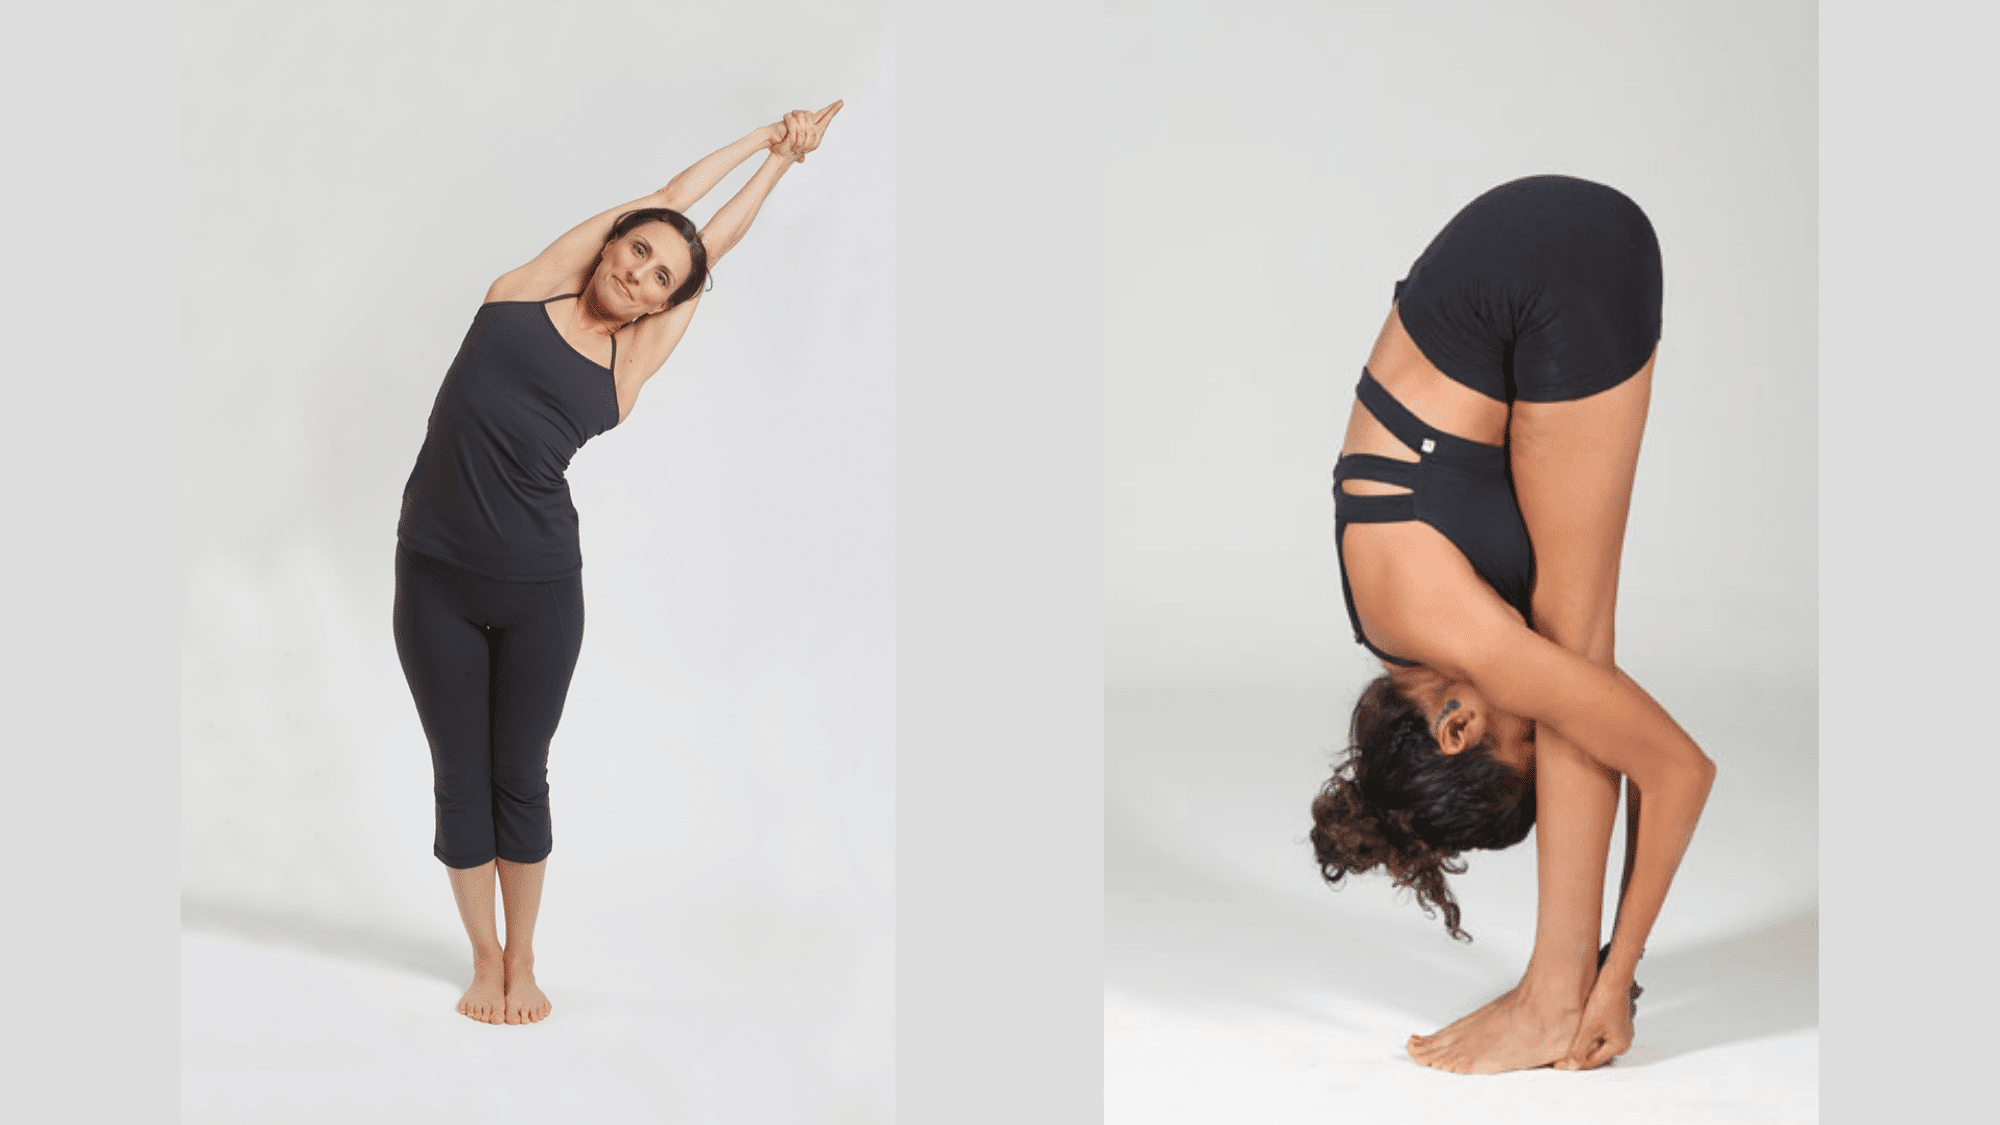
Improves posture, increases spinal flexibility, tones the waist and abdomen, strengthens core muscles, boosts circulation and digestion, and relieves stress.
How to Do It:
- Reach upward with strong, engaged arms.
- Stretch evenly through the spine.
- Bend backward without collapsing in the lower back.
- Fold forward, keeping your torso close to your legs.
- Lift your hips toward the ceiling and pull your elbows close behind your calves.
3. Awkward Pose (Utkatasana)
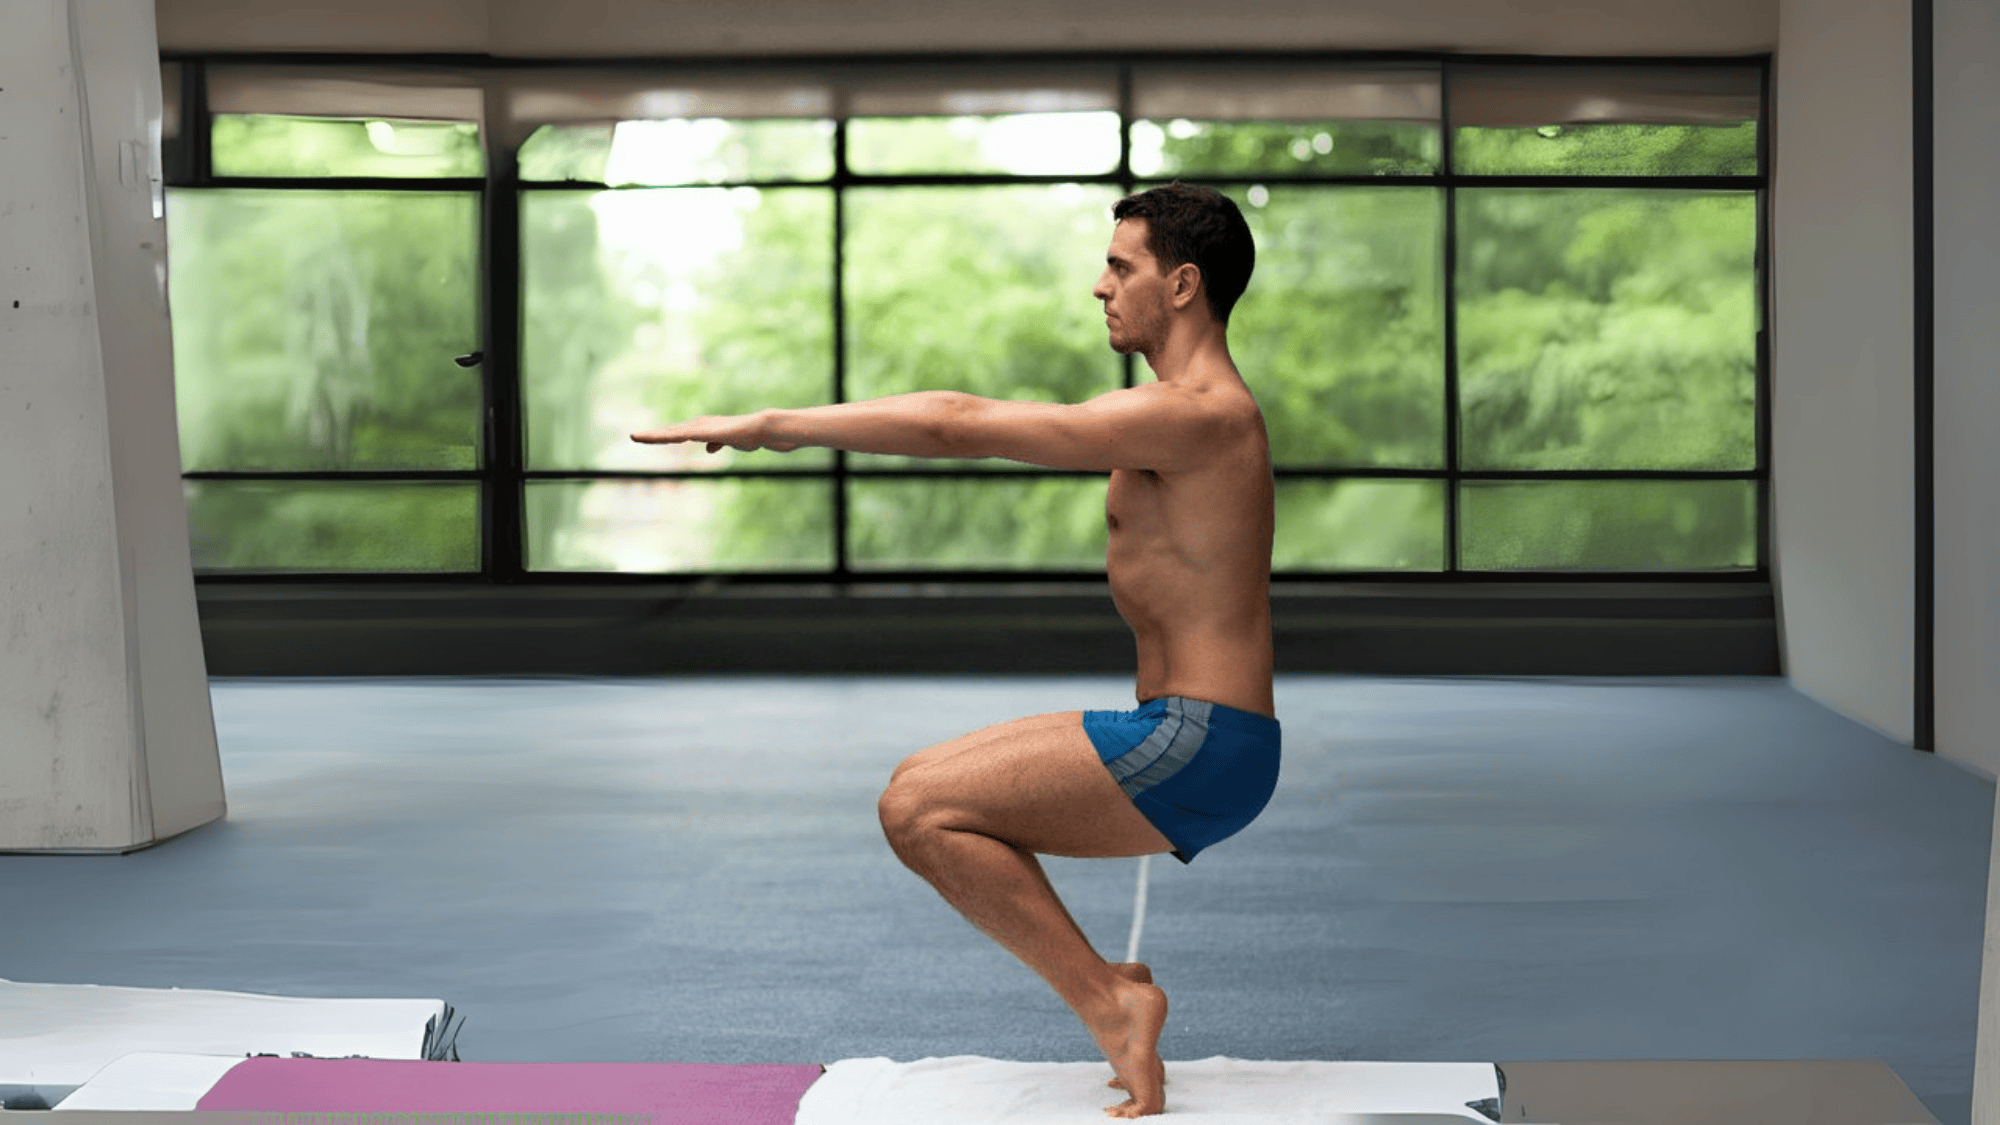
Strengthens legs and arms, warms up the body, increases hip flexibility, boosts circulation in the knees and ankles, and relieves stiffness and lower back pain.
How to Do It:
- Keep feet and knees about 6 inches apart.
- Stretch arms forward, parallel to the floor.
- Relax your shoulders downward.
- Keep fingers together and arms straight.
- Maintain steady, normal breathing.
4. Eagle Pose (Garurasana)
Strengthens legs and shoulders, improves balance and flexibility in major joints, boosts immunity, enhances circulation, and helps reduce the appearance of varicose veins.
How to Do It:
- Cross one leg over the other.
- Keep your spine tall and straight.
- Bring palms together in front of the face.
- Draw your stomach in and hold your posture steady.
- Squeeze thighs and arms firmly for full compression.
5. Standing Head-to-Knee (Dandayamana Janushirasana)
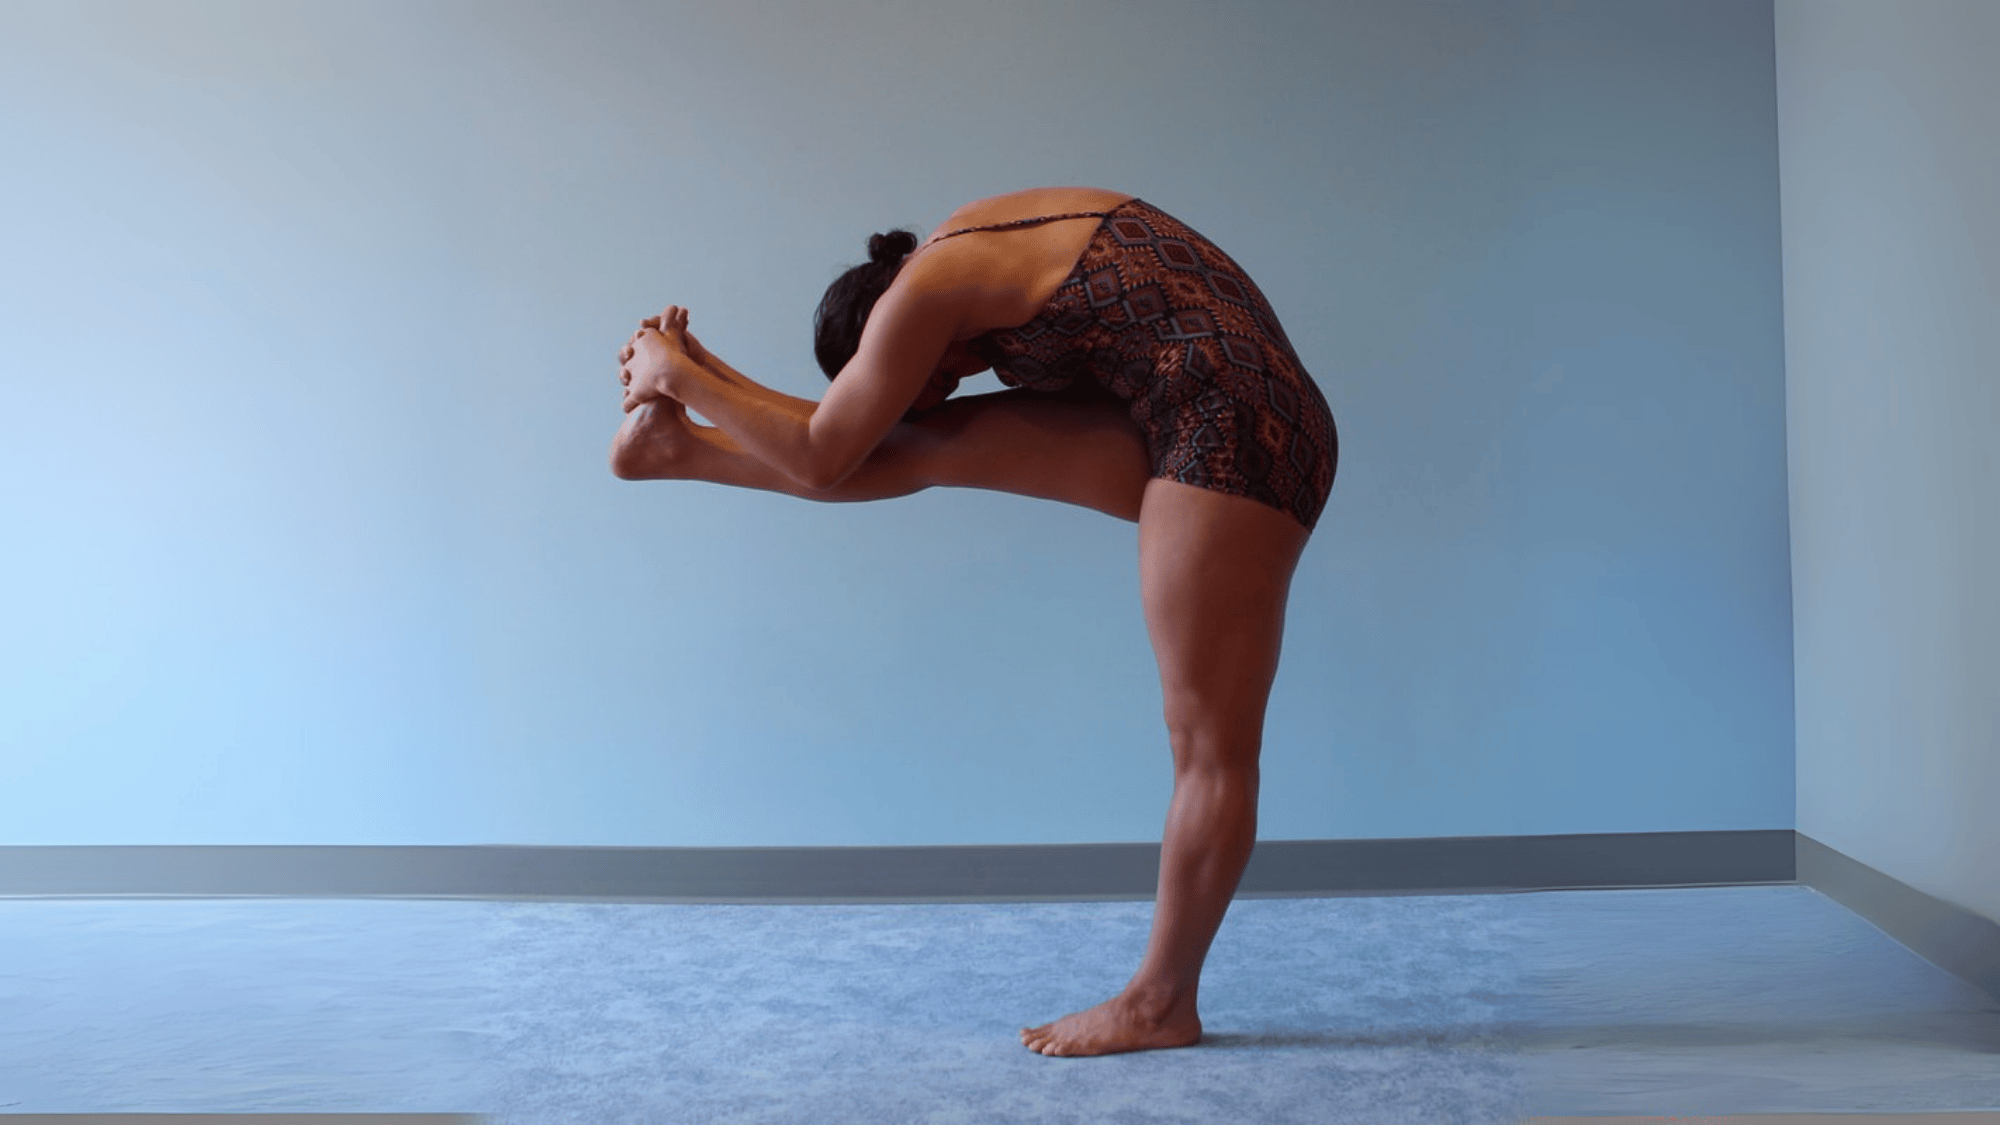
Builds focus and discipline, tones the abdomen, strengthens tendons and arms, improves flexibility in legs and spine, and stimulates reproductive and digestive organs.
How to Do It:
- Lock the standing leg fully.
- Grip the opposite foot with both hands.
- Extend the lifted leg straight forward.
- Round the spine and bring the chin to the chest.
- Touch your forehead to your knee while maintaining your posture.
6. Standing Bow-Pulling Pose (Dandayamana Dhanurasana)

Enhances posture, tones hips, arms, and buttocks, increases lung capacity, balances blood circulation, strengthens the spine, and helps reduce abdominal fat.
How to Do It:
- Grip your ankle tightly with one hand.
- Raise the opposite arm straight upward.
- Bring your knees close together before kicking back.
- Lean forward as the leg lifts and spine arches.
- Imagine a foot arching above the head.
7. Balancing Stick Pose (Tuladandasana)
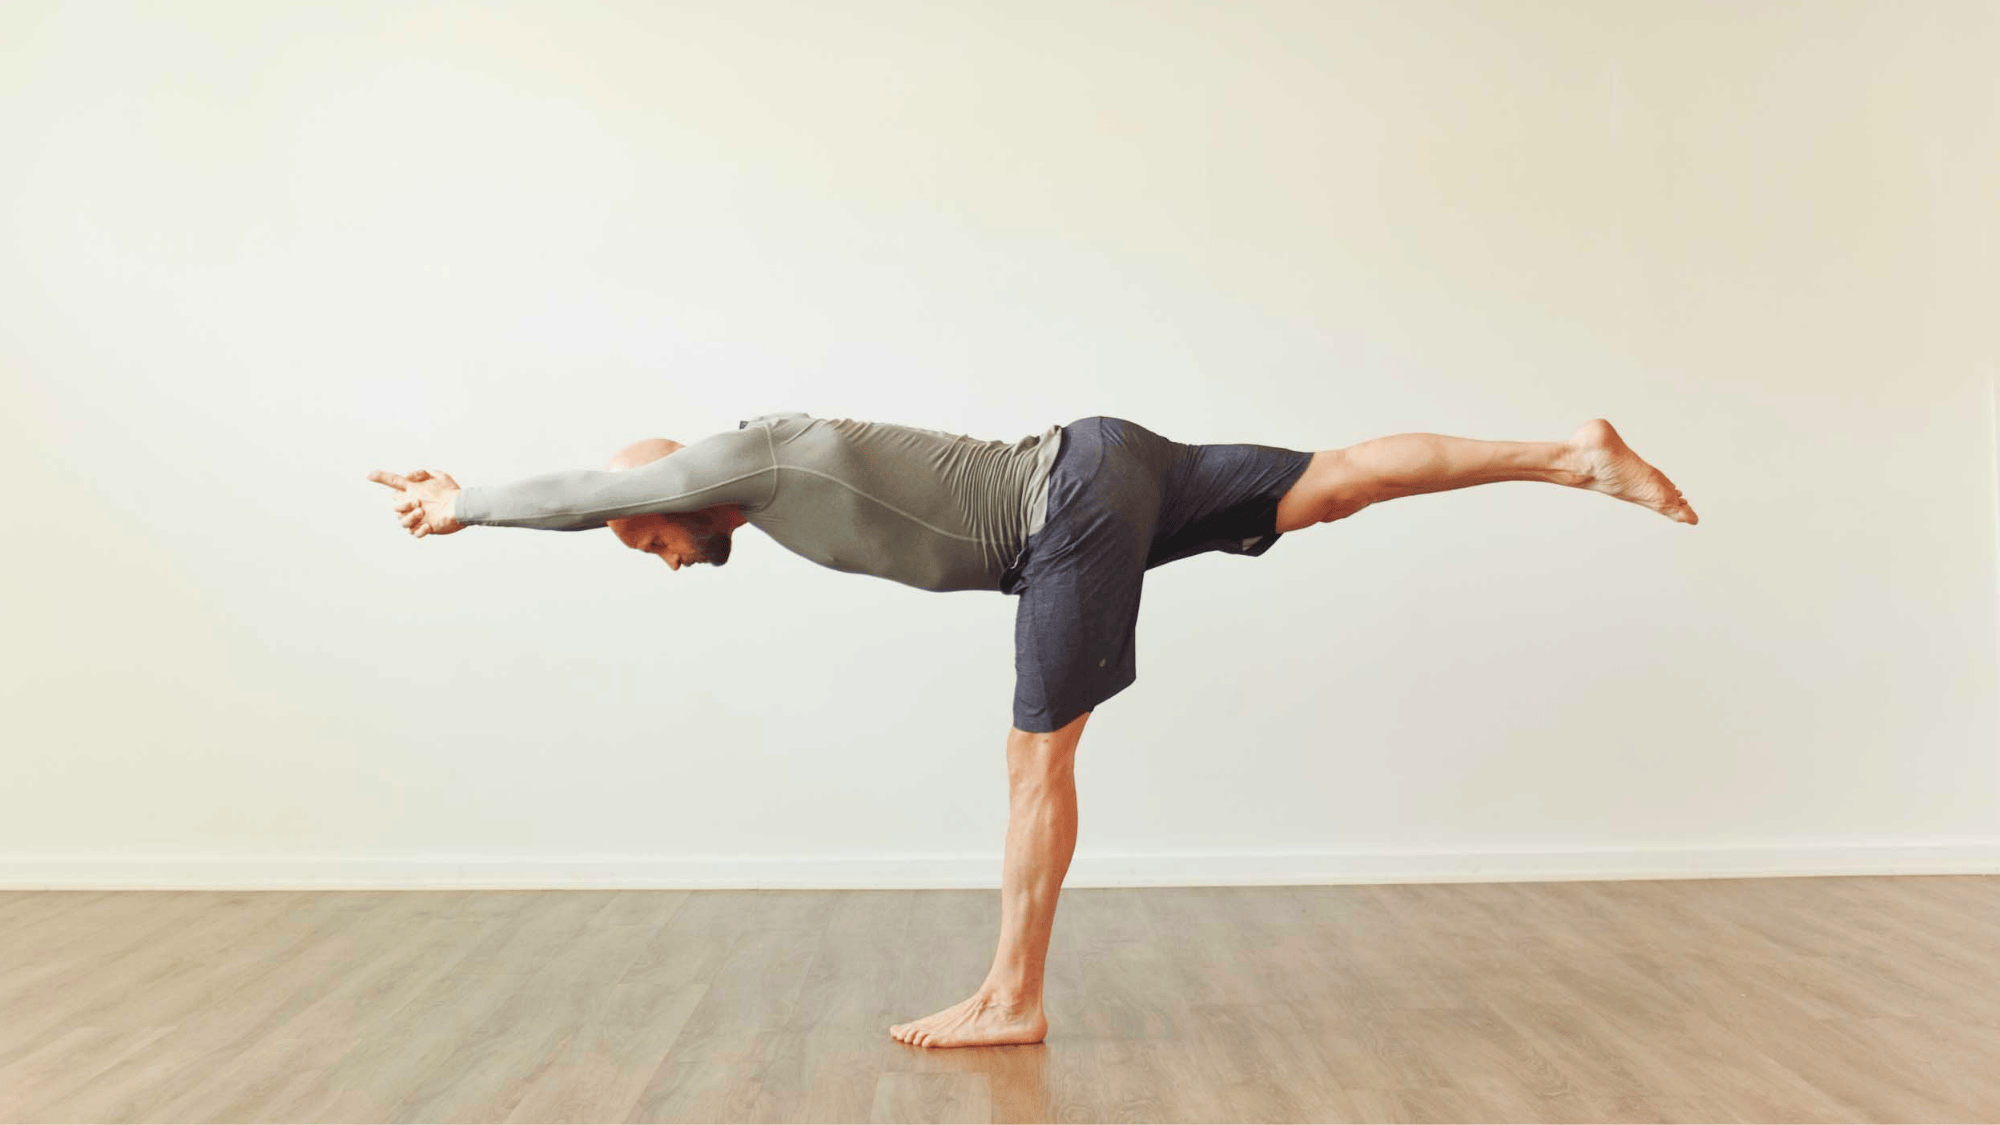
Boosts heart circulation, sharpens balance, strengthens legs and abs, improves posture, stimulates internal organs, and relieves spinal stress.
How to Do It:
- Stretch both arms overhead, palms pressed together.
- Lock the standing knee.
- Extend the opposite leg straight back.
- Lean forward until your body is parallel to the ground.
- Maintain a straight line from the fingertips to the toes.
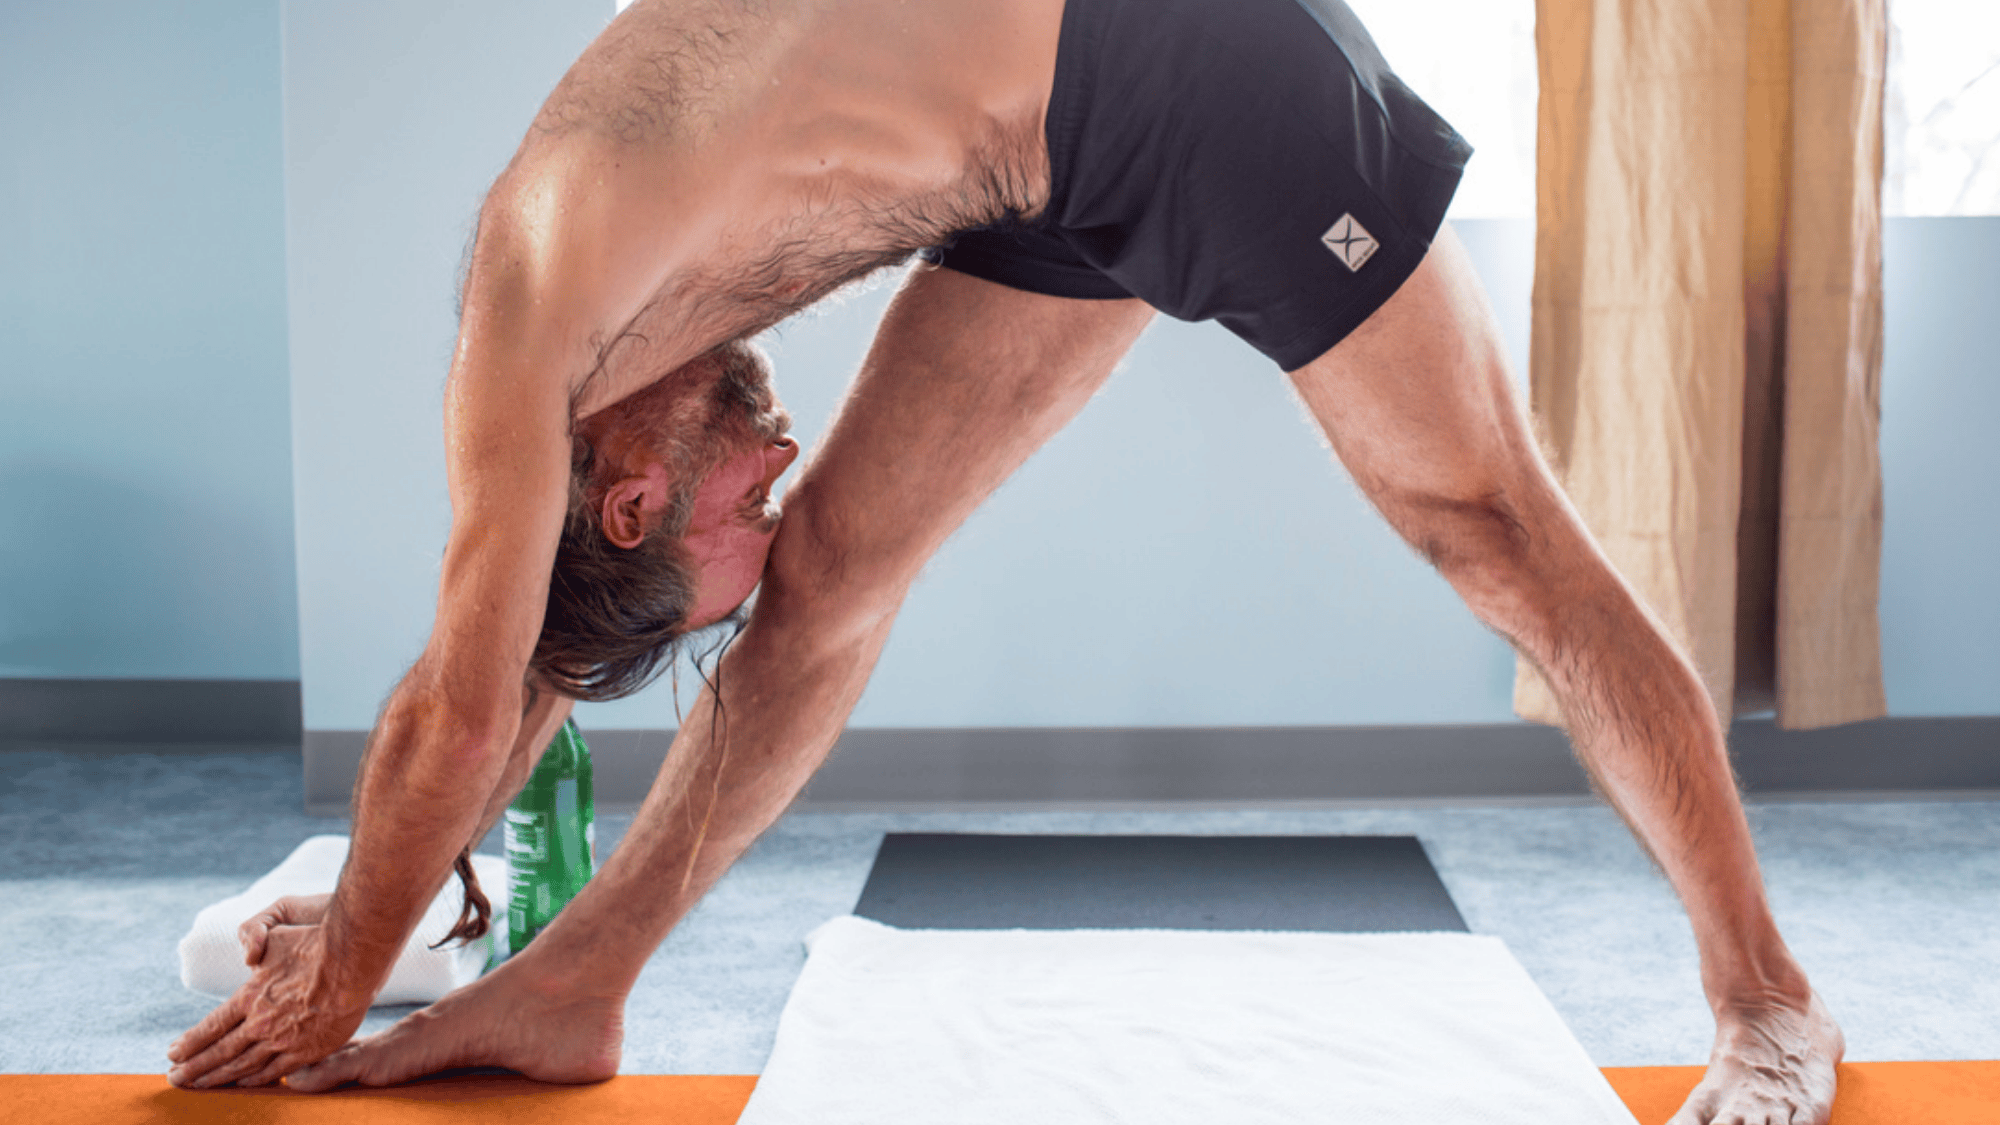
8. Standing Separate-Leg Stretching Pose (Dandayamana Bibhaktapada Paschimottanasana)
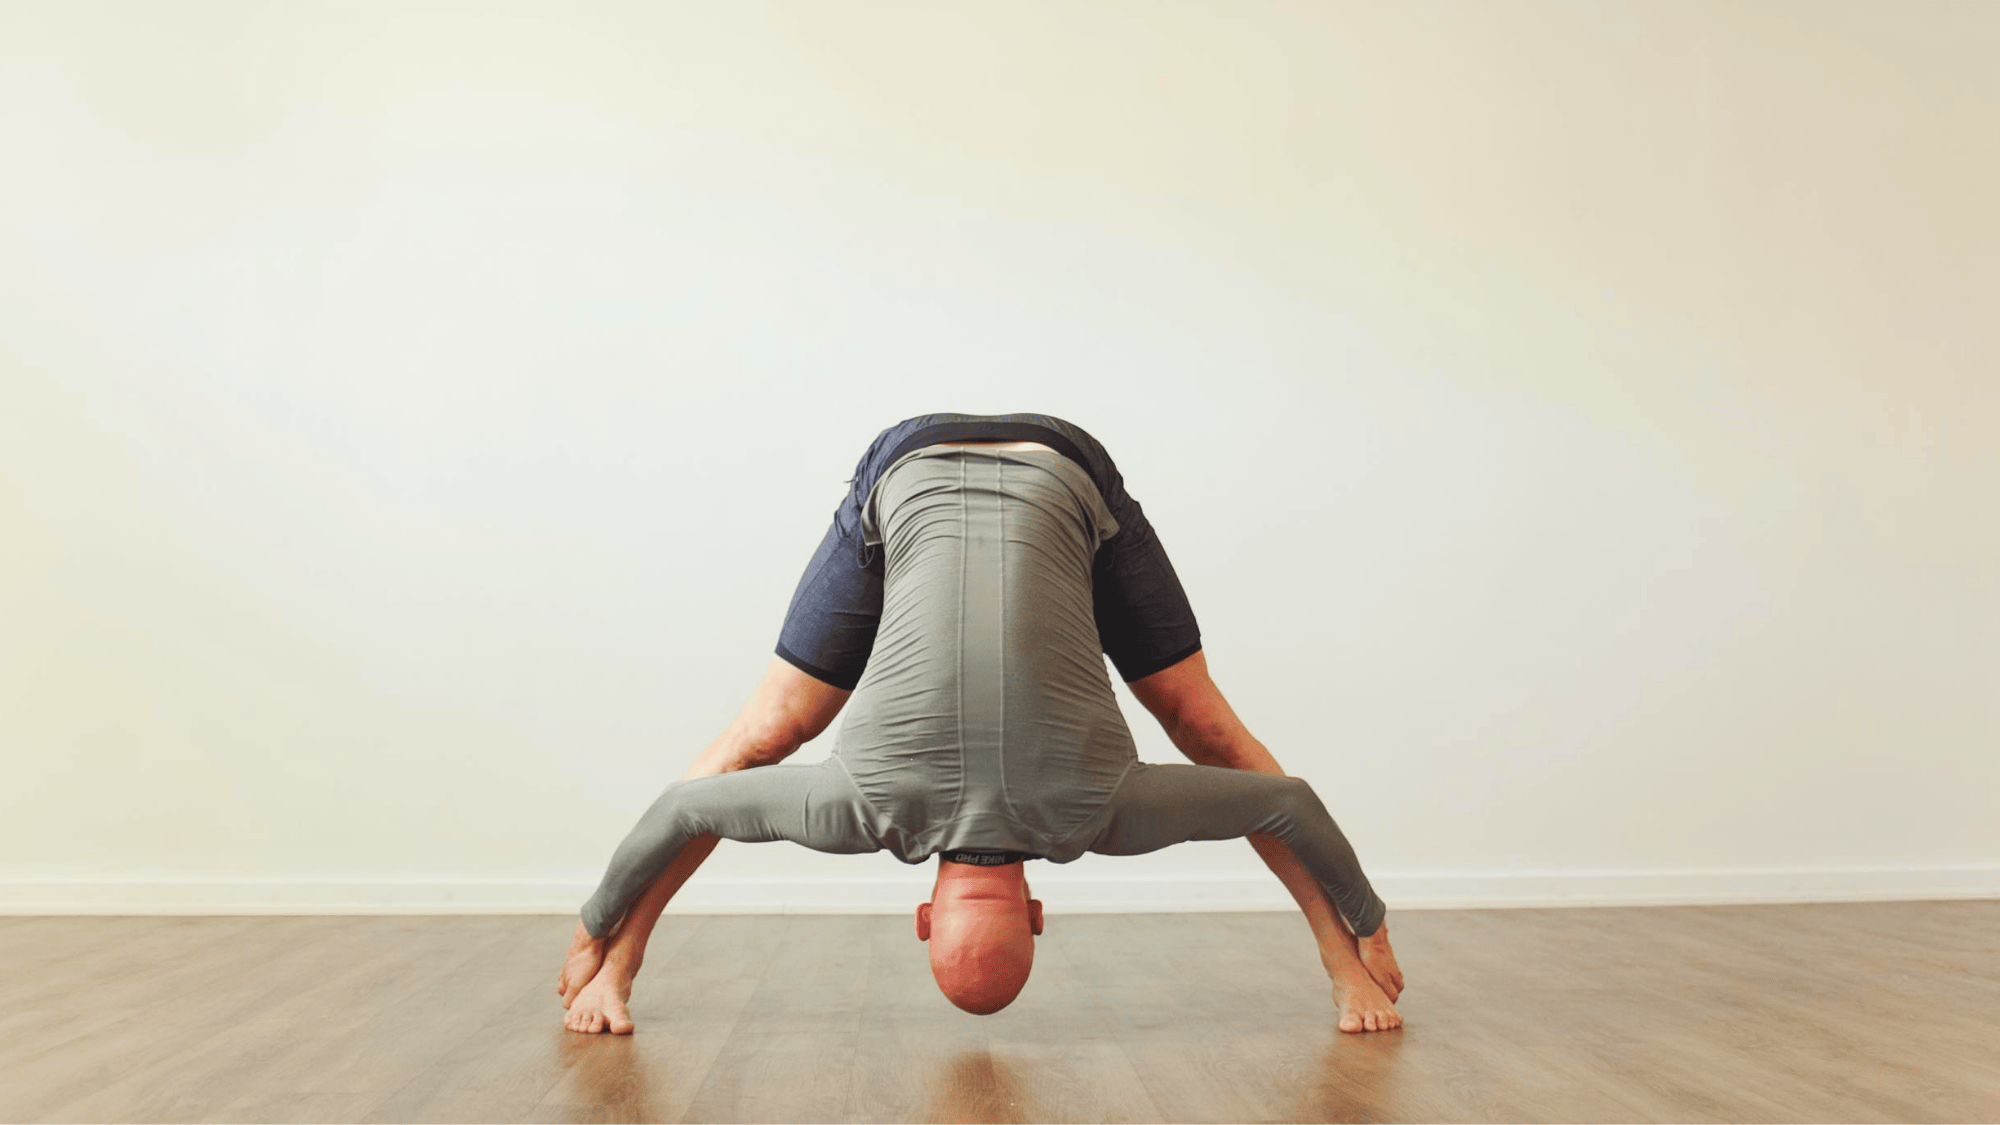
Releases tension in the lower back, tones thighs and hips, enhances digestion, stimulates adrenal glands, relieves constipation, and improves spinal and leg flexibility.
How to Do It:
- Step feet apart about 4 feet.
- Keep your spine straight as you fold forward.
- Rest your forehead on the floor between your feet.
- Grip heels once they’re within reach.
- Use arm strength to deepen the stretch.
9. Triangle Pose (Trikanasana)
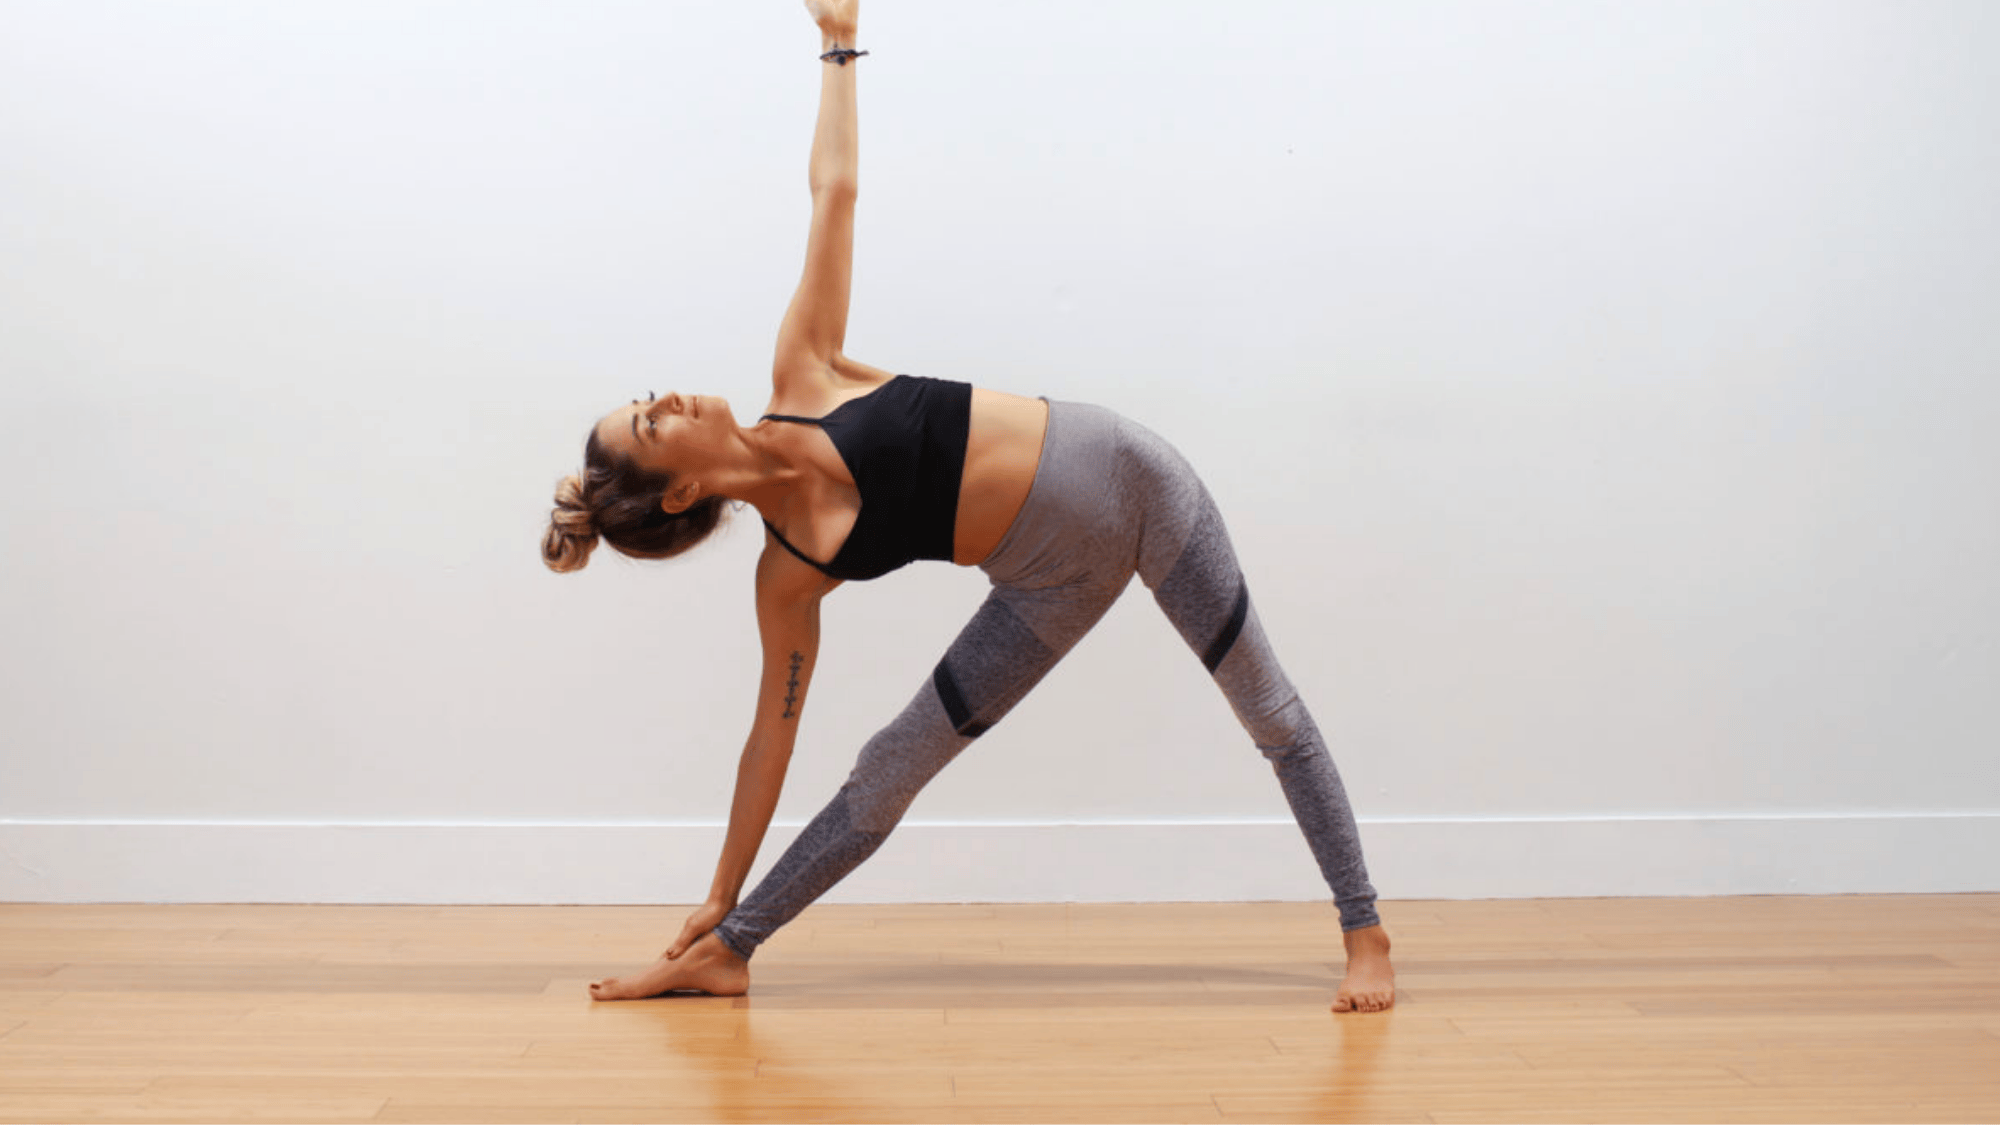
Strengthens legs and hips, stretches both sides of the torso, energizes the entire body, opens joints, improves posture, balances hormones, and relieves menstrual discomfort or low blood pressure.
How to Do It:
- Step into a wide stance.
- Stretch one arm upward and the other downward.
- Keep torso flat and shoulders aligned.
- Push hips toward the mirror.
- Touch your chin to your shoulder while keeping your chest open.
10. Standing Separate-Leg Head-to-Knee Pose (Dandayamana Bibhaktapada Janushirasana)
Improves pancreas and kidney health, balances blood sugar, reduces abdominal fat, strengthens the immune system, and tones the waistline.
How to Do It:
- Step feet wide apart.
- Turn the torso toward one leg.
- Interlock fingers and stretch arms overhead.
- Tuck chin to chest.
- Round spine and place forehead on knee.
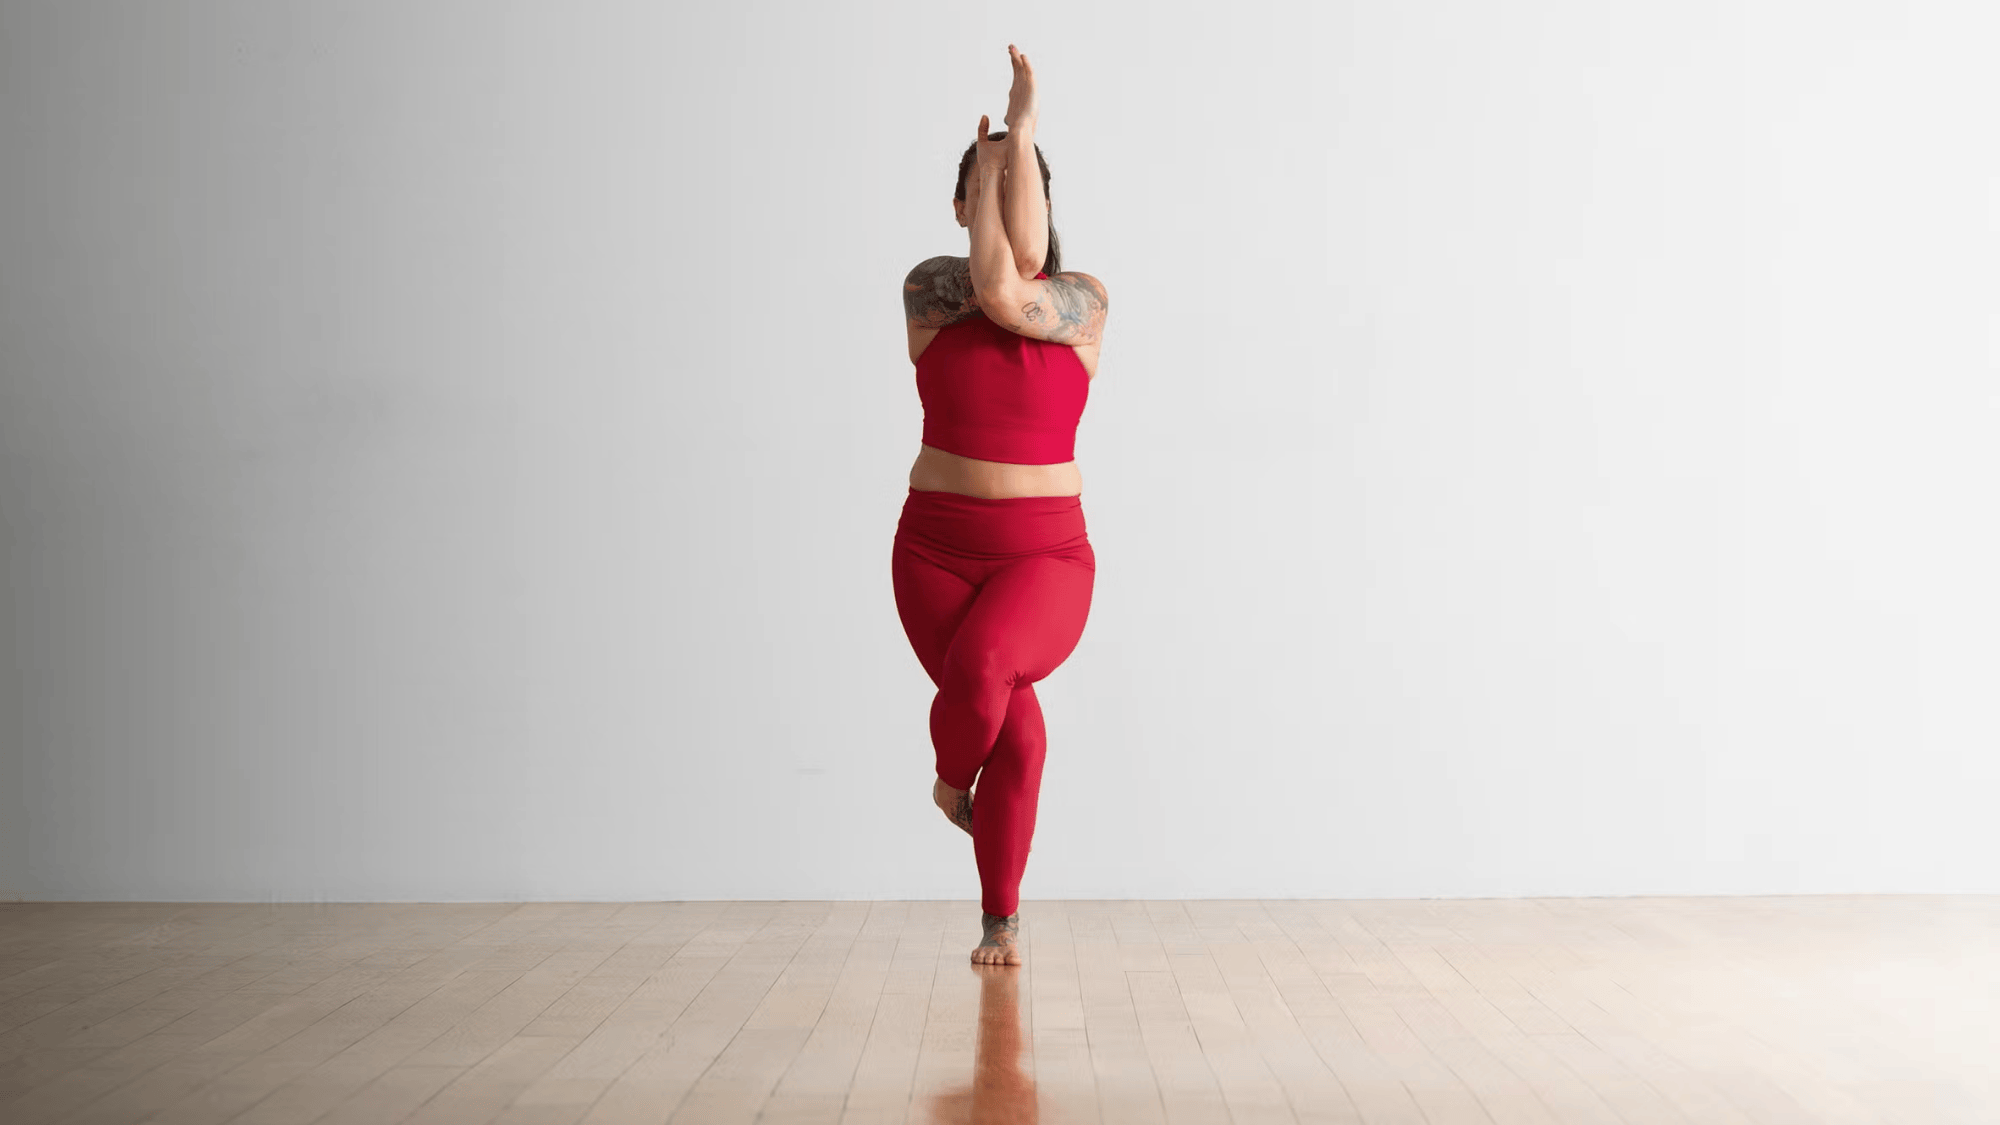
11. Tree Pose (Tadasana)
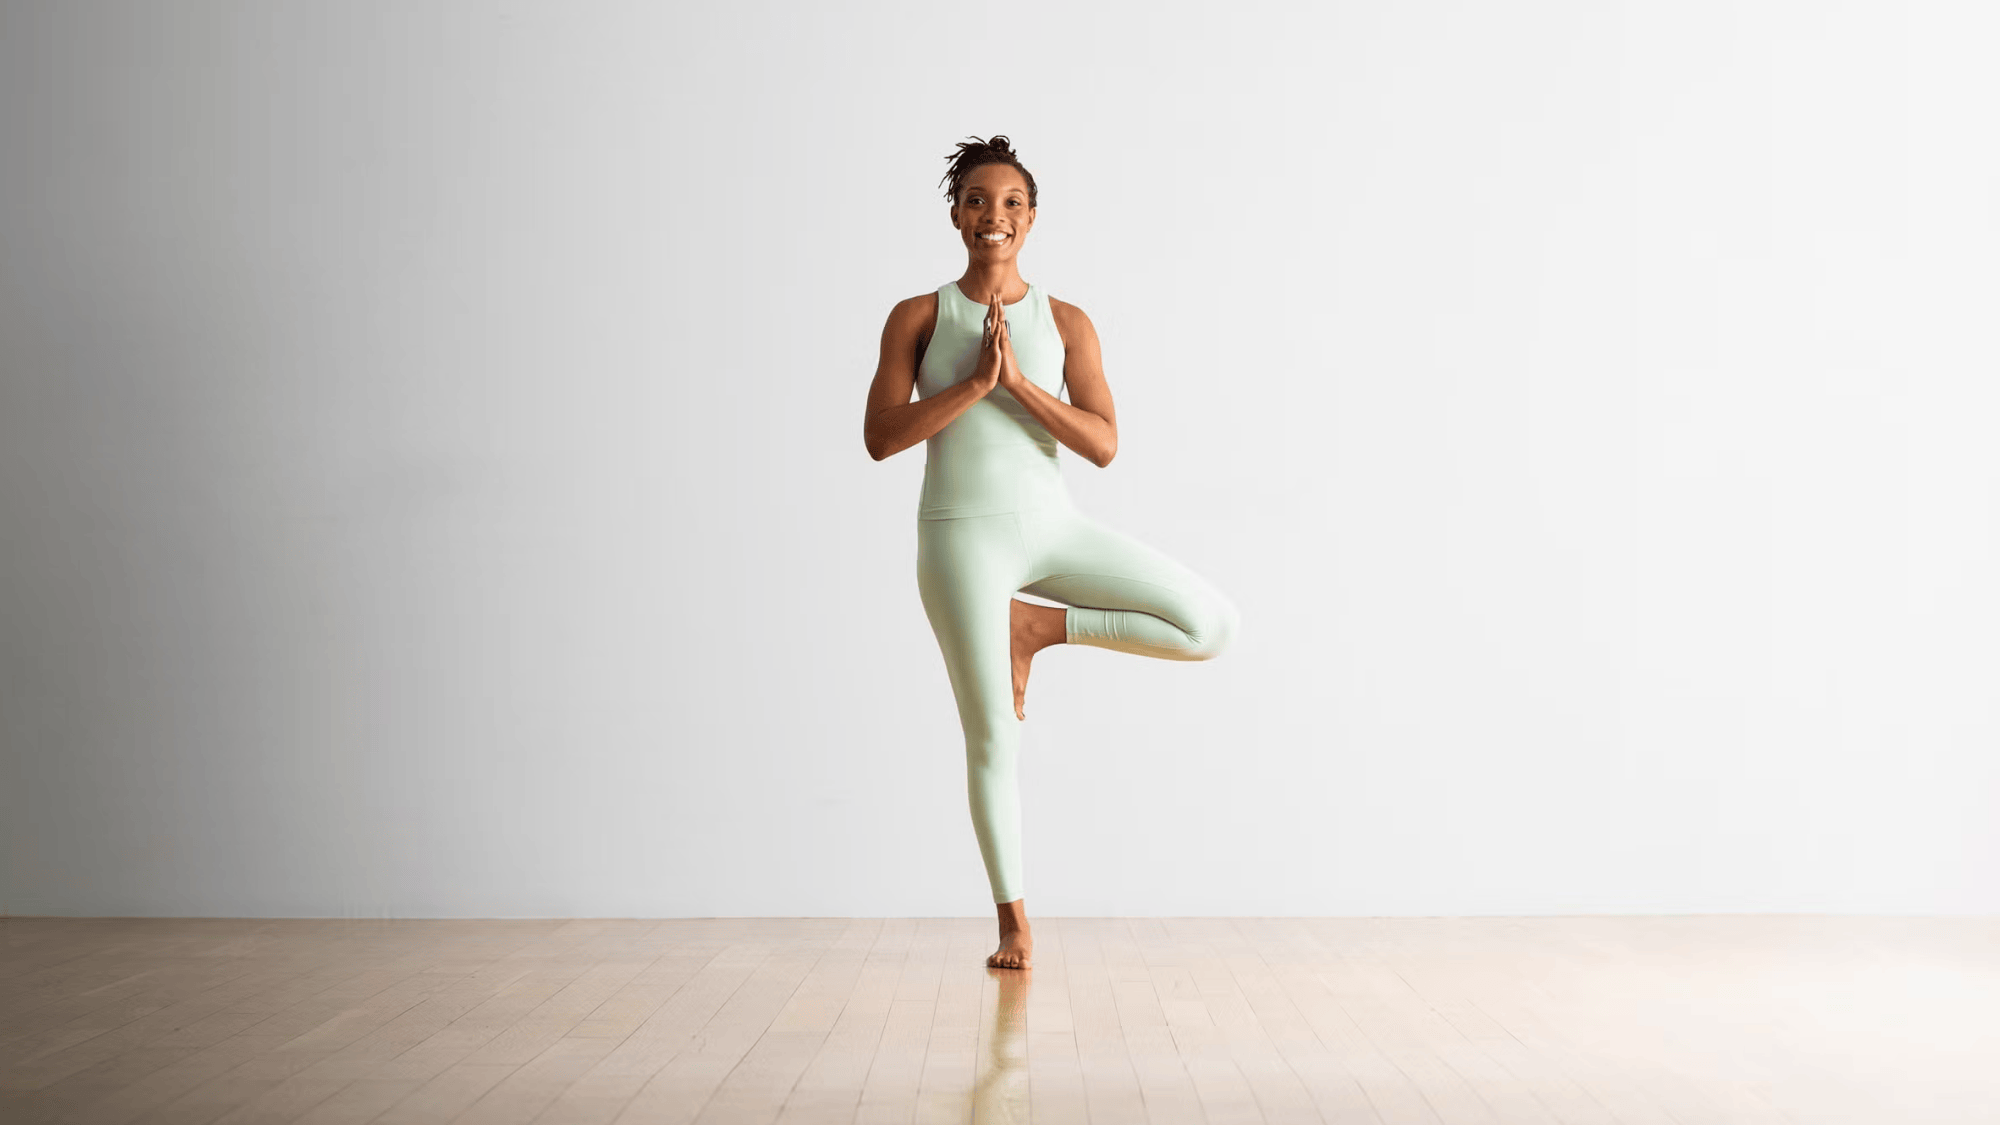
Improves posture, strengthens spine, tones abdominal muscles, builds balance, and enhances concentration.
How to Do It:
- Stand tall with feet together.
- Place one foot on the opposite thigh.
- Keep your knee pointing outward.
- Bring palms together in prayer position.
- Hold the balance while breathing calmly.
12. Toe Stand Pose (Padangustasana)
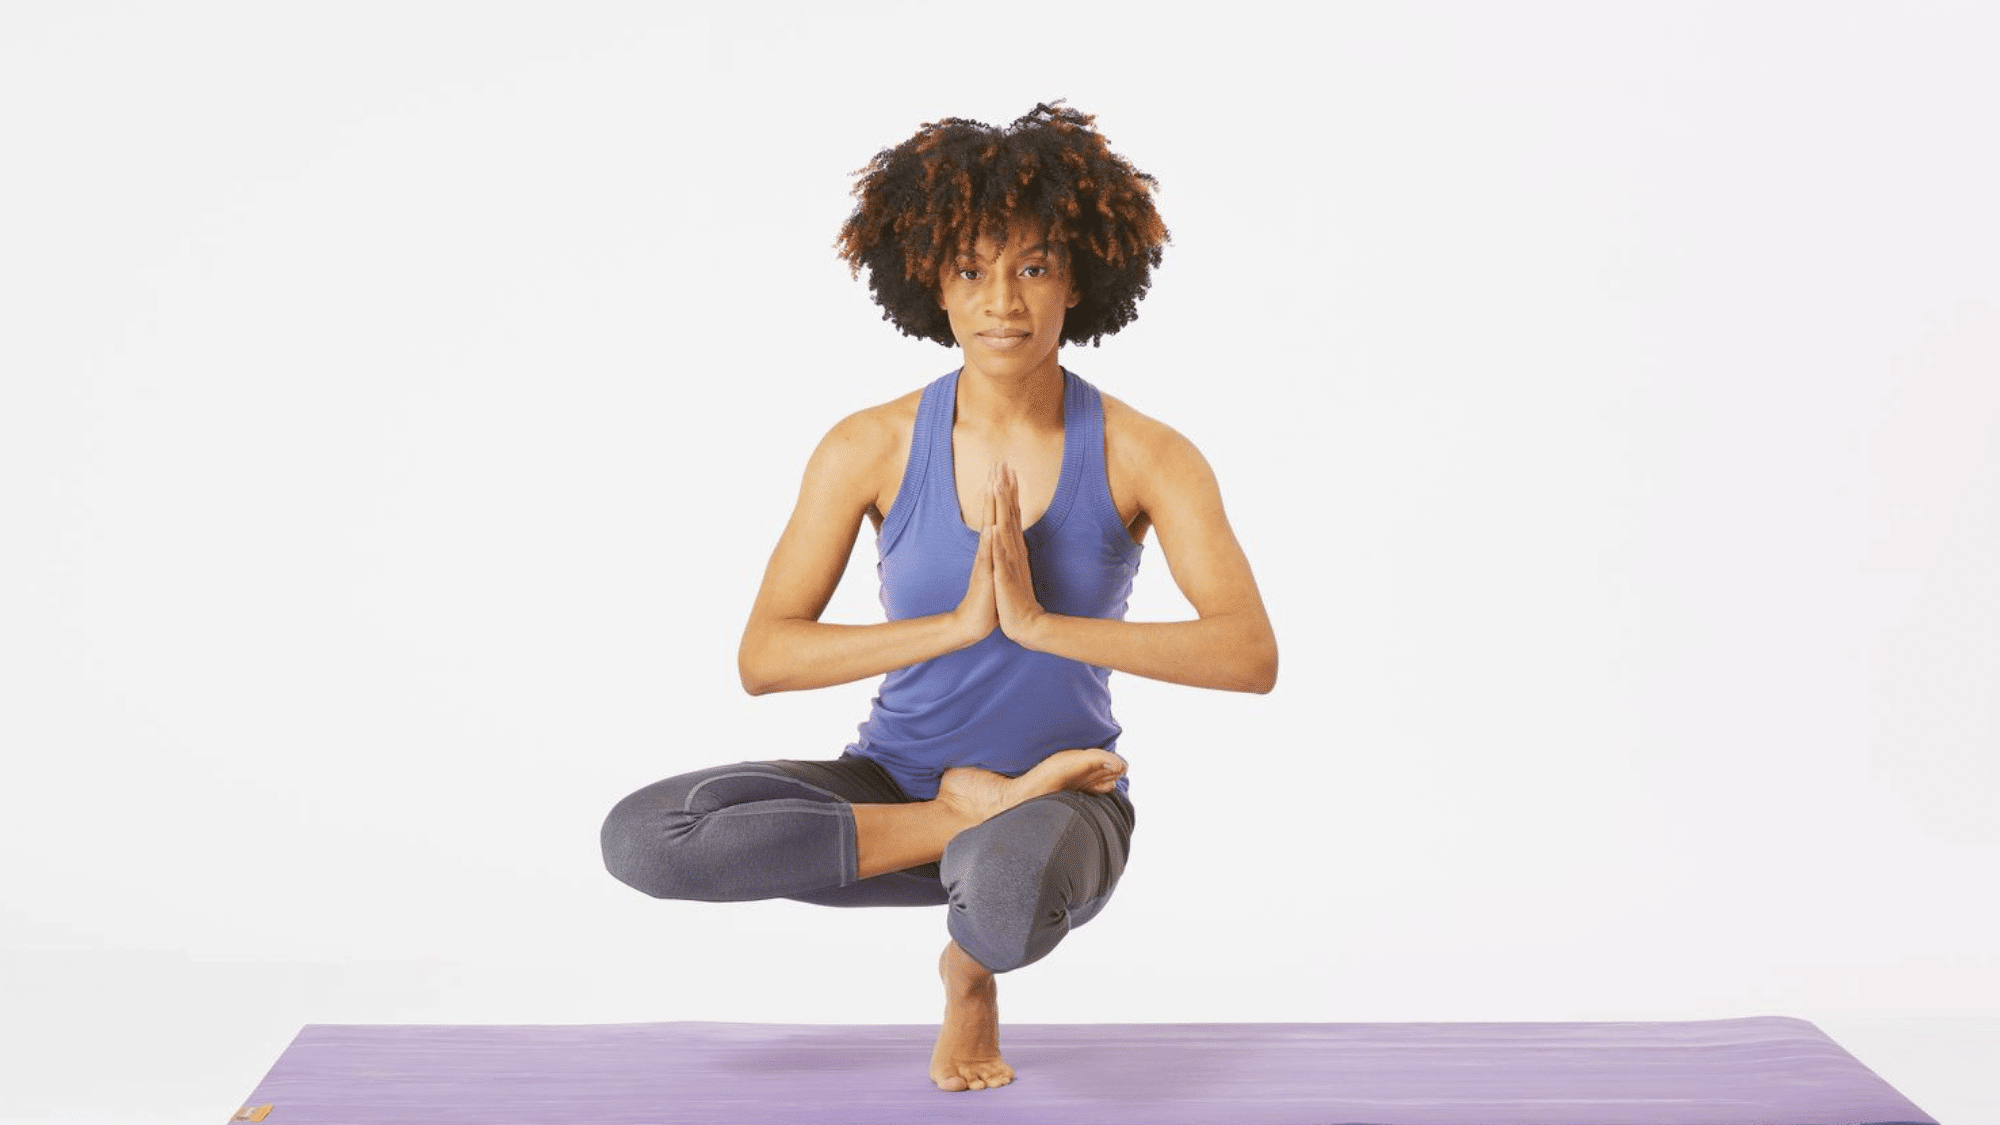
Strengthens knees and ankles, improves balance, tones core, and develops mental focus.
How to Do It:
- From Tree Pose, bend the standing leg.
- Lower your hips slowly until you are seated on the heel.
- Place fingers on the floor for support.
- Bring palms together at the chest.
- Balance steadily on the toes of one foot.
13. Corpse Pose (Savasana)
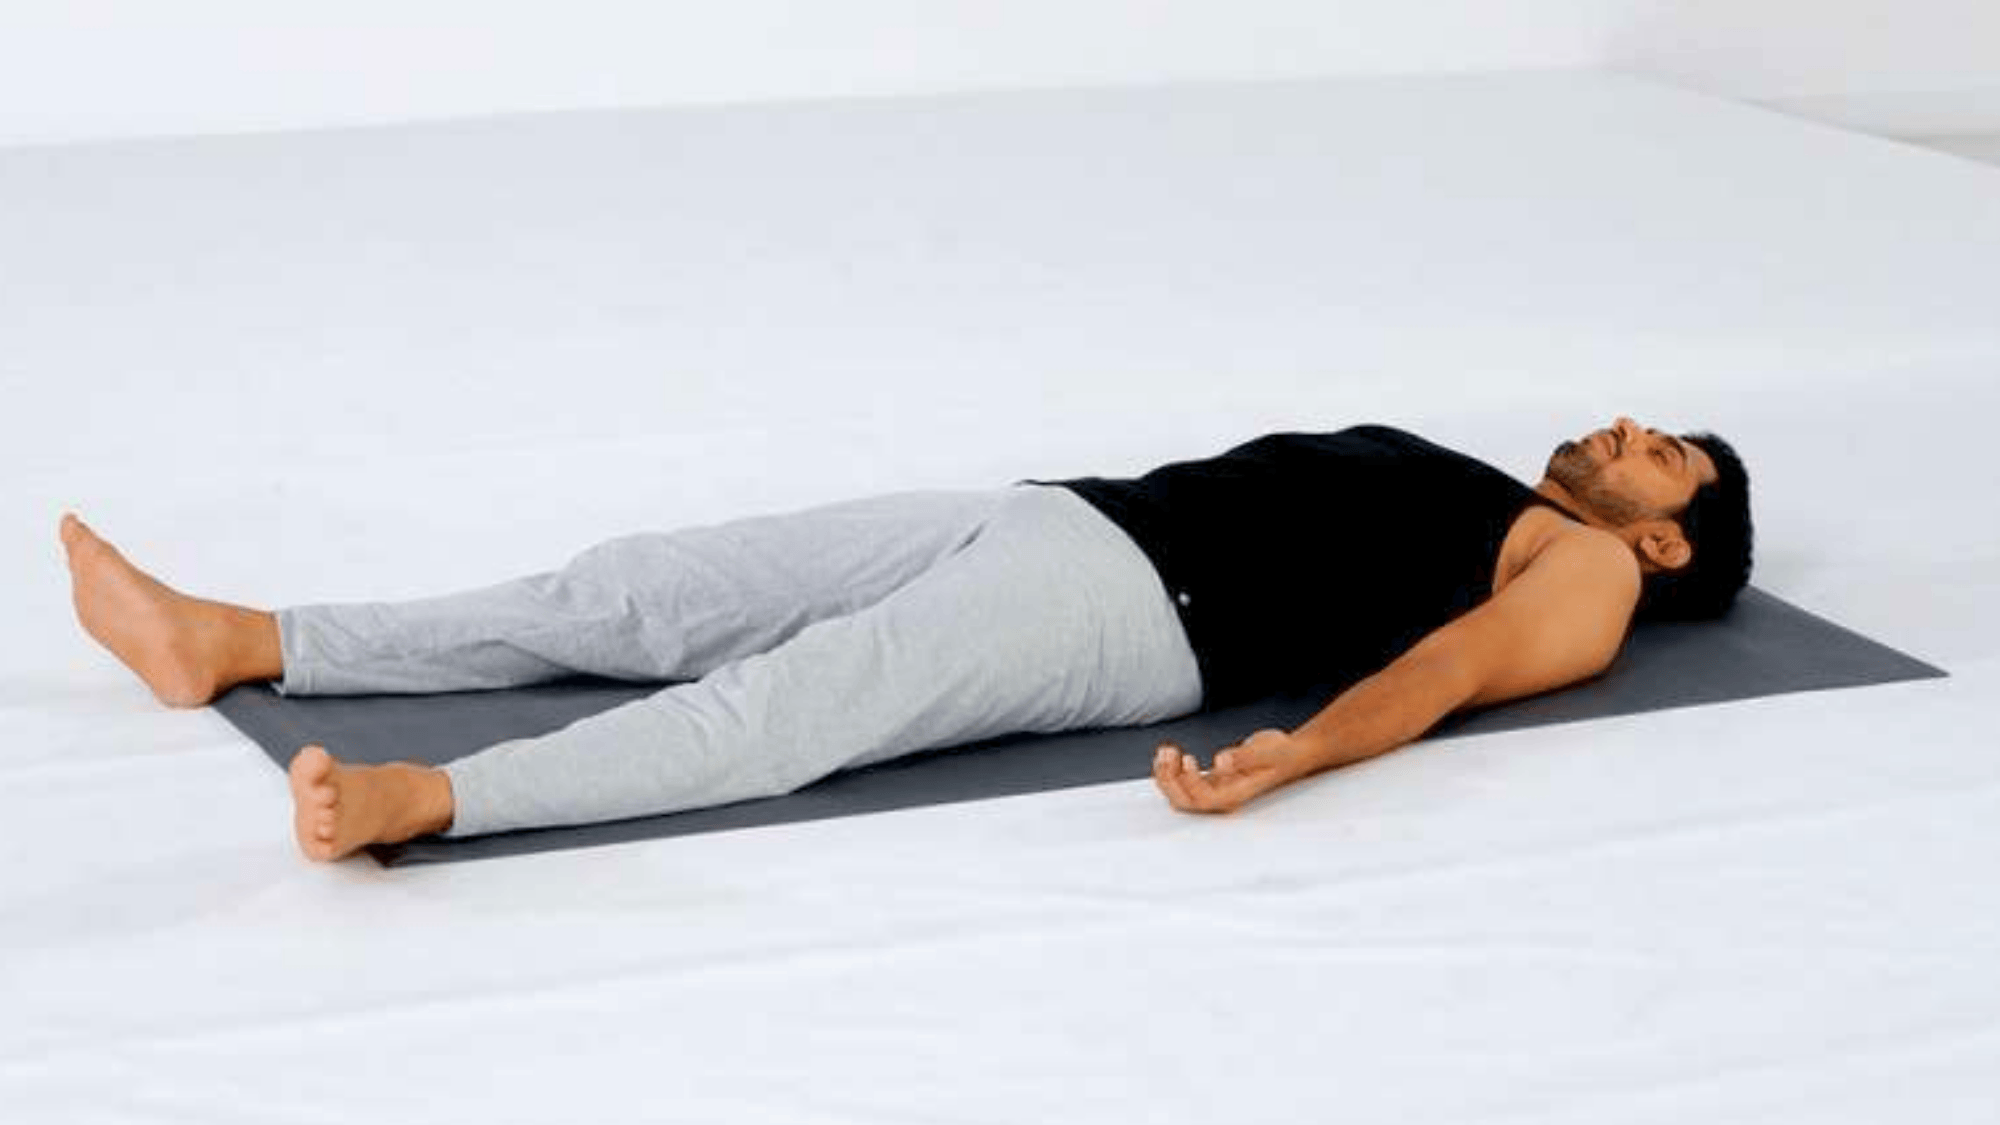
Relaxes muscles, lowers heart rate, relieves stress, and restores energy between the standing and floor series.
How to Do It:
- Lie flat on your back.
- Arms at sides, palms facing up.
- Legs slightly apart.
- Close your eyes and breathe naturally.
- Keep your body completely still.
14. Wind-Removing Pose (Pavanamuktasana)
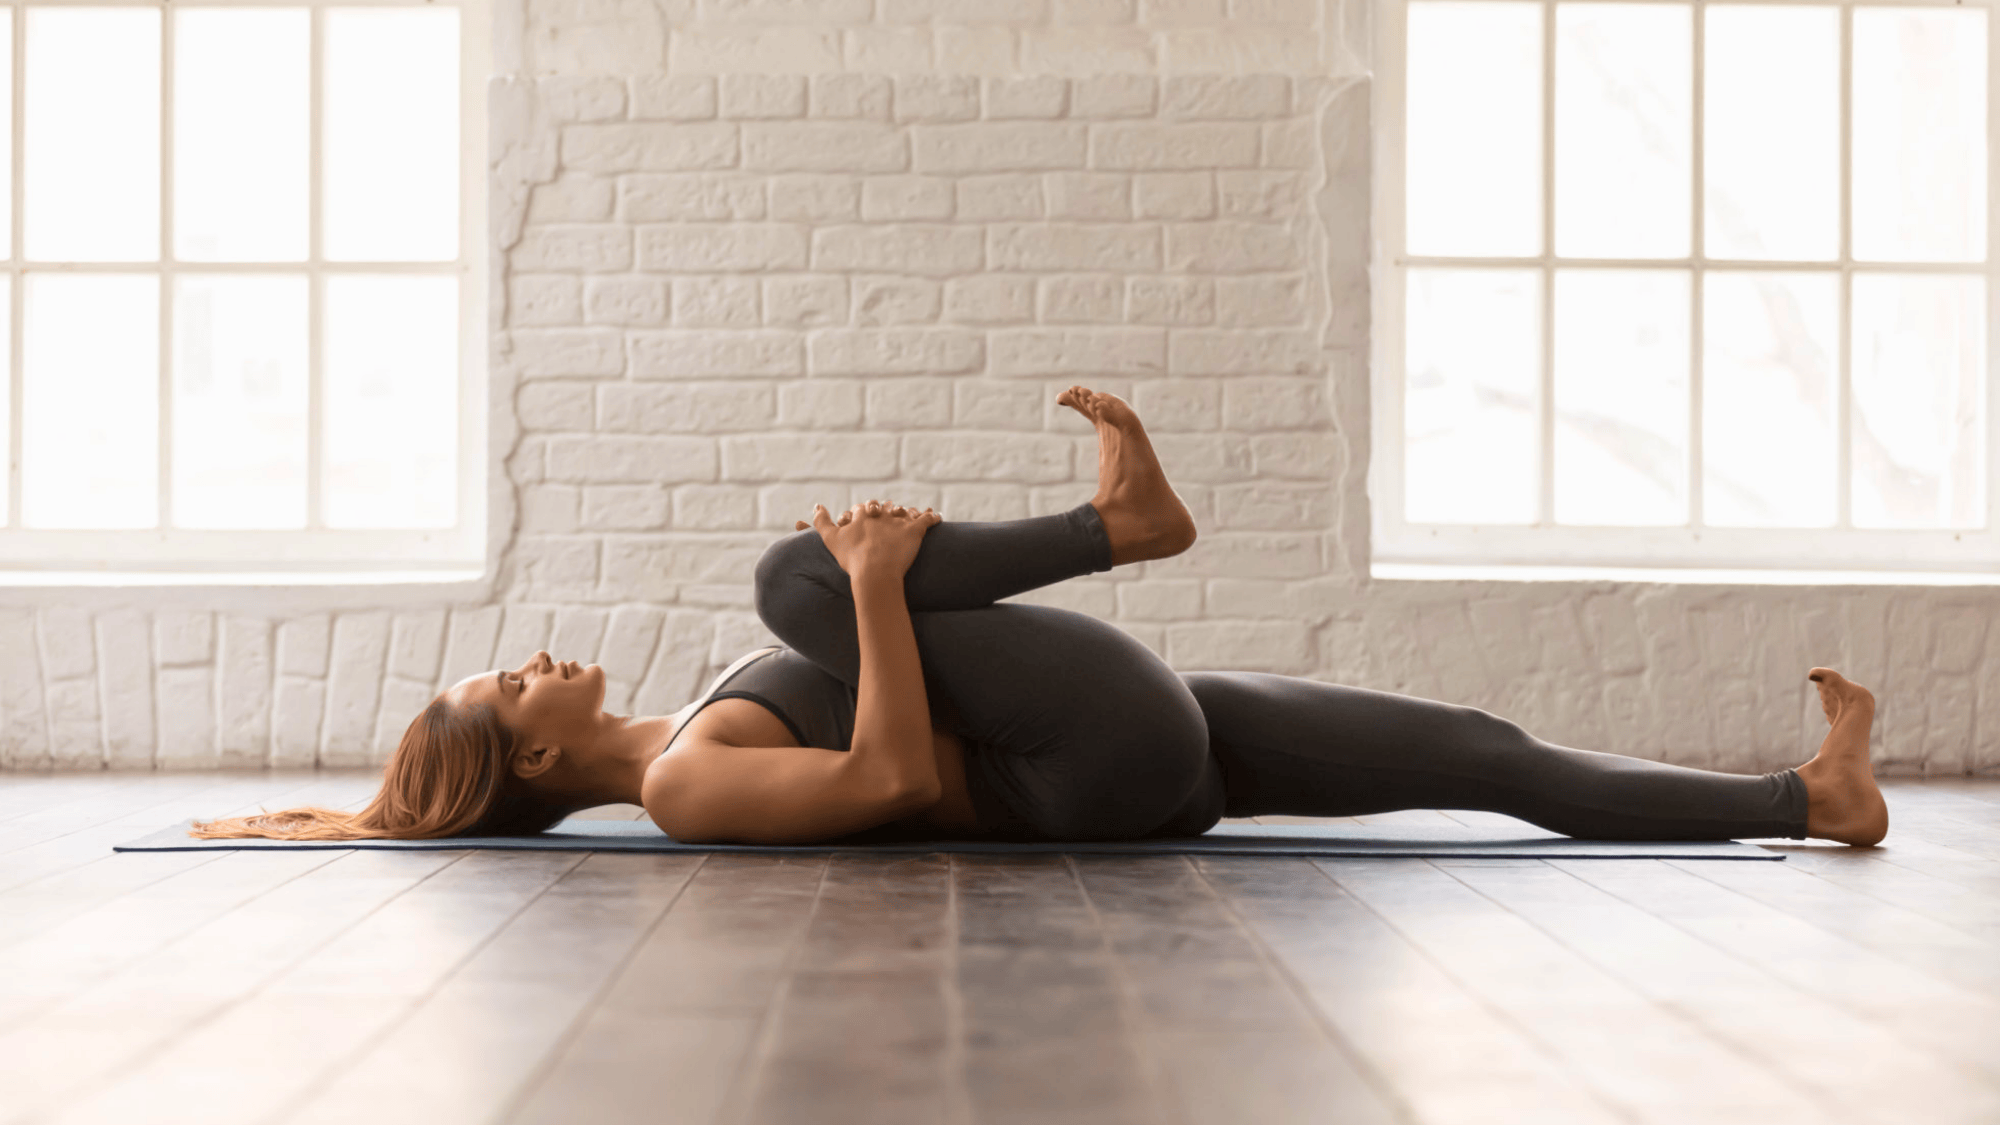
Aids digestion, relieves gas and bloating, massages intestines, tones abdominal organs, and improves hip flexibility.
How to Do It:
- Lie on your back.
- Pull one knee to chest with both hands.
- Keep the opposite leg extended on the floor.
- Press your chin down slightly.
- Switch sides, then hug both knees to chest.
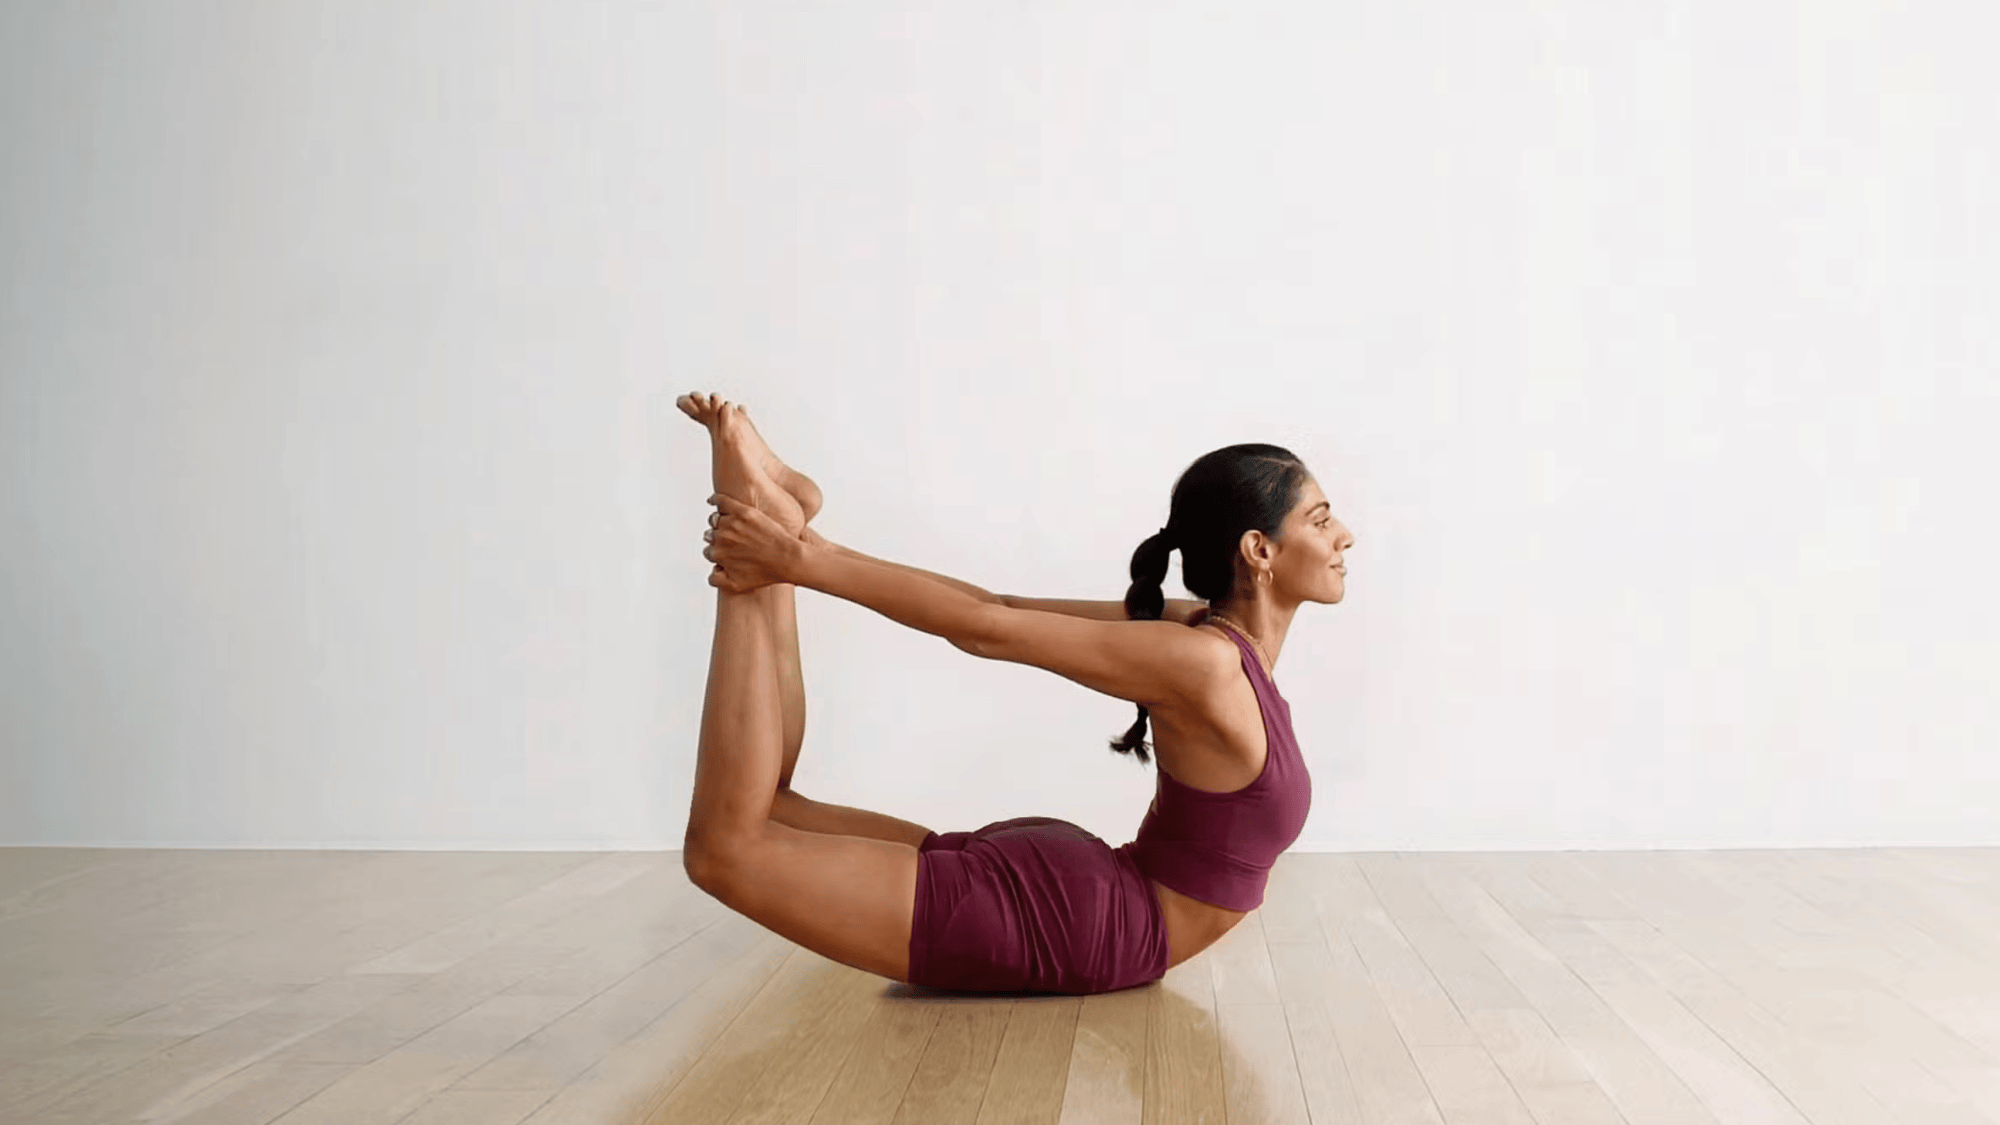
15. Sit-Up (Pada-Hasthasana Variation)
Strengthens the abdomen, stretches the spine, energizes the body, and improves digestion.
How to Do It:
- Lie on your back with arms overhead.
- Flex feet and press heels into the floor.
- Inhale, then exhale as you sit up.
- Reach forward, touching toes.
- Keep your spine straight and your forehead toward your knees.
16. Cobra Pose (Bhujangasana)
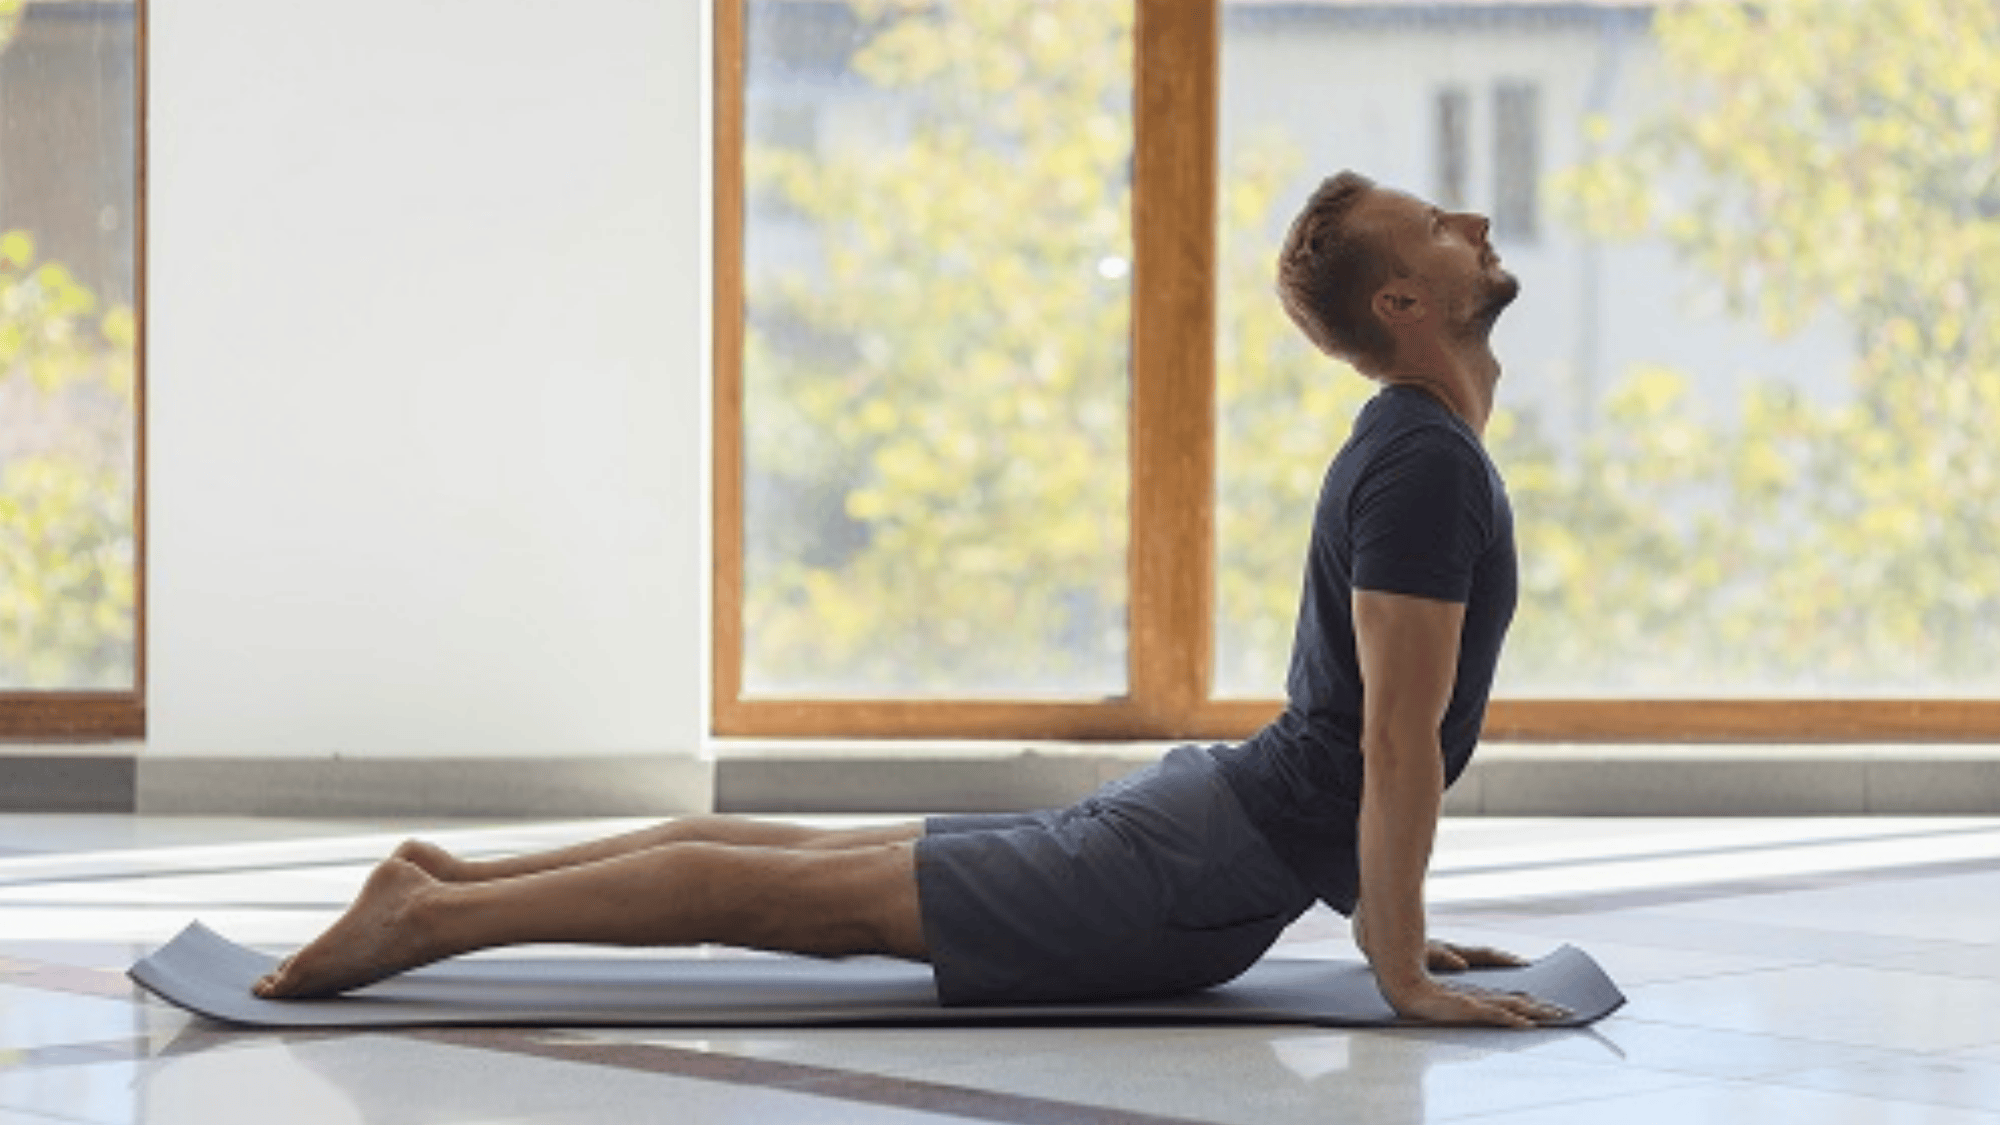
Strengthens the spine, improves flexibility, tones the buttocks, stimulates the kidneys, relieves back pain, and boosts digestion.
How to Do It:
- Lie face down with legs together.
- Place palms under shoulders.
- Keep elbows close to ribs.
- Inhale and lift your chest upward.
- Keep hips and legs grounded.
17. Locust Pose (Salabhasana)
Strengthens the lower spine, tones the hips and buttocks, improves circulation, and relieves sciatica.
How to Do It:
- Lie face down with arms under body.
- Palms flat against the floor.
- Lift one leg high, keeping it straight.
- Lower and switch sides.
- Finally, lift both legs together.
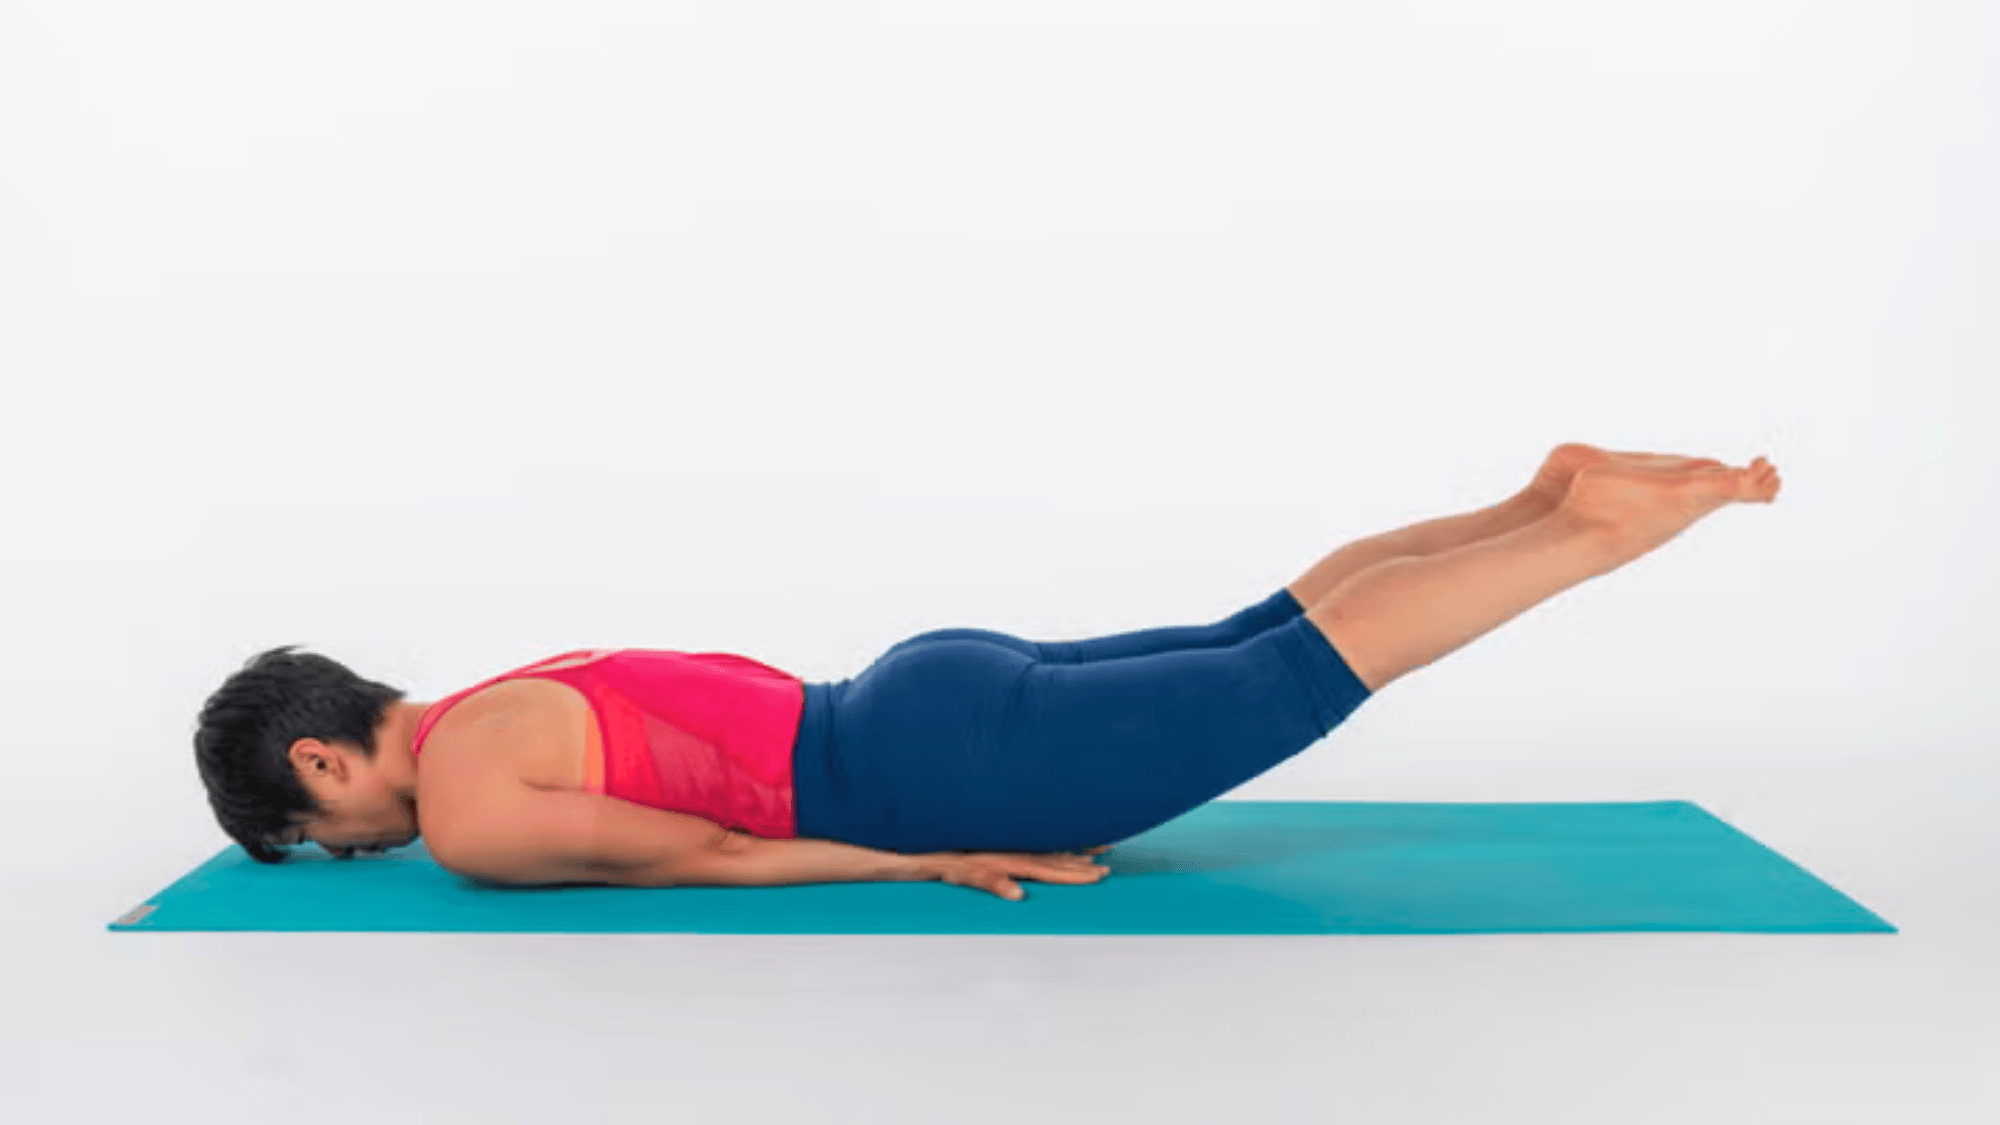
18. Full Locust Pose (Poorna-Salabhasana)
Expands the chest and ribcage, strengthens the upper back, tones the arms and thighs, and improves posture.
How to Do It:
- Lie on your stomach with arms extended outward.
- Inhale and lift chest, arms, and legs off the floor.
- Stretch arms backward like airplane wings.
- Keep your neck long and gaze forward.
- Hold posture before releasing slowly.
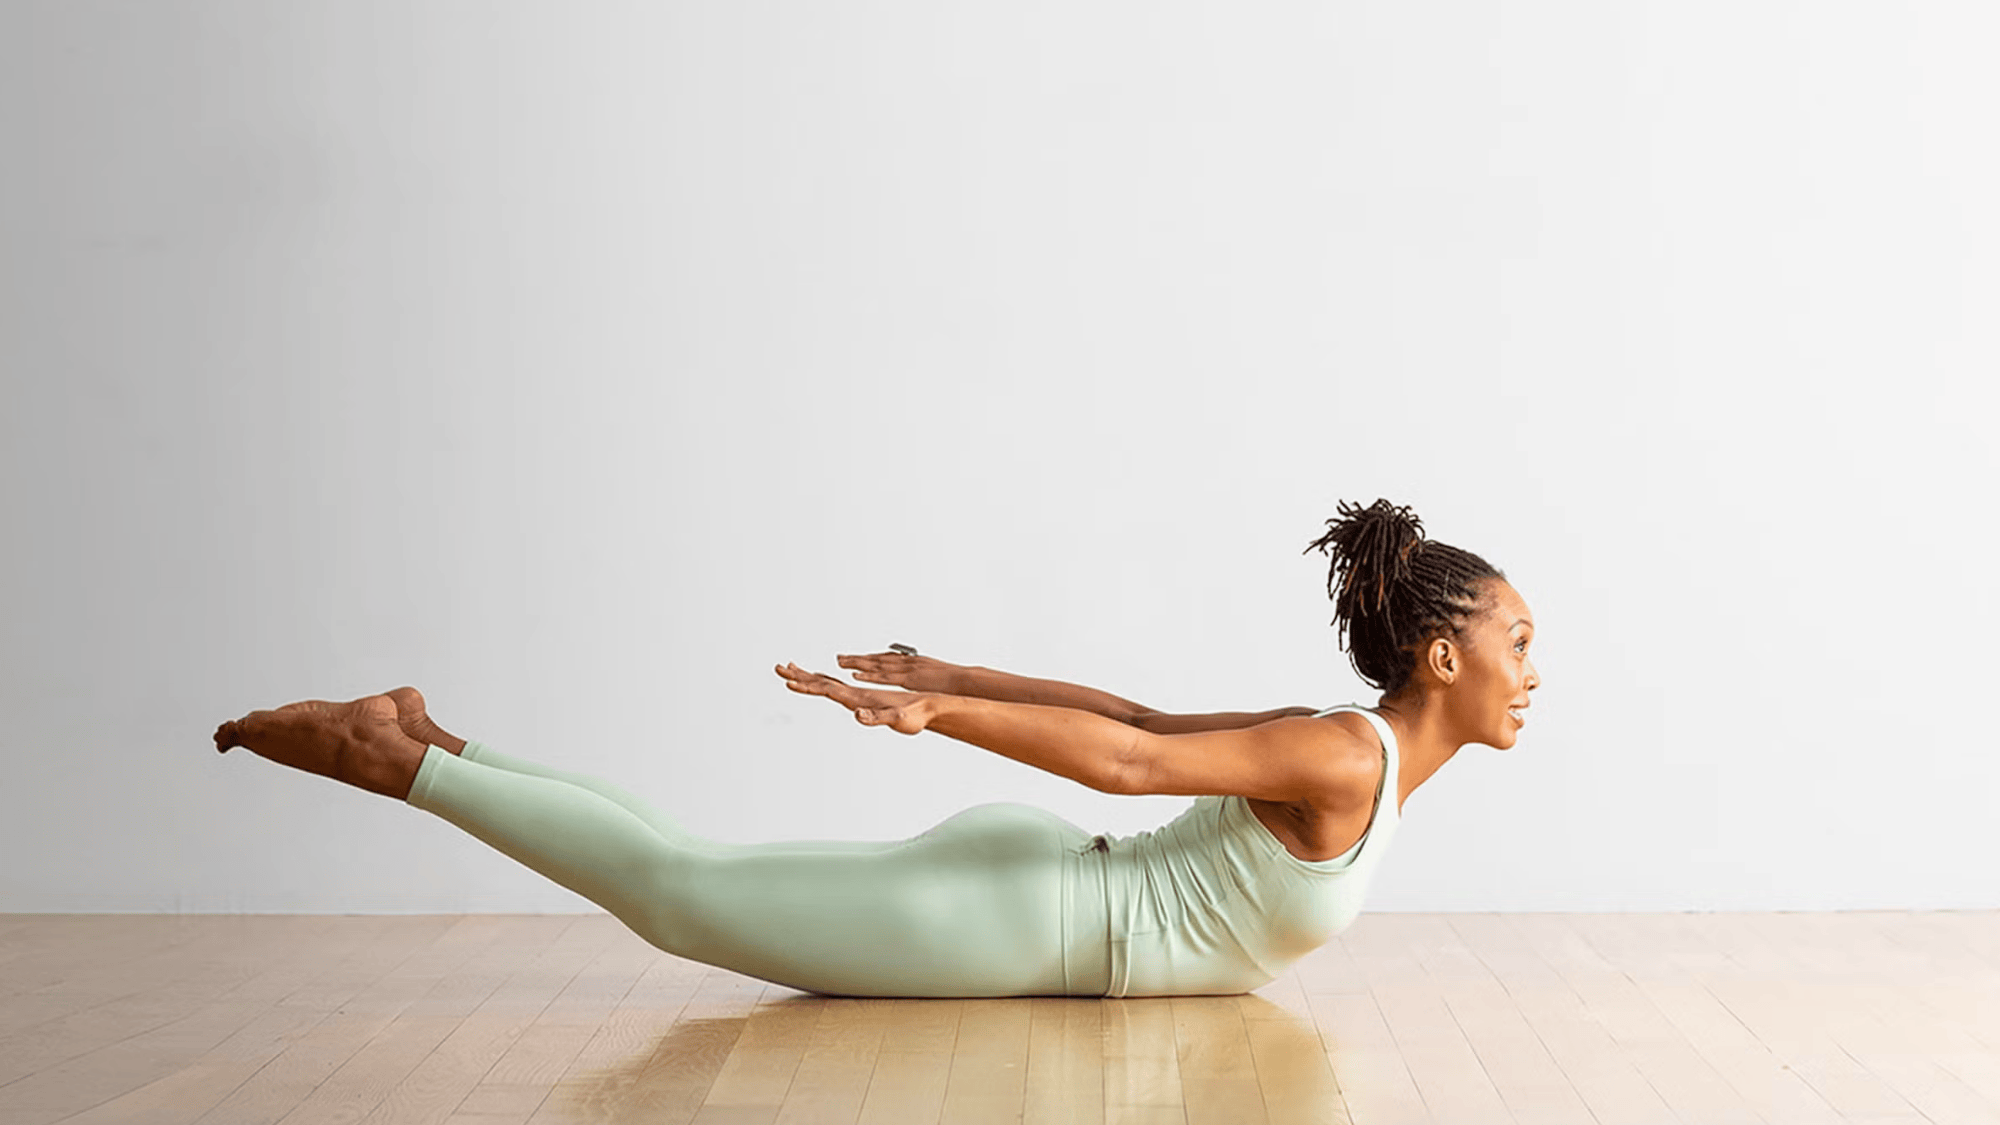
19. Bow Pose (Dhanurasana)
Opens the chest and lungs, strengthens the spine, tones the abdominal organs, improves digestion, and boosts flexibility in the back and shoulders.
How to Do It:
- Lie face down.
- Bend knees and grab ankles with both hands.
- Inhale deeply and kick legs upward.
- Lift the chest off the floor as you pull the arms back.
- Balance on the abdomen while holding the bow shape.
20. Fixed Firm Pose (Supta-Vajrasana)
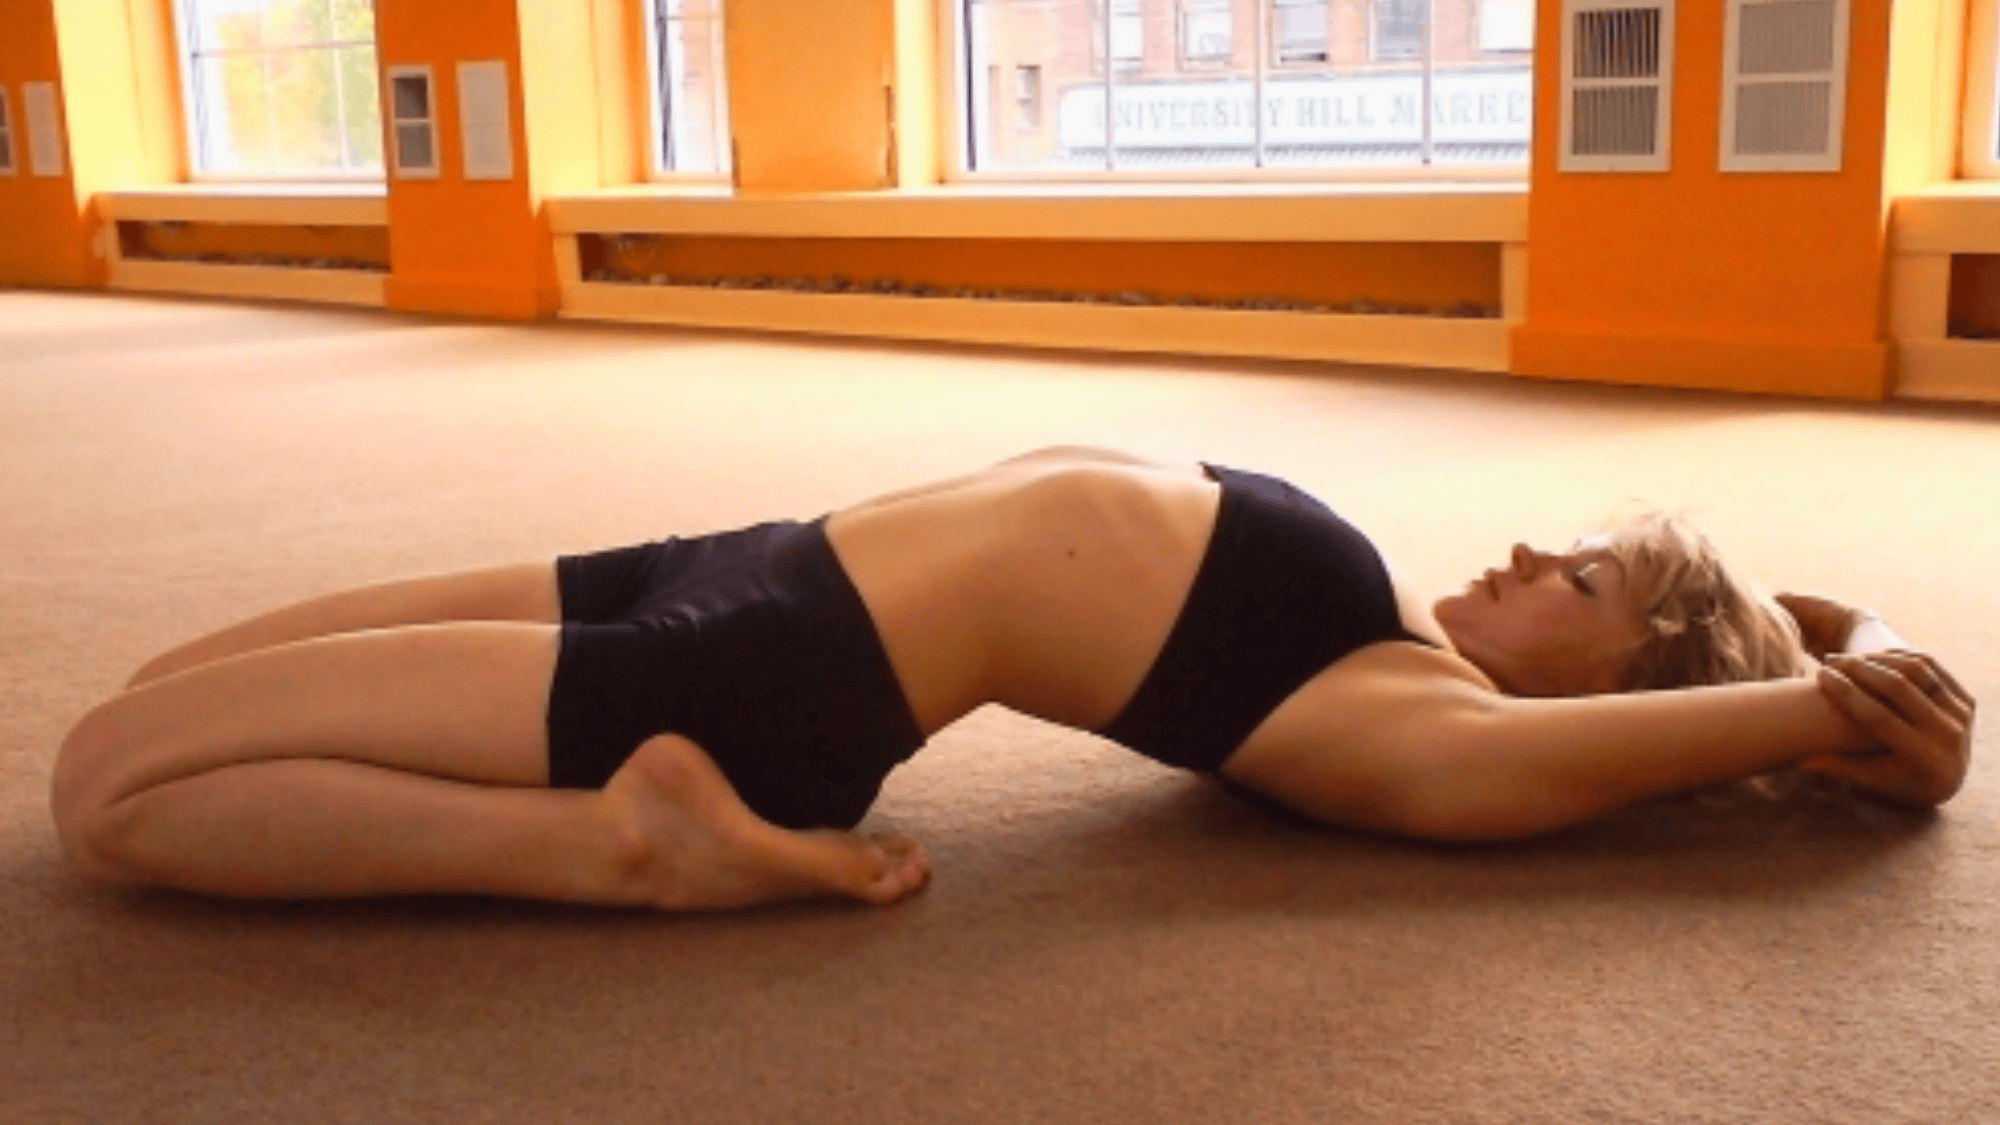
Stretches the knees, ankles, and thighs, relieves joint stiffness, improves circulation in the lower limbs, and strengthens the lower back.
How to Do It:
- Sit between your heels with your knees bent and your toes pointing backward.
- Slowly lean back onto forearms.
- If comfortable, lie down with arms overhead.
- Keep knees together and hips on the floor.
- Hold posture while breathing gently.
21. Half Tortoise Pose (Ardha-Kurmasana)
Relieves tension, lengthens the spine, boosts lung capacity, improves digestion, and calms the mind.
How to Do It:
- Kneel with buttocks on heels.
- Stretch arms straight overhead, palms together.
- Slowly fold forward until your forehead touches the floor.
- Keep hips on heels.
- Stretch arms as far forward as possible.
22. Camel Pose (Ustrasana)
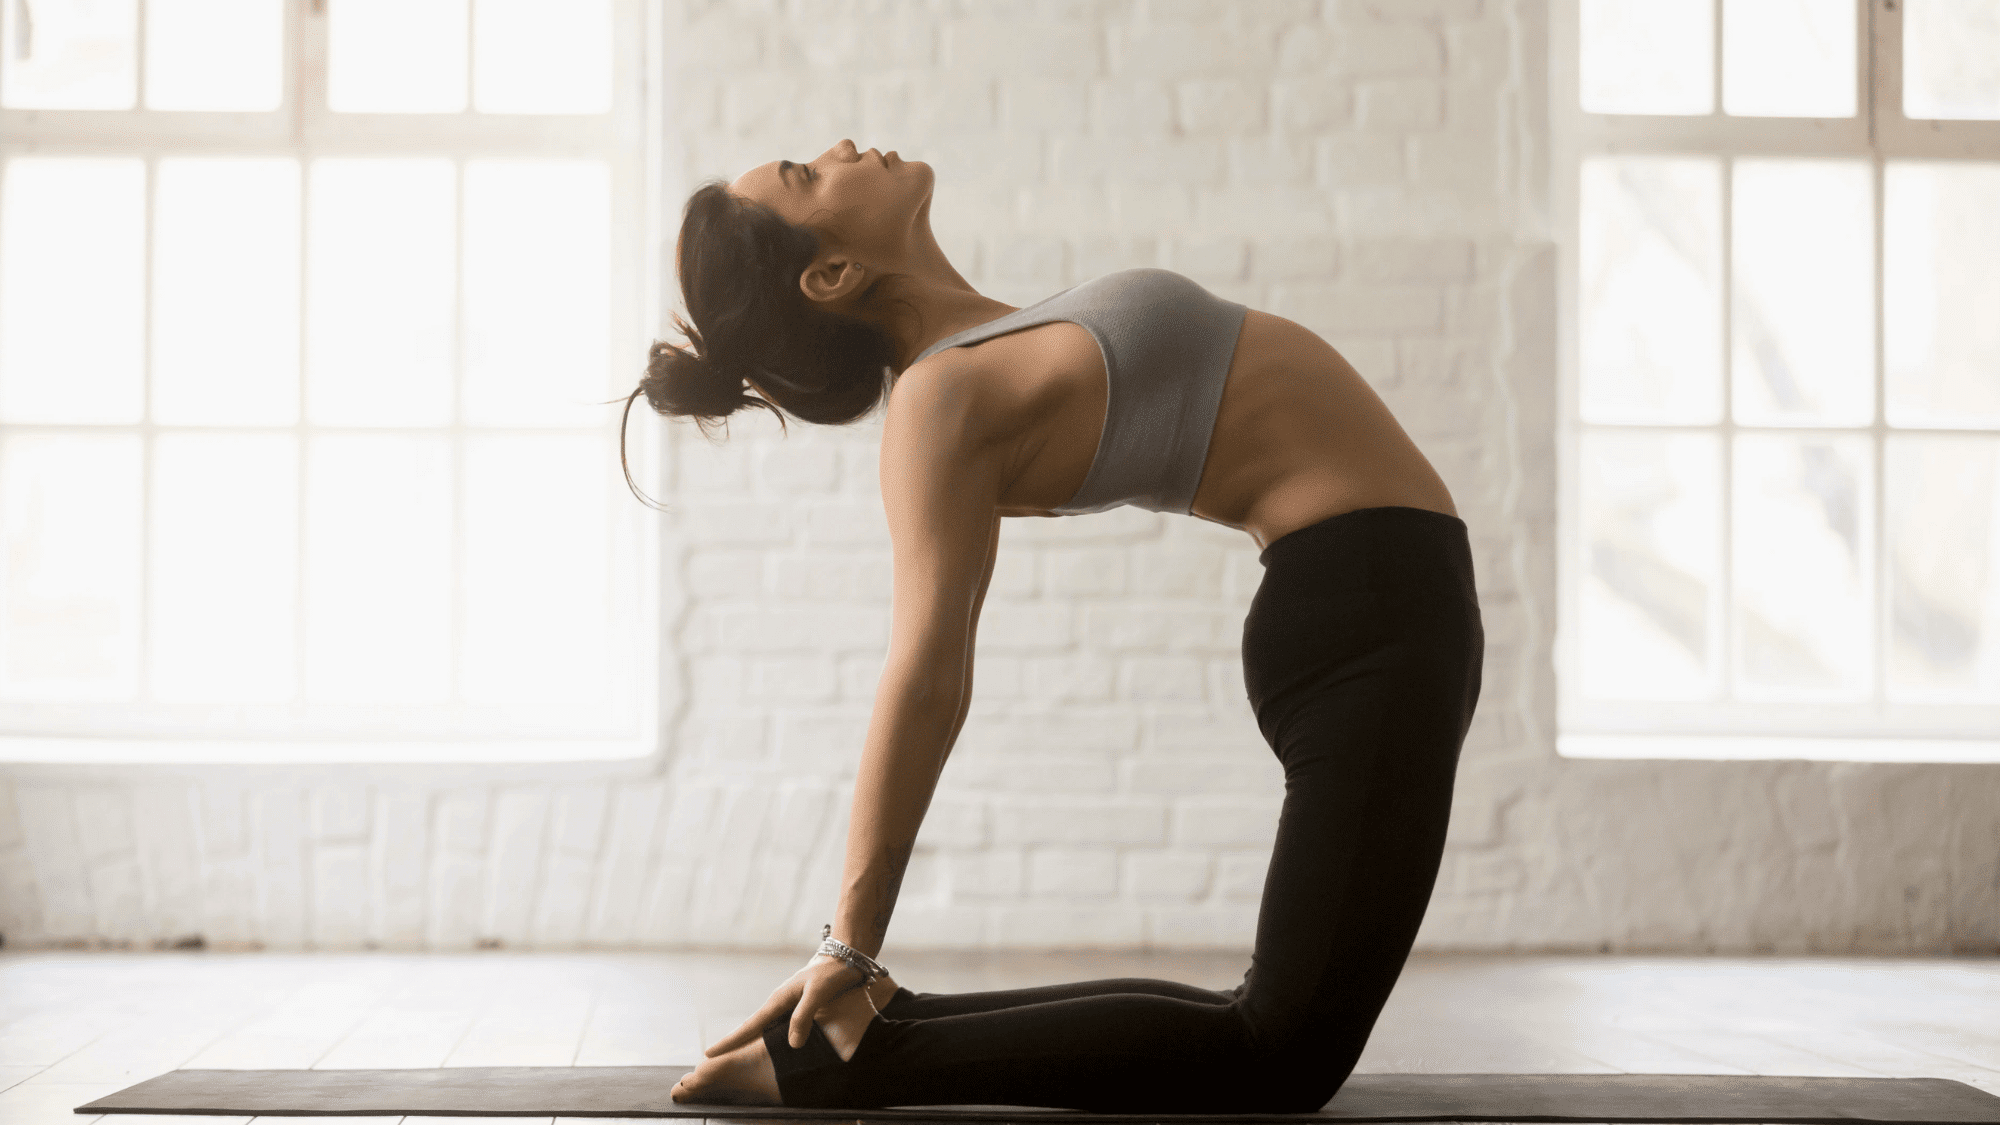
Opens chest and lungs, improves spinal flexibility, strengthens the back, stimulates the thyroid glands, and helps relieve anxiety.
How to Do It:
- Kneel with knees hip-width apart.
- Place your hands on your lower back for support.
- Lean backward, reaching for heels.
- Drop your head back and lift your chest upward.
- Hold your posture, then slowly return to an upright position.
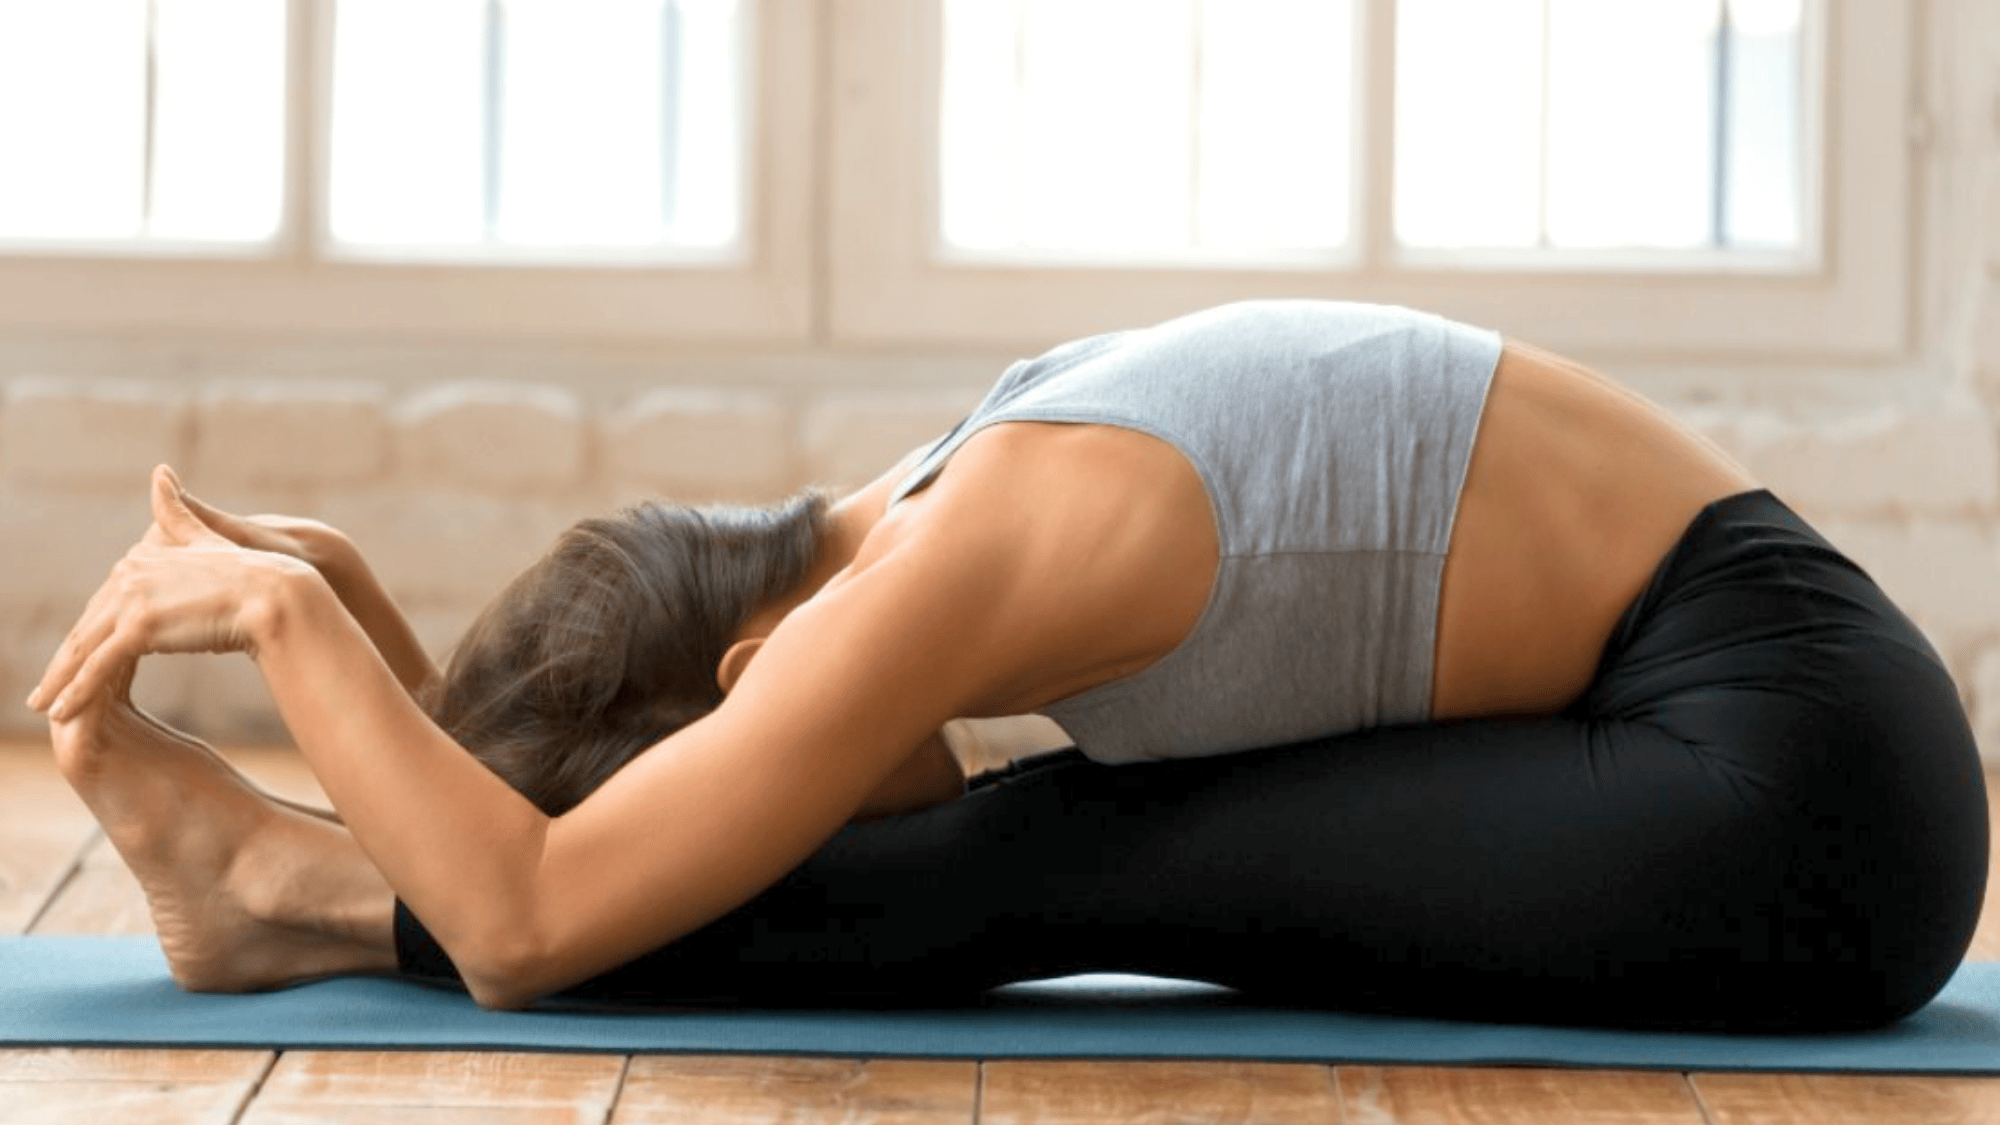
23. Rabbit Pose (Sasangasana)
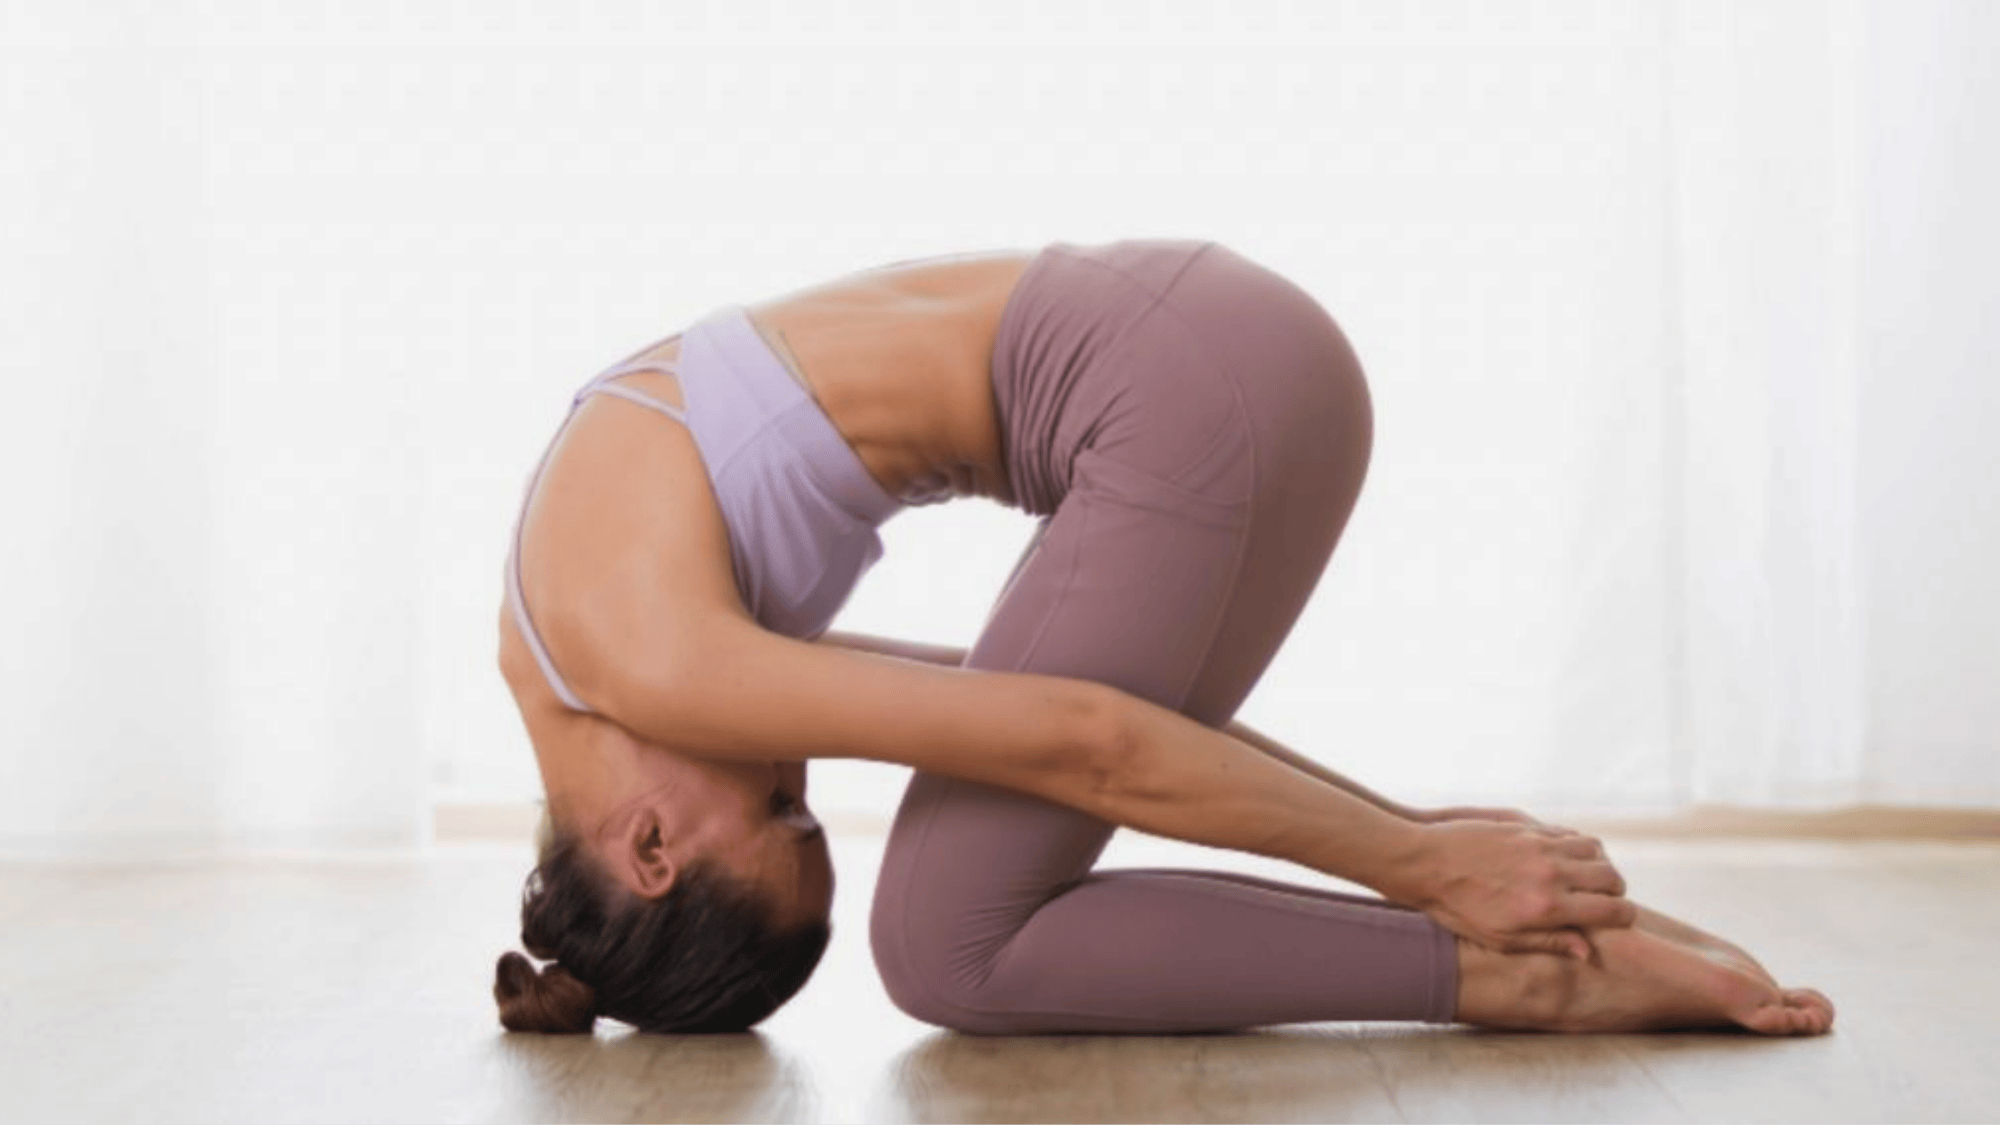
Stretches the spine, relieves back and neck tension, improves thyroid function, and calms the nervous system.
How to Do It:
- Kneel and hold your heels with both hands.
- Lower your chin to your chest and place the crown of your head on the floor.
- Lift hips upward, rolling spine forward.
- Pull heels as you deepen the stretch.
- Keep thighs perpendicular to the floor.
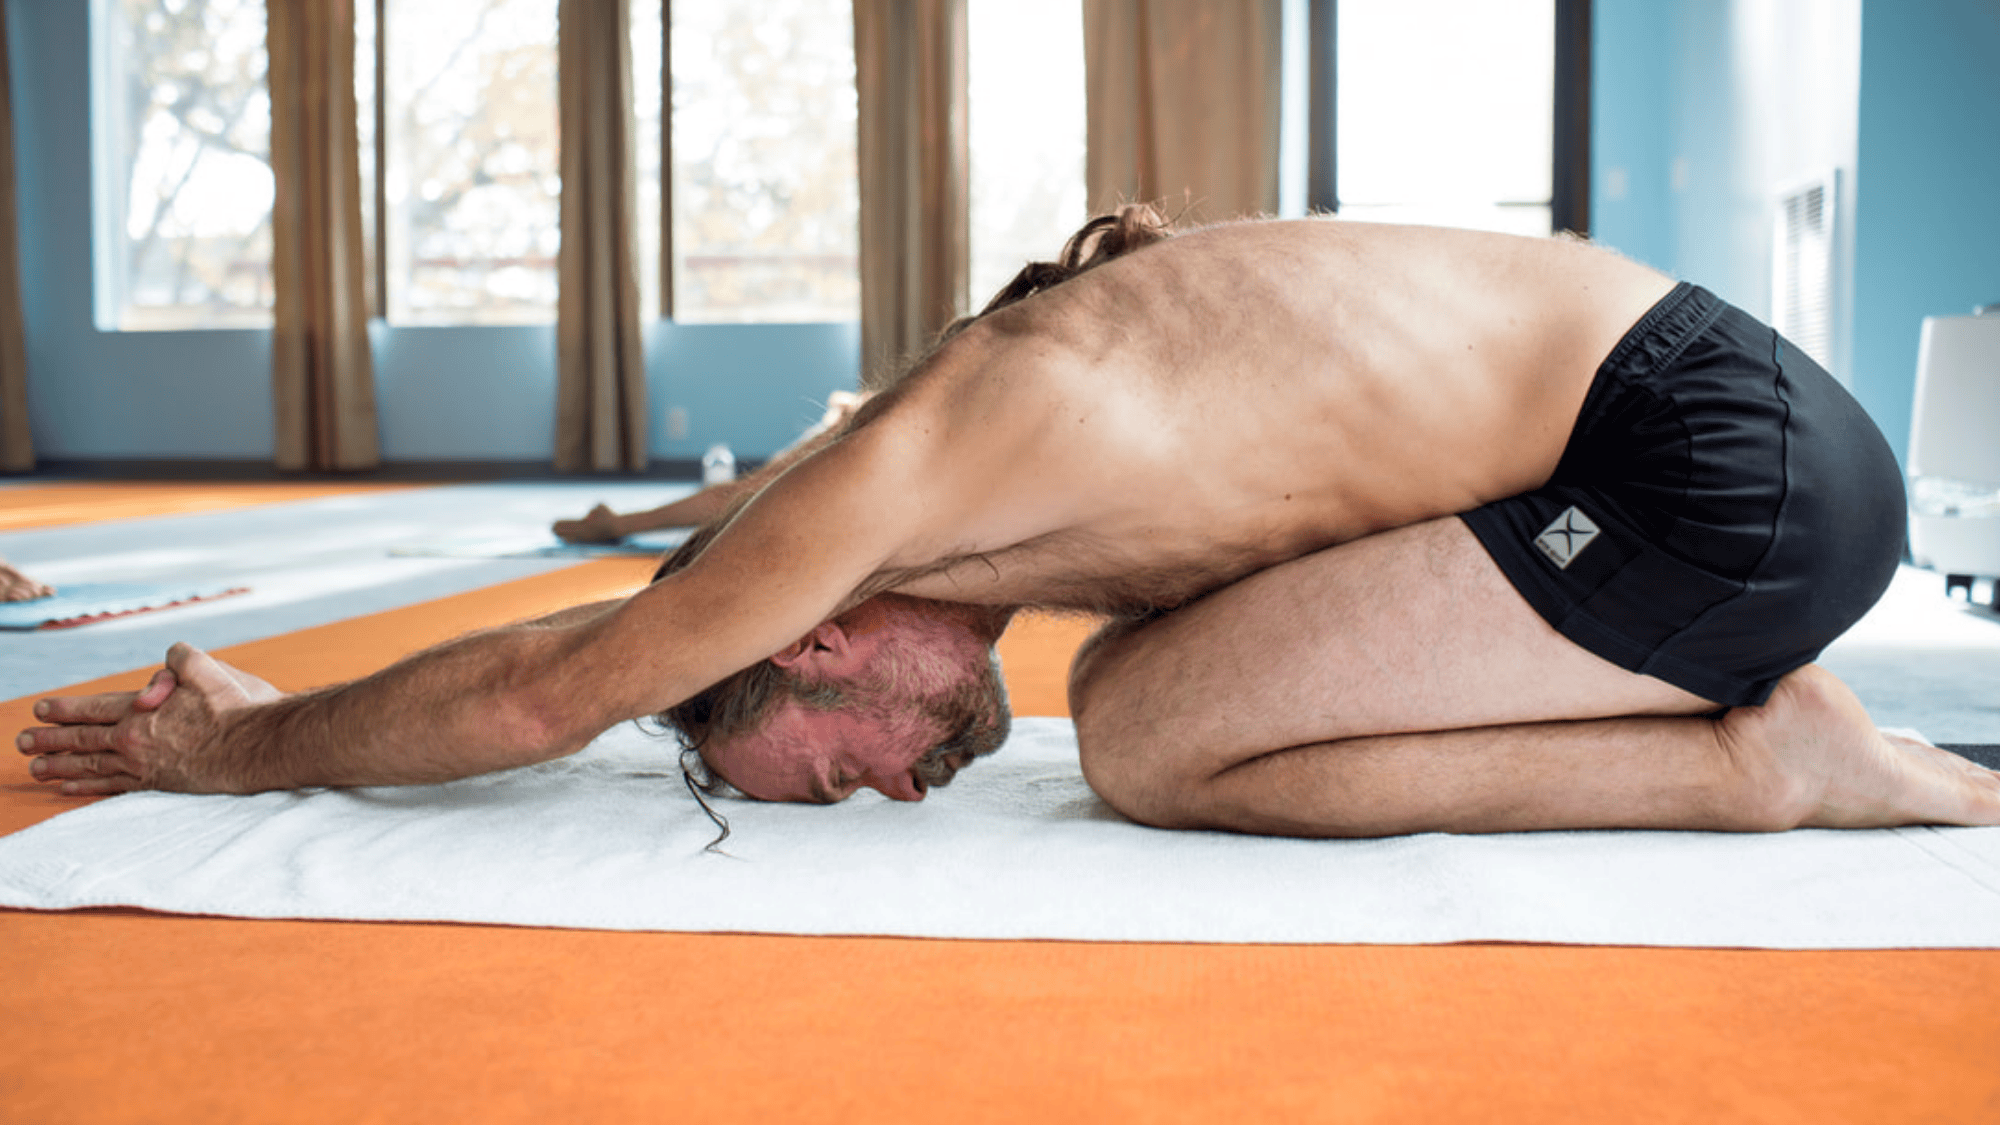
24. Head-to-Knee Pose with Stretching (Janushirasana with Paschimottanasana)

Stimulates the kidneys, pancreas, and thyroid; stretches the hamstrings; tones the abdomen; and aids digestion.
How to Do It:
- Sit with one leg extended and the other bent.
- Reach forward with both hands toward the extended foot.
- Round spine and bring the forehead toward the knee.
- Switch sides.
- Finish with both legs extended, reaching forward.
25. Spine Twisting Pose (Ardha Matsyendrasana)
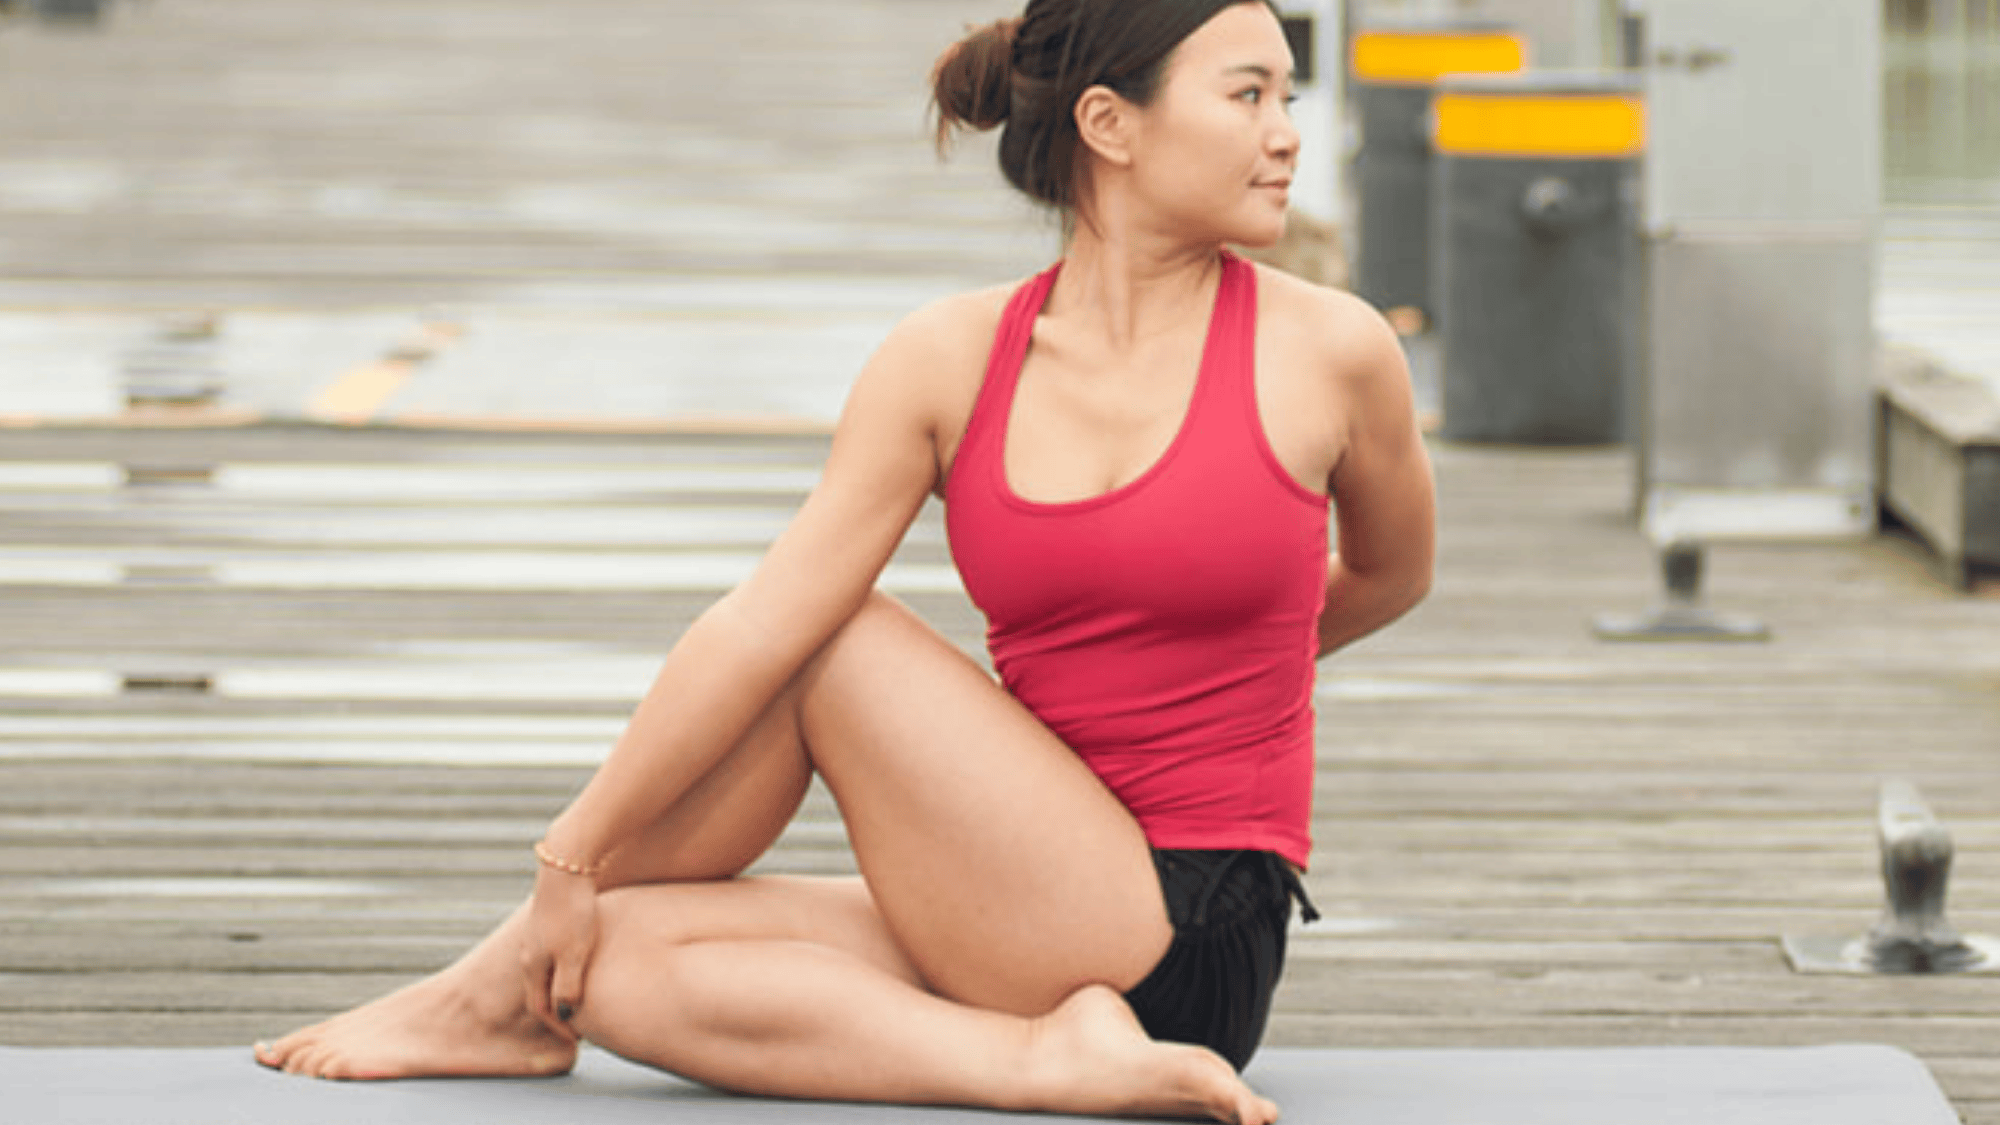
Improves spinal flexibility, massages abdominal organs, stimulates digestion, and enhances circulation in the spine.
How to Do It:
- Sit with one leg bent under you.
- Cross the opposite leg over the knee.
- Place your elbow outside the bent knee.
- Twist your torso and look over your shoulder.
- Repeat on the other side.
26. Blowing in Firm Pose (Kapalbhati Pranayama)
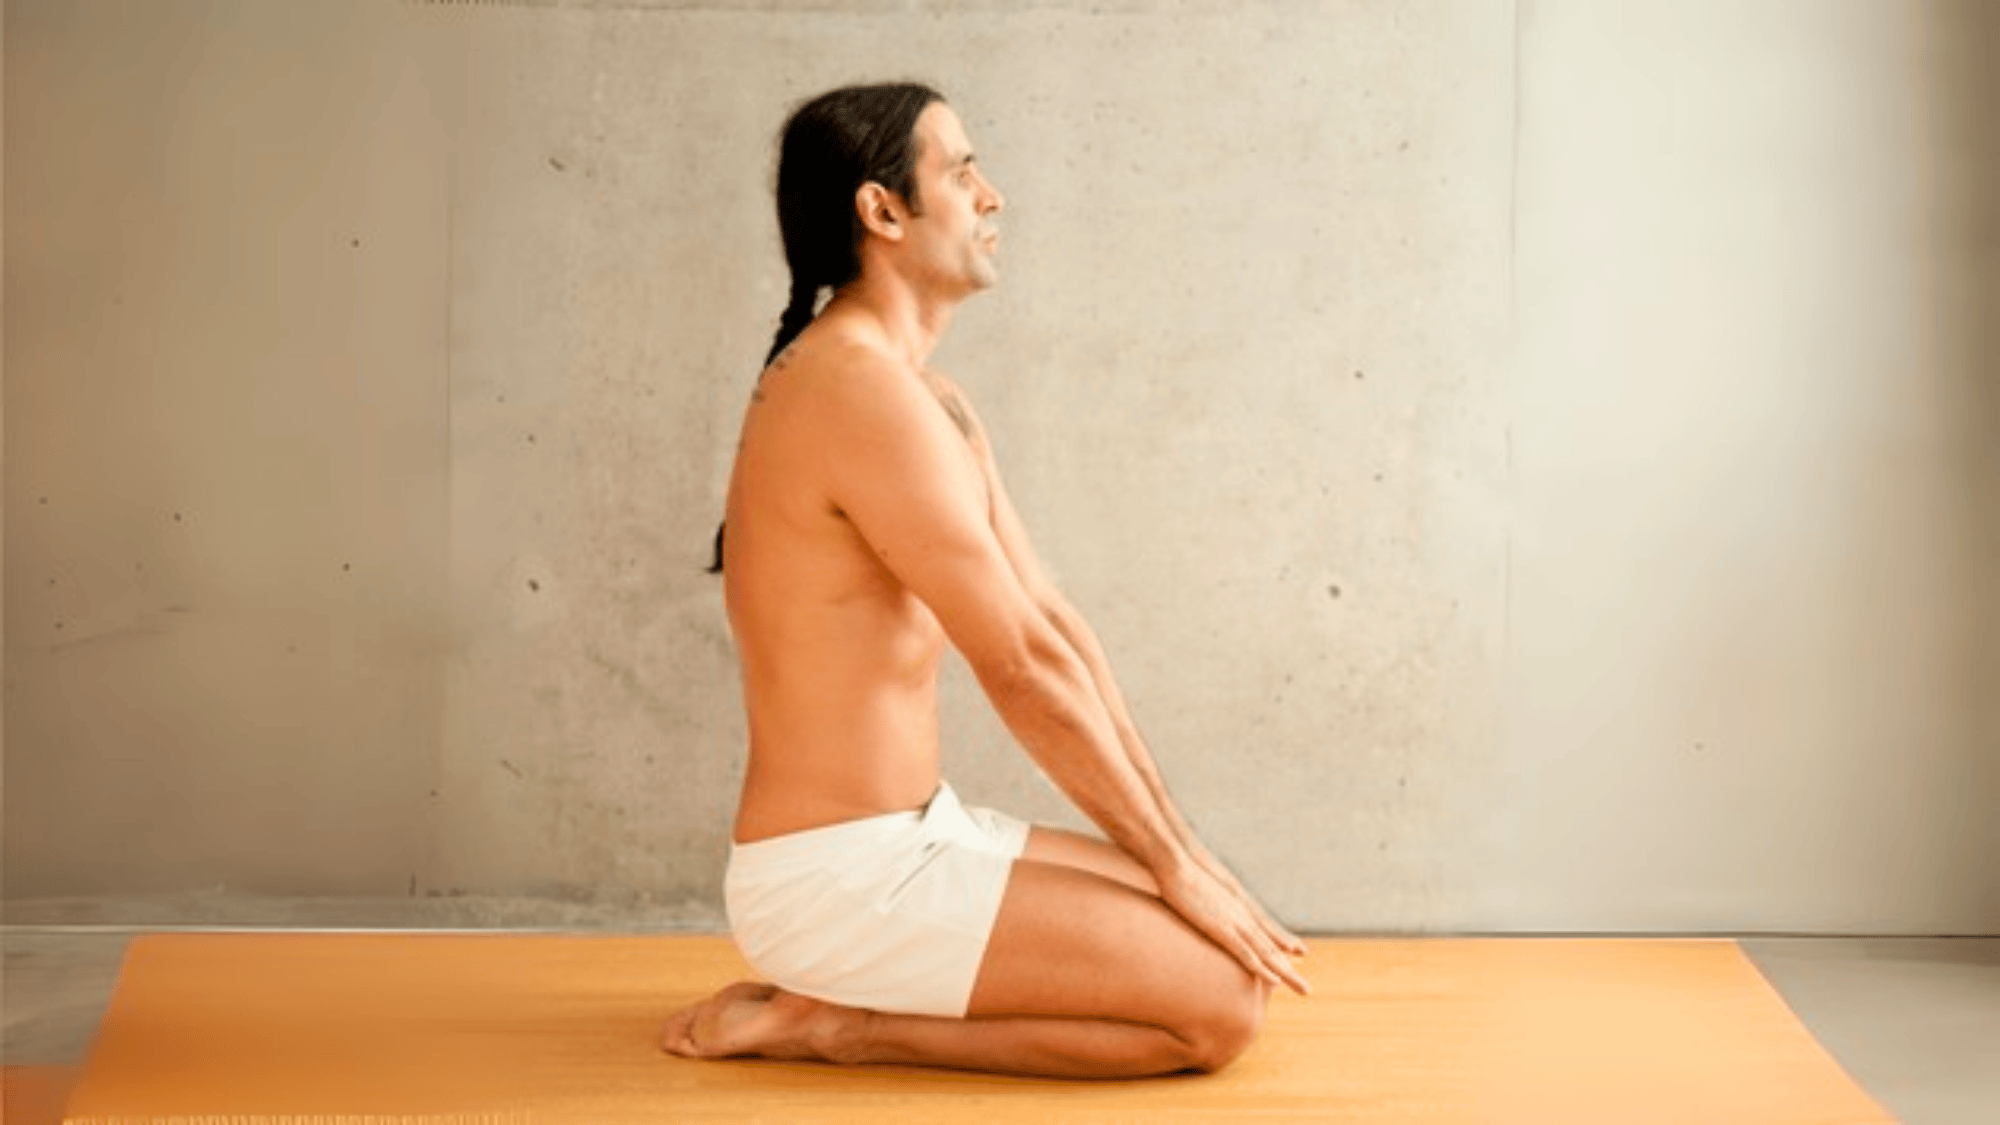
This final breathing exercise energizes the body while cleansing the respiratory system through powerful, controlled exhalations that activate your core.
Steps:
- Sit on heels with spine straight.
- Place hands on knees.
- Inhale deeply through the nose.
- Forcefully exhale through the mouth by contracting the abdomen.
- Continue in steady rhythmic breaths.
This breathing technique concludes your Bikram session by stimulating circulation and leaving you feeling refreshed and mentally clear.
Benefits of Bikram Yoga
Practicing Bikram Yoga offers more than just a sweaty workout; it brings a mix of physical, mental, and wellness benefits that can positively impact your daily life. Here are some positive impacts Bikram Yoga can bring you:
-
Improves Flexibility: The heated studio environment warms muscles, making stretching safer and easier. This allows deeper movements, a greater range of motion, and increased flexibility in the spine and joints.
-
Burns More Calories: Hot yoga burns more calories compared to traditional yoga. A 90-minute Bikram session can torch over 300 calories, supporting weight loss and improving overall fitness.
-
Builds Bone Density: Weight-bearing poses strengthen bones, especially in the hips, spine, and neck. This benefit is especially important for aging adults and women, as it helps lower osteoporosis risk over time.
-
Reduces Stress: Regular hot yoga lowers stress levels by calming the nervous system. It also enhances self-confidence, mental clarity, and emotional stability while improving quality of life.
-
Eases Depression: Yoga helps relax the body and elevate mood. Research shows it can significantly reduce depressive symptoms, serving as a supportive therapy alongside conventional treatments.
-
Boosts Cardiovascular Health: Hot yoga challenges the heart, lungs, and muscles. Poses performed in heat raise heart rate similar to brisk walking, improving endurance, circulation, and metabolism.
-
Lowers Blood Glucose: By increasing energy use, hot yoga helps regulate blood sugar. Studies suggest it particularly benefits older adults with obesity, reducing diabetes-related risks over time.
-
Nourishes Skin: Heavy sweating during hot yoga improves circulation, delivering oxygen and nutrients to skin cells. This deep-cleansing effect refreshes the complexion and promotes radiant, healthy-looking skin.
Bikram Yoga vs. Other Yoga Styles
One of the biggest questions people have is how Bikram Yoga differs from other popular yoga styles, such as hot yoga, Hatha, or Vinyasa. Here’s a clear comparison:
| Feature | Bikram Yoga | Hot Yoga | Vinyasa Yoga |
|---|---|---|---|
| Sequence | Fixed: 26 poses + 2 breathing exercises | Varies by teacher or studio | Creative; teacher designs flow |
| Room Temperature | 105°F (40.5°C) with 40% humidity | 90–105°F (varies by studio) | Usually room temperature |
| Class Length | Always 90 minutes | 60–90 minutes | 60–90 minutes |
| Teaching Style | Scripted dialogue, same worldwide | Flexible, depends on the instructor | Creative and flow-based |
| Focus | Discipline, structure, physical and mental stamina | Physical challenge, detox, endurance | Balance, mindfulness, creativity, breath-to-movement connection |
| Suitability for Beginners | Yes, but intense due to the heat | Often beginner-friendly, less rigid than Bikram | Very beginner-friendly, modifications often offered |
So while Bikram Yoga offers a highly structured and predictable experience, other yoga styles leave more room for variety and personal expression.
Risks & Suitability
While Bikram Yoga offers many benefits, it’s equally important to understand the possible health risks and who should carefully avoid this practice. Here are a few things to keep in mind:
Potential Health Risks
The heated environment brings benefits, but it also presents challenges, especially for beginners, so it’s essential to be aware of potential risks.
- High heat can cause dehydration and dizziness.
- Risk of heat exhaustion if hydration is ignored.
- Beginners may feel overwhelmed by the intensity.
- It is important to rest when needed and drink plenty of water.
Who Should Avoid Bikram Yoga
While many enjoy Bikram Yoga, it may not be ideal for everyone, especially those with health conditions or a sensitivity to high heat.
- Pregnant women (unless cleared by a doctor).
- People with heart conditions or blood pressure issues.
- Those sensitive to heat or prone to fainting.
- Anyone new should progress slowly and listen to their body.
What to Expect in a Bikram Yoga Class
Entering your first Bikram Yoga studio creates an immediate sensory shift. The warmth envelops you as you step inside, signaling that this won’t be an ordinary workout experience.
You’ll notice that the instructor follows a traditional teaching method, using specific verbal cues that remain consistent across all sessions.
This standardized approach allows you to focus entirely on your practice without worrying about what comes next.
The true essence lies in cultivating awareness of your body’s responses and learning to work with your current abilities rather than against them.
This mindful approach changes what could feel like an endurance test into a moving meditation that builds both physical strength and mental clarity.
Tips for Beginners in Bikram Yoga
Starting Bikram Yoga can feel a little overwhelming, especially with the heat and strict routine. But with the right mindset and a few simple habits, you can ease into the practice more comfortably. Here are some tips to keep in mind:
- Hydrate well before and after class to replace fluids lost through sweating.
- Arrive early to adjust to the heat and settle in calmly.
- Bring two towels, one for your mat and one for yourself.
- Take breaks when needed; sitting quietly is part of the practice.
- Wear light clothing that allows your skin to breathe.
These small steps can make your first classes smoother and help you build confidence as you adjust to the unique pace of Bikram Yoga.
Wrapping It Up
By the end of a Bikram Yoga class, you’ll likely feel exhausted yet strangely refreshed. That’s the unique balance this practice creates, pushing your body while sharpening your mind.
Over time, the fixed sequence and heated environment become less intimidating and more like a trusted routine.
I’ve seen how it teaches patience, discipline, and the power of simply showing up, and now you know it too, that you know what Bikram Yoga is.
Bikram Yoga isn’t for everyone, but for those who connect with it, the benefits extend far beyond the studio walls.
Share your experience or questions in the comments; I’d love to hear your thoughts!